Pages

Saturday, October 29, 2011

circle infinity scarf

Who doesn't like a nice warm circle scarf for fall? Here's one I made from colorful knit fabric:


My infinity scarf is considerably less infinite than many others out there, partly because I don't like drowning in a vast sea of fabric but mostly because I ran out of yardage. 


I bought this knit because I liked the colors and it had a more interesting design than any knit I'd ever seen at Joann's. The girl cutting the fabric said, "Yeah it's kinda cool but I wouldn't wanna look at it all the time." Then she proceeded to tell me about the purple tulle she was making a skirt out of. To each her own.

I originally tried to make a simple short-sleeved dress out of it, but accidentally chopped the hem way too short and couldn't bear to wear it as a bulky pocketed short-sleeve shirt. The knit is heavy and sweatshirty -- not good for a dress anyway -- but is too cozy to waste. So I dutifully seam-ripped it apart, and salvaged enough yardage (in increments) to create what would become a circle scarf.
                           

I stitched together each small section to create a long single layer of fabric. It ended up measuring over 9 feet long, yikes:


I've seen some tutorials that just stitched together the two short edges here and called it a day (see Come On, Ilene!), but I didn't want the wrong side to be exposed at all when I wore it. My crappy scissors hack at my fabric, so even on a knit the raw edges look bad. So I folded the scarf in half lengthwise (right sides together) and stitched the long edge, leaving the short ends open so I could turn it right side out. It's essentially a (really) long tube.


I then brought the two ends together to form a large circle. I wanted a clean seam to close the loop, so I stitched the two ends, right sides together, as much as it would allow me (you can't go all the way around as it is). This formed a little gap that I had to hand-stitch closed.


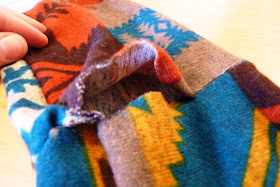
So once I sewed, it looked like this on one side:

And this on the other: 

I whipstitched the opening closed, making sure the raw edges were folded under. There's probably a better hand stitch out there that would be less noticeable, but since this is a scarf that is bundled up anyway, I didn't worry about small imperfections.

The end!


It's skinnier than I'd probably like, but since it's so long I can wrap it around my neck about four times to create enough volume.


Easy and affordable, the best kind of project.

---------------------------------------------------------------------------------------------------------
Project linked to: 
and

Monday, October 24, 2011

diy: custom dry erase board

I was originally inspired by this jewelry display idea from Real Simple magazine:


So I bought an inexpensive picture frame from Garden Ridge, a sheet of styrofoam, fabric to cover the styrofoam, and gold pins to hang earrings and bracelets on the board. I even bought a giraffe statue to hang necklaces, instead of a bust, because it seemed eccentrically cute at the time. I ended up hating the whole project because my jewelry is too ugly to display and the giraffe looked tacky (surprise).

Instead, I decided to put the glass back in and frame a slightly patterned yellow dishtowel to create a dry erase board for my kitchen:


Works for grocery lists, to-do lists, "Happy Birthday Mom" messages, questionably funny drawings, and other pretending-to-be-practical-but-really-just-kinda-cute-decor things.


Why a dishtowel? It matched my kitchen decor already and was one of those waste-of-money towels that can't actually absorb any liquid. Upcyclin'.


Here are others that used regular fabric or decorative paper, some of which have tutorials:
Source: Real Simple
Source: Make and Takes
Source: Metal and Mud
Source: O. Alouette
Source: Papernstitch

Sunday, October 23, 2011

tutorial: how to make a round pintuck pillow

Want this pillow?:
 

If you stalk the apartment decor section of Urban Outfitters like I do, you may already recognize these round velvet pintuck pillows that come in an array of colors (currently 11 colors). They have a rating of 4.5 out of 5 stars over 73 reviews, probably because they are pretty fabulous. They're also $32-$34 each, which isn't outrageous but of course I like to think I can always do better.

So I made one.


Certainly it's not exact, especially the pintucking, but it still emulates the retro-throwback style. And it was half the price to make. So, wanna make your own? Get ready to smock!

Click below to see the full tutorial:

Tuesday, October 18, 2011

sewing rooms & storage

I re-adopted this sewing hobby only recently and still have a relatively manageable amount of supplies and scraps, but I'm getting impatient to move to a place with a spare room for all things sewy. Okay, well to ask for a "spare room" would be to ask for how much more in monthly rent? 


As it is, I'm stationed in my living room, which already serves dual function as my dining area, so when my dining table is covered in a sewing machine, tabletop ironing board and an explosion of pattern tissue, I'm subjected to cutting fabric on the floor and eating dinner on the couch and entertaining guests in... the bedroom? Um.


Then:


Right now:

This could be (and has been) worse, actually; last night everything in that garbage bag above (pillow stuffing, blue scallop scraps, piles of thread) was strewn across various surfaces as well.

I'm gonna distract myself from this awful mess by collecting photos of lovely sewing areas that belong to other people who clearly never touch a thing within them:

Hideable yet also displayable. Primary source: Better Homes and Gardens


Everything seems so tiny here. Secondary source: Truelock Equals Truelove


These people stand up to sew, and sit down to use their enormous 1990s computer monitor. Source: Super Ziper


You can't call yourself a true sewist until you have one of those headless ladies hanging around. Source: SaĆ­dos da Concha


Sewing shed. Lovely and rustic and only slightly claustrophobic. Source: Content in a Cottage 

Teach me how to use that sewing machine. Source: Home Klondike

They call this a minimalist sewing room, which seems like an oxymoron. Source:  Genuine Style

Yes, you can create a sewing room without using the color pink. Source: Country Living


Moral of the story: all fabric scraps should be lightweight cotton prints with equal size, yardage and color palette so they can be stacked like perfect little rainbows in your China cabinets. Seriously? I tried the neat little sweater-stacks on my closet shelves before and that failed by the second hour. This would be no different, and maybe worse.


This is more up my alley:


Maybe I should stick with my current style of throwing all my simultaneous sewing projects on the couch, because it seems neat & organized spaces annoy me. Sew on!

Monday, October 17, 2011

scallop tote bag sew along

Sweet simple scallops, so splendid and stylish. 


So, (sew), last week, Kate from See Kate Sew posted the pattern and tutorial for her self-designed "sweet scallops tote." She then invited her readers to participate in a sew-along and make one for ourselves. I've never been a part of a sew-along before, but it's a good opportunity to show and tell (sew and tell), and take a gander at what other people made right along with me. Plus I haven't made a bag in awhile, so I thought it'd be a nice change of pace from the skirts upon skirts upon skirts I keep making and not wearing. None of my close friends sew, nor do they really care to watch me sew or have me explain it to them, so I thought this could be a way to join a community of people who enjoy the craft like I do. 


Here's mine:
A'ight, I expected the bag to be pretty cute but THIS cute? C'mon!


I knew from the start that I wanted an "ombre" effect, and went with blues because blue is just so bleu-tiful.  Kate's original intention for this project was to use up some of her scrap fabric, but my scraps are limited, mismatching in a bad way, and mostly apparel knits. So I ventured to the fabric store for quilting cotton solids, and felt bad for hauling six bolts of slightly different shades of blue to the counter to be cut into quarter-yards. The employee said, "Feeling indecisive?" 


I did recycle some items for the tote bag base and lining. I sliced off the back of two beige linen Walmart pillows I never used, and cut the lining from a blue-striped sheet I bought at a thrift store this weekend. I have many more projects for these sheets, just you wait.


Kate's free printable pattern:


Times six. I think she used seven and layered hers more closely.

 Stitched,  turned right side out and pressed:


Fast forward a few steps of attaching lining and stitching sides, and here we are:


I didn't have enough of the beige linen to make the straps as long as the pattern instructed, but the bag itself is pretty small (12.5" x 14" before sewing) so I was okay with shorter straps. I attached some leftover blue to the back of the beige, stitched together, turned right-side-out and top-stitched:


 Attached them to the bag on the outside and top-stitched little squares. Done:


Thanks, Kate!
Click here to join the sew-along.