What happens when I mix posthorns and an overpriced Anthropologie blouse?
It's quite obvious, really. I get a posthorn blouse.
If you're confused, let me provide some definitions for you:
A posthorn (n.) is a "valveless cylindrical brass instrument with a cupped mouthpiece, used to signal the arrival or departure of a post rider or mail coach" in the 18th-19th centuries (source: Wikipedia).
Anthropologie (n.) is an American retail chain owned by Urban Outfitters Inc., specializing in beautiful clothing, accessories and home decor items that can make a grown woman cry (source: personal experience).
Sometimes I like to play the "Anthro-poor-logie" game, in which I look on their website to find basic items that cost more than my monthly rent. Like this $678 tote bag. See? Fun! Another part of the game is where I imitate their style using kitschy $6 thrift store fabric. That's what I did with their Antilles Tank (no longer available). See? More fun!
Sometimes I like to play the "Anthro-poor-logie" game, in which I look on their website to find basic items that cost more than my monthly rent. Like this $678 tote bag. See? Fun! Another part of the game is where I imitate their style using kitschy $6 thrift store fabric. That's what I did with their Antilles Tank (no longer available). See? More fun!
I apologize in advance for all the lint covering my fabric in all these photos. I do a lot of my cutting and photo-taking on... the floor.
For this blouse you will only need fabric and matching thread. There are no closures since the top is just a roomy rectangle with adjustable straps. I used ~2 yards of fabric since I wanted mine fairly long and I cut my sash/tie/straps/bow thing on the bias.
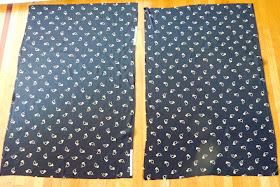
1 - Cut two rectangles in your desired width and length for the front and back pieces. It should be at least wide enough to pull over your shoulders. I used the full width of the fabric (44") and cut it in half so each rectangle is 22" wide. I made mine about 30" long, but you can certainly adjust that to make a shorter blouse or longer tunic/dress.
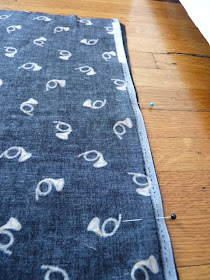
2 - Place the rectangles right sides together, then pin. Stitch the sides using a 1/2 inch seam allowance, leaving ~7 inches unstitched at the top. This opening makes room for your shoulders/arms.
Stitch close to the edge, pivoting and squaring off the bottom the opening. Do this on both armholes. "Armholes."
Make tiny snips at the bottom of the opening so you can turn the raw edges to the inside and stitch them down. You will stitch close to the edges, just as you did for the armholes in the steps above.
6 - Stitch back together the top half of the slit with a narrow seam allowance. This is to secure it so doesn't open up or flop over while you're wearing it. Mine is pretty messy but the bow covers this part so it's not a huge deal.
7 - Fold over the top raw edge 1/2" and press. Do this for both the front and back sections. The edge can also just be serged.
Fold down ~2 inches to the inside to form the sash casing. Pin, then stitch in place, making sure you secure the 1/2" folded raw edge on the inside.
9 - Fold the sash in half lengthwise, right sides together. Stitch 1/4" from the raw edge and leave a ~5" opening in the center so it can be turned inside out.
10 - Trim corners if your sash has angled ends. Turn sash inside out. You can either handstitch the opening closed or topstitch the whole thing so that the raw edges are secured inside. I topstitched just that edge, but maybe I should have topstitched the folded edge too.
11 - Attach a safety pin to one end of the sash. Start at the front opening of the casing, and lead the sash through in one direction. The sash will bridge the gap between the front and back sections to form the blouse's straps. Continue to lead the sash through the casing until it comes out the other side of the front. The loose ends will thus be hanging out the front and can be tied in a bow or knot.
12 - Hem the blouse as much as you please, and that's it! You're adorable, and oh-so thrifty.
------------------------------------------------------------------------------------------------------
Project linked to:


.JPG)


