Showing posts with label knit. Show all posts

Saturday, August 25, 2012

upgrade, midgrade

This is how I used to iron:


This is how I now iron:


This is how I used to cut fabric:


This is how I now cut fabric:


That's right. I bought an upright ironing board AND a counter-height cutting table. I now have my own sewing room (!!) and I finally live close enough to an IKEA (!?), so I've been shoppin' til I'm droppin'. For the past year I've used a godawful tabletop ironing board for all my pressing. It had awkward little obtrusive legs so I couldn't even drape a pant leg over the edge to iron one layer at a time, and the board was so lightweight that I had to practically chase it around the room as it scooted away from me. My last apartment was tiny and I used my dining table for my sewing machines, and my floor as my place for ironing and cutting.

No more! Consider my back pain-free (except when I wear my Target heels to commute to work, but that's an unrelated issue). I'll share with you my sewing room in its entirety once it's a bit more decorated and organized. In the meantime we can talk about the dress I was wearing in all those - ahem - candid photos above, that I made with my new big-girl equipment...


Another solid color knit dress?! Get outta town. This one is Simplicity 2281, a Cynthia Rowley design from last year I guess. I'm trying to sew through my pattern stash and I'm down to the last dozen or so that I haven't touched at all. This is mostly because JoAnn's is now quite far away from me, which could be a good thing, but it means that I've resorted to sewing up patterns I'm not that excited about. I still have a grudge against Cynthia from when she was a guest judge on Project Runway All Stars and made Mondo cry. This may have colored my judgment of her pattern line as a whole. grl, DON'T mess with Mondo.


I made View A, the one without the alien wings. Long story short (yeah right): I do not like this pattern that much. I was worried about those sticky-outty tucked sleeves on my broad shoulders from the get-go, and I should have trusted my instincts. My heart-shaped face needs a lower neckline than this. Also, gathers? I decided awhile ago to stop making stuff with gathers, but I guess I forgot because this dress is chock full of them. It's just so, youthful.


And it's a tad too big. I should know by now: save the side seams for last so it's easier to adjust later. I wasn't sure how to do that with the full bodice/waist lining, though, and I always get nervous steering away from the instructions because I've made mistakes when I assumed I was smarter than the patternmaker. I ain't.


Can't even use a belt, the waistband's so wide. In the pattern's defense, I think I used the wrong fabric... I made it out of ponteroma knit, which is pretty thick and stable. This dress has a fully lined bodice and waistband, so the end result is really heavy. Knit dresses don't need linings, but I wasn't sure how else to finish the bodice and the back keyhole thing. 


Ugh. Homemade, much? Don't make gathered skirts or neck bows in thick fabric.

I trimmed the seams as much as possible but they're so bulgy. Here's an example of the thickness of ONE sewn seam, where the bodice, bodice lining, waistband, waistband lining all come together at the sides:


Seriously now. It looks like a pastrami sandwich. Thank goodness I recently bought a walking foot.

The thing about sewing... you have to make the whole damn thing before you can determine whether you even like it. Luckily this one didn't take too long (no zip) and the fabric was inexpensive, so it's not like I regretted skipping a muslin. Towards the end I was skeptical but thought that it would look better once hemmed. I still wasn't thrilled, but I finished it all up anyway because I know I'll wear it in fall, layered under jackets and scarves. I do like the color and it's certainly comfortable (duh).

Anyway, I'm sorry this is the second post in a row where I've whined about my finished item. I should plan my next project more carefully so it'll be something I (and you) absolutely love. I think I will ditch the pattern-stash-bust idea and splurge on a rad new pattern. But what?! Should I wait for Colette to release their fall line in a couple weeks (yay)?

Sunday, August 12, 2012

business cas.


This past winter, I initially "signed up for" Scruffy Badger's New Look 6000 Frock Fest. I couldn't make time to buy the fabric and sew up the pattern, though, so I gave up and ducked out sheepishly (or, duckishly). Blogging-related guilt is one of the strangest types of guilt. Maybe I'll do a sociological analysis of this. Hm no.


Anyway, here's my stab at the New Look 6000 frock, beyond late to the fest. I know, I know. Something's... off. Can you spot it?


It's not the fact that I haven't mastered the sad-60s-secretary pout that this model has. It's that my side pleats lay on the right side of my body, instead of the left side where they're supposed to be. Meh. No parents, no rules. This is an easy mistake because the whole front is just one weird accordion-looking piece, and as someone who's sewn from several dozens of patterns in my life, I automatically placed the pattern piece to cut on the wrong side of the fabric. Oops. Wrong side. 

Venture onward.


This is a risky pattern for me. Shift dresses make me self conscious, and even in a double knit this required a lot of tweaking on fit: take in a thousand inches around the waist and lower back, let out a thousand inches in the hips. Luckily the center back seam and darts help with adjustments like that. And yet, the fabric still drags and pulls in mysterious ways. As for the front, it's unfortunate that the pattern has no way to help shape the side opposite all those pleats. On my initial fitting, it drooped sadly on my left half so I made the pleats deeper and longer to take in some of the extra fabric. It worked okay.


I had a weird feeling about these pleats from the beginning. Especially in gray, it kept reminding me of...


Oh dear. 

Overall, I feel fine about this dress but I actually doubt I'll wear it that often. It's not, uh, something I'd wear out with my peers or anything. Luckily it didn't take too long because I used a Ponteroma knit and omitted the zipper and back vent. I jumped into this project quickly because I'm starting a new job this coming week (in my new city!) and I wanted some more "business casual" attire. But maybe wearing a figure-hugging armadillo dress with little chicken wing sleeve cuffs isn't the best first impression. 


How many animal names have I mentioned in this blog post? Badger, sheep, duck, armadillo, chicken. Five.

Do any of you have suggestions or recommendations for other office-appropriate dress patterns that don't feature shark gills?

Shark. That makes six.

Thursday, July 5, 2012

cardi-gangbuster


I have an obsession with drapey and slightly oversized cardigans. My collection of them is reasonable right now, but I have plans to totally take over my closet and my life with them. This was my first attempt at making one and it has only fueled the cardi fire. It's one of those pieces I want to plan all my outfits around so I can wear it non-stop.


It's a Vogue pattern, oddly. I say "oddly" because I almost never buy nor make Vogue patterns. They're either weird or, as we've discussed, make it impossible to tell what the garment looks like because the sample is made up in crazy busy fabric or the model is crouching away from the camera in pain.


Luckily this Very Easy Vogue 8819 just featured some dead-eyed illustrated women on the cover so I didn't have to interpret too much. It has sleeveless and full-length sleeve options, too, but I went with the half-sleeves so I could cross over seasons.


As you can see, the main design features are all these bias-cut pieces that intersect at various seams. As you can also see, it's an OCD print-matcher's basic nightmare. If you are obsessive about your stripes, perhaps you shouldn't attempt this pattern in a striped fabric. Maybe I cut slightly off but I sometimes found it impossible to match the stripes all the way down certain seams, so I just had to focus on making it symmetrical instead of perfectly continual. I ain't mad. It's easier to get away with jaggedness in thin and narrowly-spaced stripes than in thicker stripes.


The back center seam is the one where print-matching is entirely possible AND crucial, however. The pattern actually has you cut two pieces for the lower back that you're supposed to stitch together at the C.B., but I straightened out the flare and cut it on the fold to save myself even more stripe-matching agony. This just meant I had to sew a V to an inverted V, but for me it was worth the technique swap. 


I made a Medium, and you can tell it's a little big because the seams dip off my shoulders, and I'm often tempted to push the sleeves up. I like my cardigans to be a bit slouchy, though, especially when I wear them over short or more fitted dresses like this one. Makes the coverage feel more balanced or something.


Let's talk about the cardigan flare, though. I narrowed the A-line of the bottom back pieces by about five inches overall. I like 'em slouchy but I don't like 'em boxy. I also didn't want it to look like I had an Oreo-themed curtain draped over my booty:


So that's that. A cardigan, just in time for the drippiest 103-degree death heat of summer. I'm just that kind of seamster. I make short-sleeve floral tops in January and elbow-length cardigans in July. 

Oh and don't think I forgot about our little agreement from my last post. I never break a blog promise, so here you go. I went with this McCalls model because our dresses were the same color:


You guys, this pose was surprisingly difficult to master. I almost popped my hip out of socket. Your feet are pointed completely sideways, in line, but your torso and head have to face directly forward, and you have to be able to touch your knee while your body is upright and not slouched forward at all. Not to mention the Tyra eye smoulder. That's BUSINESS. Who knew pattern modeling would take such quad strength? 

Keep it up, McCalls. Those girls got talent.

So who shares my cardigan obsession, even in summer? Or maybe I should ask who isn't a fan of cardigans, so I can squint at you (Tyra-style) through my computer screen and say, "...f'real?"

Thursday, June 21, 2012

diy spray starch: eliminate curled edges on jersey

Look familiar?:


Knit jersey is GREAT (yea? nay?), but, you know, it has some characteristics that can bug the hell out of us seamsters. The raw edges don't fray, but they do curl. This can work in your favor if you want it to be a design element, like on the cardigan Lizz made from Dixie's pattern. Or it can mean difficulty matching edges and trimming seams accurately. And careful -- watch that overlocker knife when you use your finger to unroll the edge as you serge.

I don't know what you people do/don't know, but I thought I'd go ahead and share a new-to-me discovery of a way to keep those roley-poley edges in check. Quite obvious, really: fabric starch!

Certainly you can buy some fabric starch spray at your local grocery store or whatever, but I decided to go au naturel and make my own. Save money, avoid the chemicals, love your jersey.

THE INGREDIENTS:


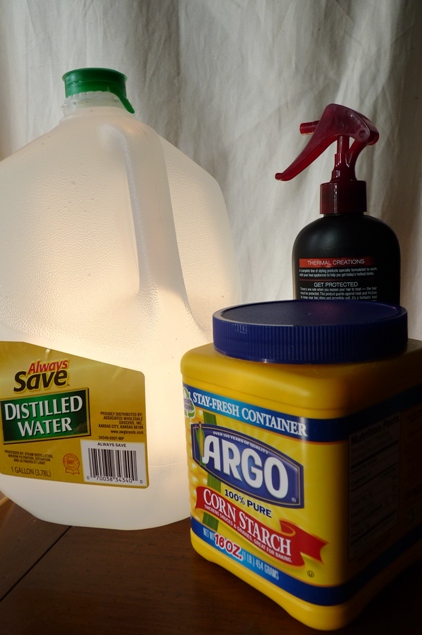
  • Distilled water (in case you have hard tap water with high mineral content that can damage your iron or possibly your fabric)
  • Corn starch
  • Empty plastic spray bottle. They sell these at stores, too, but luckily I had saved this spray bottle from a questionably effective hair product so I'm totally eco-friendly here. OK that's questionable, too. Please forgive that I bought water in a huge plastic tub.

I used 1 cup (240 mL) of distilled water: 


and 4 level teaspoons (20 mL) of corn starch:


You may want to use less corn starch to test first, and I think it also depends on the fabric content and weight. Cotton jersey stiffened up more easily, so three teaspoons would probably be fine, but rayon jersey seemed to need the help of an extra teaspoon. I wanted to get rid of the curl but also wanted to use it as a stabilizer for stitching, so I was happy with my lightweight cotton jersey turning pretty crisp.

Mix these ingredients in a bowl or something that will be easy to pour from. I used my measuring cup. The liquid will turn milky white, and the lumps should dissolve once stirred.


Pour into your spray bottle, reattach the nozzle and give it a good shake. Don't spill like I did. Or photograph the process in the light of an epic sunset, like I did.


Here's what normally happens when you don't starch but simply press the edge out and then lift or move the fabric at all:


Instant re-curl! Instead, press the curl out, then spray the edge liberally with your starch. I spray until it's pretty damp, but don't go overboard.


Run your iron over it until dry. I did not use steam.


And your edges will be nice and crisp. Go ahead, wave the fabric around. No re-curl!


Here's the fabric, where the left edge has been starched and the right edge has not. Much more sewable, eh:


The starch will come out when you wash your finished garment. No worries. In the end you'll still have a nice drapey garment to frolic around in.

And here's a part I test-hemmed along the crossgrain. It seems more successful (less wavy) than my jersey hems usually are, and faster than using Steam-a-Seam:


Unfortunately I don't know how long this starch will keep before you need to make a new batch. The Internet has mixed verdicts on DIY starch, so maybe just make a small amount as you need it. Be sure to shake the mixture each time before you use it, and as always, test on scrap fabric first to make sure it doesn't leave any residue or stains.

Any other fabric starching or jersey stabilization tips out there?

Tuesday, January 24, 2012

half-circle skirt: best thing i've ever sewn

"Best thing I've ever sewn" could mean many things, and certainly this wouldn't meet everyone's criteria, but my navy blue knit half-circle skirt is definitely the most versatile thing I've sewn, not to mention economical, comfortable, easy. All those things combined, for me, make it the best. It took me maybe an hour from start to finish. That's crazy. An HOUR. I spend more time each day reading Damn You Autocorrect. Why don't I make more half-circle skirts? Ooh, that gives me an idea for how to celebrate Pi Day this year (3/14).


A couple weekends ago I took an inventory of my entire wardrobe, or at least the things that can be worn in public and weren't in the laundry hamper at the time. I even took pictures of most everything (just on hangers, not on me, geez), which was tedious but helped me get a birds-eye visual of what I have and what goes together and what I need. Some good did come of it; TWENTY-FOUR of the items previously hanging in my closet have since been designated to the "consign or donate" pile. Yikes. 

But perhaps most importantly, I realized how many tops I have that weren't worn very often because they were missing a common denominator. So once I figured out what that was, I made it. This navy blue knit skirt is that one piece that brings it all together, and here's a small sampling of how far this bad boy can extend into my wardrobe.
handmade top: blogged below
handmade top: blogged here
urban outfitters infinity scarf
target ribbed top
thrifted top
f21 top
thrifted cardigan
I'm sure you're aware by now that when it comes to my apparel I don't pay much attention to these things you people like to call "seasons." I do own some sweaters, actually, but they're monochromatic neutrals and not as fun to photograph. I'm actually surprised by how many floral prints I own. When'd I get so girly?

This knit fabric was the only thing not on sale at Hancock Fabrics the other week, but I bought it anyway because it was exactly what I was looking for: drapey, comfy, stretchy, navy, stable(y). It was 60" wide so I only bought one yard - $12.99, still not bad for the total cost of a skirt. I used Patty the Snug Bug's circle skirt calculator to help determine the radius and skirt length, then kinda followed this Online Fashion Courses video tutorial for making the pattern. I interfaced the waistband with self-fabric, and just serged it all right on up. 

My sewing-with-stretch-knits confidence is way up. I hope you're proud. The red/orange knit top in the first photo above is another recent creation. I made it by tracing a RTW shirt that's my go-to for casual wear. I think I found the original top in the juniors' section of Target; it's supposed to be a dress for a 13-year-old or something, but of course I wear it with legitimate pants. I did make my own version a smidge shorter than that so there's no confusion.


I hate wearing jeans, but sometimes I have to because this is the American Midwest (or South, depending on who you’re asking) and it's pretty casual around here. I mean, I went to college in rural Ohio and I felt overdressed wearing a cardigan instead of a hooded sweatshirt to class. 


When I am forced to wear jeans (for what? I dunno, tree climbing?), I feel more comfortable pairing them with a long sweater or top that covers the derrièreThis fits the bill! The derrière bill, if you will. It has a wide scoop neckline in the front, a lower scoop in the back and elbow-length sleeves that (hopefully) draw attention to the shoulders instead of dem hipz. 


The fabric is a vintage polyester knit from Etsy (shop: EstateByRobin). Virtually unwrinkleable. Thanks, '70s! The shop owner described it as a "warm summer tomato red" though it does look quite orange, especially in photos. As long as it's not considered tangerine tango I'm cool with it.


Have you tackled knits yet, or are you still wary of them? Knowing this crew, you've been fearlessly zig-zagging 'em up for years now. I'm glad I finally learned how to properly sew with them because they've already made some great garments. I'm also grateful for my serger (and the lovely parents who gifted it) for helping me take the leap.