Showing posts with label recycle. Show all posts

Thursday, December 15, 2011

two skirt refashions

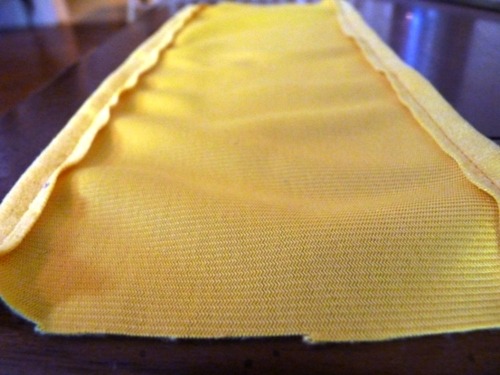
Once upon a time, two days ago, there was a men's shirt that wasn't being worn. Not anymore, y'all.


The shirt is Patagonia brand so it's very well made. Its content is 55% hemp and 45% organic cotton, basically my dream fabric. I love hemp fabric, I do. It lasts forever. I also respect Patagonia's environmentalism and the lengths they go to use sustainable textiles & responsible manufacturing processes. I think they'd appreciate my refashioning efforts.

There are a few tutorials around the sewing blogosphere on how to make a skirt from a men's shirt (see here, here and here). 


Here's my basic run-down:
- I kept the side seams, bottom hem and button placket intact. 
- I made the waistband from the shirt's yoke (top back), using a skirt pattern I have that I knew would fit.
- I cut off another piece of the remaining button placket to use on the waistband, and stitched it on the front center so it would align. 
- I gathered the top edge of the front and back pieces to fit the waistband.
- I used one of the sleeves to make belt loops.


The waistband facing is bright blue cotton scrap.


That's that one.
-------------------------------------------------------------------------------------------------------

And now for another...


This was a very large black corduroy jumper from the 1970s (or so they say). I got it for $5 from the "rough rack" at the local vintage thrift store. 


I used Simplicity 2152, view E. I added an inch to the overall length, but it's still a bit shorter than the model's.


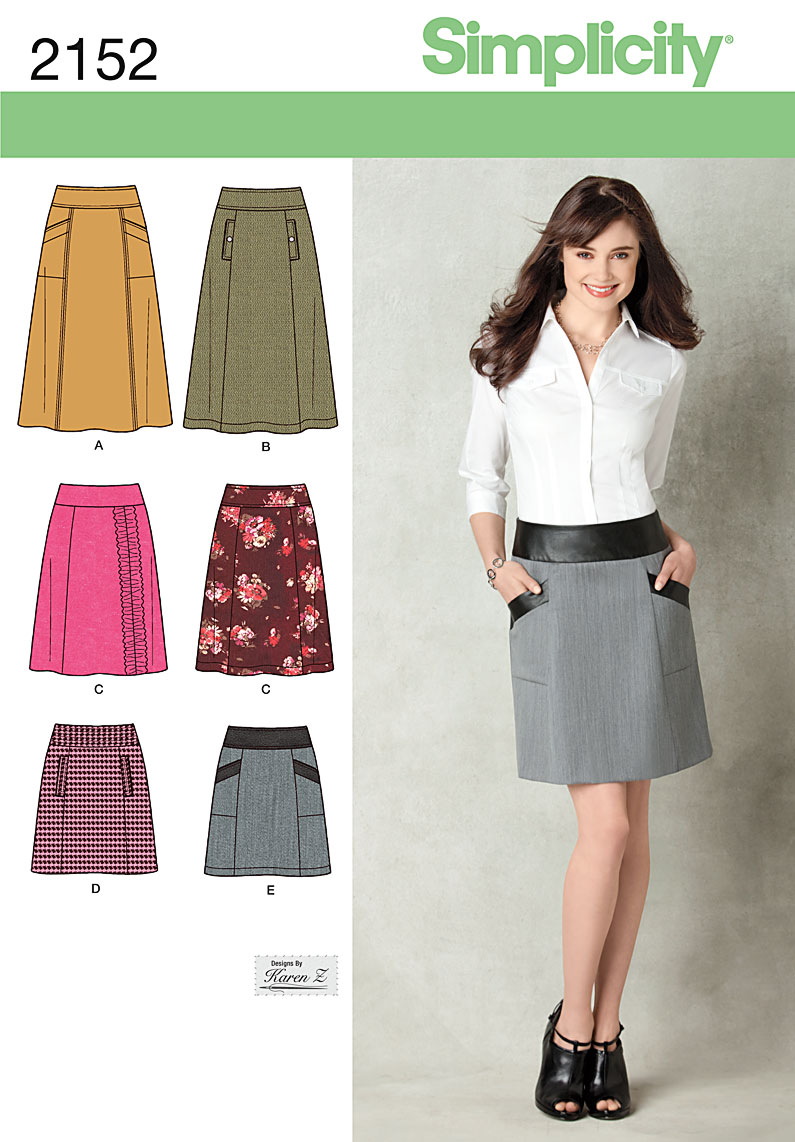
I didn't lap the zipper in center back, and instead left the gold teeth exposed. What can I say, playas gonna play.


It's a nice simple pattern, and came together really quickly and easily. I'm just glad to have an office-appropriate black skirt now. My last attempt at making a corduroy skirt was an epic fail, too, so I'm glad this one worked out.

Apparently my hair is red today.
For the waistband facing I used a cotton print in my stash. The cord would have been too bulky.


During this time of major material consumption for the holidays, I hope you find some ways to reuse and repurpose as well. It's much more gratifying!
-----------------------------------------------------------------------------------------

linked to:

Friday, November 4, 2011

simple sewing: fabric-covered pencil cups

Here's an easy breezy sewing project: turn your lunch into pencil cups.


I've never done anything with tin cans besides toss them in my recycling bin, but I can now say they're pretty much a craftswoman's dream since they're so accessible and versatile. They have such a practical shape and size, and are still cool-looking just on their own without their labels.

I can't cook, so I eat a lot of canned soup. It's about time that I used all those cans to enhance my life in other ways. Why not pencil cups? I probably spend as much time per week looking for a frickin' pen in this apartment as I do eating soup, so I need them to be more accessible.

OK. Step 1: Remove the label, which comes off easily under hot water. At least for Amy's soups it does.


Step 2: Cut a 5.25" x 10" rectangle of fabric. I used leftover fabric from some other home projects, because living room matchiness is a must. Turn the long edges over a 1/2 inch each and stitch. The resulting width is about 4.25" (the height of the can).

Step 3: Wrap the fabric around the can and mark where the ends should meet. It should be snug but not too tight that you won't be able to slide it on. Stitch the ends where you marked, right sides together. Trim the excess and press the seam open so it lays flatter on the can.

Step 4: Turn it right side out and pull it over the can, kinda like a beer coozie:

That's all it takes. Make one or one dozen. They contribute both color and functionality -- gotta love that.


----------------------------------------------------------------------------------

Project linked to:

Wednesday, November 2, 2011

prep skirt: from a sheet

I bought a blue and white striped sheet set from a thrift store for $6. I've never made clothes from a sheet before, but it's ridiculously economical. So much yardage! Makes so many things! Freedom to completely mess up and cut anew, guilt-free! 


I already used some of it to create a lining for my scallop tote bag. I decided to make a skirt next because I hadn't sewn a skirt in, what, three whole weeks? My nearest Wal-Mart surprised me with its revived sewing/fabric section so I snagged a few New Look patterns there for under $3 each. 


This one is New Look 6030, view B for the most part. View B doesn't call for the belt/sash but I made one anyway; no belt loop deserves to remain empty.


I'm calling this the prep skirt because it looks like something one would wear while sipping lemonade on their rich uncle's sailboat. I ain't mad. I like the skirt length and pocket detail. The belt loops and sash are what attracted me to the skirt initially, but I'm not crazy about where the belt loops are placed -- they're far apart on the sides, so the belt inevitably creeps up between them. I thought about attaching the belt to the waistband permanently so it won't roll, but then the skirt would be difficult to take off and on since the zipper's in the back and the sash closure's in the front. Maybe I'll just use a real belt in the future.


The pattern calls for a regular zipper but I used an invisible one, recycled from a never-worn skirt in my closet. It's tan instead of white but the belt covers the tab so it doesn't matter. I also didn't use a hook and eye because there wasn't much of a gap above the zipper.


The "View B" skirt has ribbon on the pockets and around the waistband. I just used self-fabric on the pockets and nothing extra on the waistband. I used interfacing on one side of the waistband but left it off its facing.


I also changed how the belt loops were attached -- I sewed them into the seam between the waistband and its facing, though the pattern says to fold under the raw edge and topstitch it to the waistband. No thanks. I guess my method makes the belt loops shorter, so I had to make my belt skinnier. 


So, I still have no idea what size to make for myself in commercial patterns. With my real waist and hip measurements, I should be a size 16, the largest in the envelope. Seemed a bit extreme, so I made the size 14 and I still had to take it in quite a bit. Am I doing something wrong?

---------------------------------------------------------------------------------------------------
Linked to:

Pattern Review - see my review
and
and

Wednesday, October 12, 2011

turn my swag on


i knew i needed a pendant lamp over my fireplace mantel to cure my dark living room woes. and to shine a light on my rad horse print.


i found this one at goodwill. i liked that it had a chain i could "swag" (like this) and that i wouldn't have to buy a lamp kit. it was brown originally, but in my genius mind i thought that a good old coat of spray paint would be all the makeover it needed.


ick. couldn't stop there. i was hoping that i could just rip the red stuff off and have the basic gold plate, chain and wire to use with a different shade. but of course the frame was made of metal, not wood, and i couldn't remove just the top part without, well, something that cuts metal.


i think i tried forty different things to make a new frame shade that fit my style. a $9 lamp at goodwill is pretty steep, after all, so i couldn't just waste it, right? i tried using the basket from this unused hanging planter:


but it was too shallow and looked pretty goofy:


since i hadn't removed the glue and staples from the base yet, i thought i'd hide it with the twine from the hanging basket:


wait, TWINE? i hate decorating with basket weave. this isn't my style at all, are you kidding me?
so i went a whole new route. the placements i bought for my dining table when i first moved in are not functional at all, but i still like the look of them.

 crumbs would easily fall through, and they attracted dust since they're made of felt or something. so i cut up two of them into six triangles. painted the metal frame of that lamp with leftover white paint. attached the triangles to the frame with needle and thread. and now i have this:


i don't own a ladder, so hanging this from my 10-foot-ceiling with a chair, a suitcase filled with books, tiptoes and a lot of cursing was a dangerous ordeal in itself. also explains why i got lazy and only swagged the chain up to where it was easier to reach on the wall.


a similar look can also be achieved with doilies, as i found on apartment therapy:

source: calinas (in swedish) via apartment therapy 


------------------------------------------------------------------------------------------------------------
Project linked to: