Showing posts with label accessories. Show all posts

Thursday, August 2, 2012

guest post: house shoes tutorial

Hey, I made shoes! Kinda. Check it out... I have a guest post on Megan Ta Da today, sharing a tutorial on how to make some summer slippers. Megan's a sewing/art/travel/awesome blogger who's currently studying art in a stone village in the south of France for the summer. Boring, right? Because of the theme of her blog, I wanted to incorporate my own travel memories into my sewing, so I made some Japanese-inspired house shoes. Japan's the only foreign country off North America I've visited, actually. Seems like I need to cross the sea more, but why leave my home when I can putter around in these cute slippers all day?


See the post here to learn how to make your own!

Is your home a shoes-off zone?

Monday, February 13, 2012

and I was like, baby, baby, baby

Sorry if the title of this post gets some Bieber lyrics stuck in your head. Shared misery, eh.


"Andrea, you shrank and became real adorable!" Wait, you guys, that's not me. That's my one and only niece, wearing the one and only thing I've made for her so far in her little baby life. I know, how negligent. For her baby shower I gave her a store-bought laundry hamper and a stuffed cow. What kind of seamstress aunt am I? I'll make up for it once she's of the age when drooling all over her clothing is no longer socially acceptable.


I made her a robe, which my dad thinks looks like a Jedi robe and my brother thinks looks like a boxer's warm-up robe. I think I'm okay with either one of those interpretations. 


I made it from Simplicity 3711 (size 3 to 6 months) with some simplifications. For the main fabric I used JoAnn's "Lil' Safari Buddies" cotton interlock knit, which is soft and cozy. The lining is made from a camel-colored king-sized pillow case that has a bit of sheen to it. 


Safari-themed kid prints are my favorite; I think it's hilarious how they "bab-ify" wild ravenous beasts like lions by giving them oversized heads/whiskers, little round bodies and goofy grins. Trust me, human babies: these animals aren't actually "buddies" with each other in the real world, but I admit they do look pretty cute when they frolic together on your bath robe.


As you'll notice on the model, the sleeves are too long and have to be rolled up. I made it for her current age range as indicated on the pattern, but I'm glad she has room to grow in it. I added belt loops to the side seams so the belt wouldn't slide off and become lost forever. I put them where the pattern indicates the waistline, but I think they should probably be lower since babies tend to flail their arms around and get picked up a lot (making the belt line rise up - see fourth photo of this post). 


I omitted the patch pockets because I found it incredibly tedious to press and neatly top-stitch tiny bébé pockets. Almost certainly my niece is the smartest baby in the whole world ever (of course), but even she doesn't yet understand the concept of pockets, so I doubt they'll be missed. I also omitted the ric rac and appliqués because I'm a no-frills kinda gal. The hood has a flat-felled seam down the center which I like.


O hai.

So, the robe's safari fabric was leftover from a set of baby-related things I made for my work's silent auction fundraiser (actual baby not included). I'll show you those items, too, because I know you're just dying to see.


I used Simplicity 2924 as the base pattern for everything here, though if you're familiar with the pattern you'll notice a lack of plastic vinyl, ribbons, reflecting tape (seriously) and bias tape in my version. I made the diaper bag, wipes case, burp cloth, bib and a pacifier clip. Everything you need to take care of your baby's spontaneous bodily messes! Lovely. 


It was difficult choosing fabrics, since the diaper bag needed to be gender-neutral enough for a mom or dad to carry around for their baby girl or boy. It also needed to be adult-friendly with enough whimsy to pair well with baby prints (i.e. no ornate damask). I wanted it to be sturdy, too, so I stuck with home decor fabric and heavyweight interfacing. I eventually chose brown and beige geometric shapes with blue accents for the whole set. Learn from me: don't use a directional print for the diaper bag because of all the seams and overlapping pockets/flaps; mismatching stripes (or circles) are inevitable, unless you're incredibly patient or have a ton of fabric to spare. Imagine how thrilled I was to find, when cutting, that both fabrics for the two bags were printed crooked on the cross grain. How perfect for a pattern that's essentially a bunch of rectangles! 


I threw in a bottle and two pacifiers for some name-brand desirability. There should be a gift certificate to a local baby product store (Mama's Hip) included, too, so I hope the whole set is a desirable item at the auction. 


I'm pretty nervous about this silent auction, to be honest, since I'm not a professional seamstress  and I've never done anything like this before. I just hope it gets some bids and  is able to raise a little money for this organization that's so dear to my heart. It's kinda ironic that my job for them is to write grant proposals for pretty substantial funding, but I'm most anxious about trying to raise ~$50 with some handmade burp cloths. Oh nooo my top-stitching's not perfect! 

Have you ever sewn for charity?

Saturday, November 5, 2011

just in time for daylight savings: watch makeovers

Saw this scarf watch idea on Scissors and Thread today (original post on A Pair & a Spare). I've seen this concept before, but I liked being reminded.


I've known for awhile that I need a new watch; my white rubbery Target one has had several months of 24/7 wear, so it looks godawful. Why would I think buying a white watch was a good idea? By now it looks like I wrap an old sock around my wrist everyday.


I couldn't easily remove the pins that hold the strap to the metal face, so I just took some scissors to it until the straps came off.


It's as easy as slipping through a scarf or ribbon or one of those belts that come with your Forever 21 dresses, and then wrapping and tying it around your wrist as you like.


I bought some single fold bias tape the other day with the intention of using it as finishing on a baby swaddling blanket I'm making for a co-worker. I didn't end up using it for that project, so I thought I'd try it here. Kinda cool-looking, actually.


This is the whole package (4 yds) wrapped around. Pretty dramatic but I think I like it. 


Don't forget to "fall back" your scarf/bias tape watches tomorrow night.

------------------------------------------------------------------------------------------------------------
Project linked to
and


Friday, November 4, 2011

simple sewing: fabric-covered pencil cups

Here's an easy breezy sewing project: turn your lunch into pencil cups.


I've never done anything with tin cans besides toss them in my recycling bin, but I can now say they're pretty much a craftswoman's dream since they're so accessible and versatile. They have such a practical shape and size, and are still cool-looking just on their own without their labels.

I can't cook, so I eat a lot of canned soup. It's about time that I used all those cans to enhance my life in other ways. Why not pencil cups? I probably spend as much time per week looking for a frickin' pen in this apartment as I do eating soup, so I need them to be more accessible.

OK. Step 1: Remove the label, which comes off easily under hot water. At least for Amy's soups it does.


Step 2: Cut a 5.25" x 10" rectangle of fabric. I used leftover fabric from some other home projects, because living room matchiness is a must. Turn the long edges over a 1/2 inch each and stitch. The resulting width is about 4.25" (the height of the can).

Step 3: Wrap the fabric around the can and mark where the ends should meet. It should be snug but not too tight that you won't be able to slide it on. Stitch the ends where you marked, right sides together. Trim the excess and press the seam open so it lays flatter on the can.

Step 4: Turn it right side out and pull it over the can, kinda like a beer coozie:

That's all it takes. Make one or one dozen. They contribute both color and functionality -- gotta love that.


----------------------------------------------------------------------------------

Project linked to:

Saturday, October 29, 2011

circle infinity scarf

Who doesn't like a nice warm circle scarf for fall? Here's one I made from colorful knit fabric:


My infinity scarf is considerably less infinite than many others out there, partly because I don't like drowning in a vast sea of fabric but mostly because I ran out of yardage. 


I bought this knit because I liked the colors and it had a more interesting design than any knit I'd ever seen at Joann's. The girl cutting the fabric said, "Yeah it's kinda cool but I wouldn't wanna look at it all the time." Then she proceeded to tell me about the purple tulle she was making a skirt out of. To each her own.

I originally tried to make a simple short-sleeved dress out of it, but accidentally chopped the hem way too short and couldn't bear to wear it as a bulky pocketed short-sleeve shirt. The knit is heavy and sweatshirty -- not good for a dress anyway -- but is too cozy to waste. So I dutifully seam-ripped it apart, and salvaged enough yardage (in increments) to create what would become a circle scarf.
                           

I stitched together each small section to create a long single layer of fabric. It ended up measuring over 9 feet long, yikes:


I've seen some tutorials that just stitched together the two short edges here and called it a day (see Come On, Ilene!), but I didn't want the wrong side to be exposed at all when I wore it. My crappy scissors hack at my fabric, so even on a knit the raw edges look bad. So I folded the scarf in half lengthwise (right sides together) and stitched the long edge, leaving the short ends open so I could turn it right side out. It's essentially a (really) long tube.


I then brought the two ends together to form a large circle. I wanted a clean seam to close the loop, so I stitched the two ends, right sides together, as much as it would allow me (you can't go all the way around as it is). This formed a little gap that I had to hand-stitch closed.


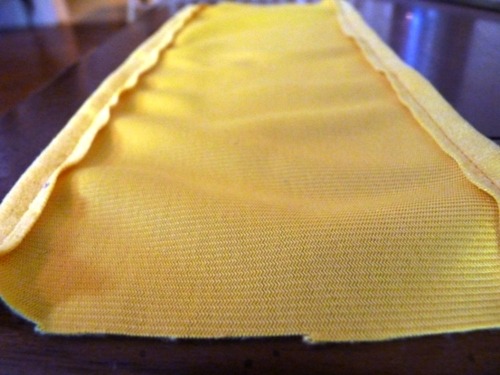
So once I sewed, it looked like this on one side:

And this on the other: 

I whipstitched the opening closed, making sure the raw edges were folded under. There's probably a better hand stitch out there that would be less noticeable, but since this is a scarf that is bundled up anyway, I didn't worry about small imperfections.

The end!


It's skinnier than I'd probably like, but since it's so long I can wrap it around my neck about four times to create enough volume.


Easy and affordable, the best kind of project.

---------------------------------------------------------------------------------------------------------
Project linked to: 
and

Sunday, October 23, 2011

tutorial: how to make a round pintuck pillow

Want this pillow?:
 

If you stalk the apartment decor section of Urban Outfitters like I do, you may already recognize these round velvet pintuck pillows that come in an array of colors (currently 11 colors). They have a rating of 4.5 out of 5 stars over 73 reviews, probably because they are pretty fabulous. They're also $32-$34 each, which isn't outrageous but of course I like to think I can always do better.

So I made one.


Certainly it's not exact, especially the pintucking, but it still emulates the retro-throwback style. And it was half the price to make. So, wanna make your own? Get ready to smock!

Click below to see the full tutorial: