

I sew a lot of narrow hems these days, and I've tried so many different methods to make them. The majority of tutorials for narrow or rolled hems (that I've seen) include a ton of measuring, trimming, or exhaustive pressing. Boo, ain't got time for that. What if you could make the narrowest of hems doing a minimal amount of all that stuff, and without a rolled hem foot? Yea, I said it.
A narrow hem has a finished depth of 1/8" to 1/4". The tiniest versions, baby hems (1/8"), are typically used to keep lightweight garments flowy without weighing down the edges, and to keep the hem of sheer fabrics as inconspicuous as possible. Due to the nature of their narrowness and the nature of the fabrics you will likely be sewing them on, these hems can be tricky to fold and sew evenly if you're doing a standard hem technique of measure-fold-press-measure-fold-press-sew. So here are some alternatives.
METHOD ONE: WITH A SERGER
For a 1/4" hem, my favorite method uses a serger for the first step. You can definitely do a similar method with a regular sewing machine, but I prefer the serger because it makes folding the hem easier; the width and sturdiness of the serged stitches help keep the fold perfectly even. You can also adjust the differential feed in case you want to tighten up the edge of your fabric ever so slightly to help with easing in a curved hem.
1. Set your stitch width so the left needle hits 1/4" away from the raw edges, or just within 1/4". Thread color doesn't necessarily matter as long as your fabric's not too sheer. Serge along the raw edge of the right side of your garment without cutting anything off. IF you're using a regular sewing machine, sew a line of stitches 1/4" from the raw edge, or just within 1/4" if possible.


2. Start folding the serged stitches toward the wrong side of the garment the same width as the stitches. Or if you didn't serge the edge, fold the edge under so your first sewn line of stitches juuuust rolls to the wrong side. The width of the stitches does all the measuring for you here. I only do a quick finger press to get the fold going, then immediately start sewing from the wrong side of the garment, using my hands to keep folding the edge before it reaches the presser foot.
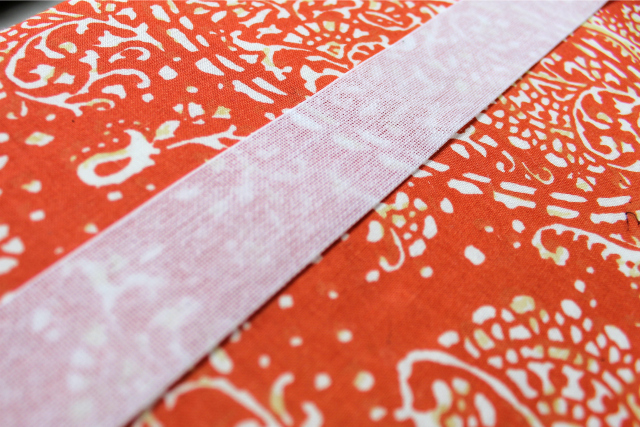
Sew right along the folded edge, about 1/16" inward. This secures the first fold and makes a guide for stitching on the next fold:

My thread is darker blue so you can see it. Again, this is the wrong side of the garment now:


3. Fold the edge under once more, the same depth as the first fold. Working from the wrong side of the garment, sew along the line of stitching you created in the last step, folding the hem over as you go. This secures the hem perfectly by catching the top edge in your stitching:

You will have a single line of stitching on the right side, and a doubled line of stitching on the wrong side:

A classy hem, without any tedious pressing OR measuring.
METHOD TWO: WITH BAN-ROL
This little trick needs to be wider known. If you dig on the Internet you can find it in other tutorials, but I thought I'd go ahead and share it here to help spread the word. For an even tinier hem (~1/8"), I like to use the aid of Ban-Rol, also sometimes referred to as Ban Roll. wtf is that? It's a very sturdy starched interfacing used by tailors for stiffening waistbands in pant and skirts. It comes in various widths on continuous yardage. It's loosely woven, despite being stiff, so you can peel away the threads to create a "comb" that helps easily turn your fabric for hemming but will be pulled out after stitching.
The great thing about this method is that the Ban-Rol is reusable so you can make one small investment to have a lifetime of beautiful tiny hems. You can find it in 50-yard packs on Amazon and Wawak, but there's no way you would ever need that much. They sell it by the single yard online at the Sewing Place, Crafter's Vision, Londa's Creative Threads, and B. Black and Sons (edit: and Kenton Trimmings Online, for those in the UK). I'd recommend getting a few yards so you can create different "combs" for different hem widths, or just in case you ever have to hem a maxi-length circle skirt or something cray.
1. Snip into one bound edge in order to get the first vertical thread free. From there, you can start pulling out the threads with your fingers. Keep pulling the single thread until you have a length that matches or slightly exceeds the circumference of your hem:


Keep going until you create a "comb" that is the width of the hem you would like to have. So, this would work for super teeny hems and heftier hems:

2. Now align the edge of the comb with the RIGHT SIDE of the raw edge of your garment to be hemmed. If your fabric frays madly, move the ban-rol inward slightly to stay clear of the fray. Pin if you want, but I've found that the ban-rol doesn't really shift as long as you align it correctly as you sew.

3. Take it to the sewing machine, where you will stitch JUST INSIDE the inner edge of the comb part. You don't want your stitches to catch the still-woven part of the ban-rol. Remember the comb is pulled out of your stitches later, so you should only sew over the horizontal threads:


4. For fraying fabrics, trim the stray threads off now so they don't poke out of your hem later. Now gently flip the ban-rol all the way over to the wrong side of the fabric. This rolls the tiny hem for you without you having to measure all the way around or burn your fingers with the iron. For complete accuracy, you may want to press this part down so the hem is flattened first.

5. Stitch along the edge next to the ban-rol to secure the hem.


6. Now gently pull the ban-rol comb out of the stitches.

~OmG~ what a stable, perfectly minuscule hem you just made. And there's no double stitching to be seen:

Note that you can use ban-rol when hemming in the round. Just overlap it where the circular hem meets. The comb will pull out as usual.
METHOD THREE: WITH WASH-AWAY STABILIZER
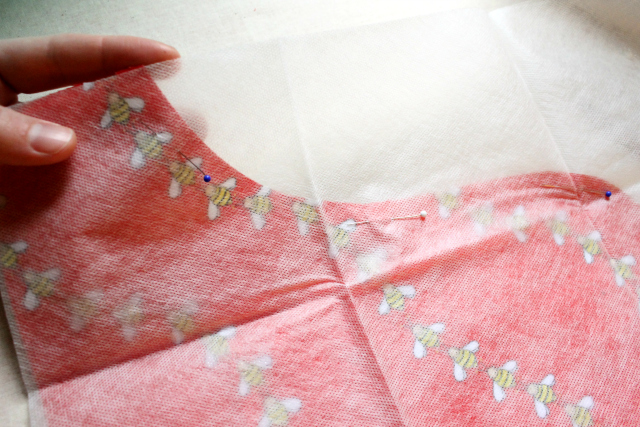
I do love the ban-rol method because it creates a very clean and light hem, versus the serged method which may add thread bulk or opacity to your hem. However, ban-rol is not flexible enough to be sewn around tight curves. I have used it on fuller A-line dress hems so it can follow gentle curves, but what if you're trying to hem a rounded placemat or the curved sides of a man's dress shirt? Or something else weird-shaped in a bee print?:

I agree; those bees are CUTE AS HELL.
This method is similar in theory to the ban-rol method, in that you're sewing something to the right side of the garment and then flipping it over to help turn the hem. EXCEPT you're using something that is wide enough so you can trim it to match the curves exactly. And you can't make a comb out of it to remove later. It's essentially like sewing a facing on a garment edge, but you want the seam to roll farther back toward the wrong side of the garment, and you want the facing to disappear somehow.
So, you have some options: you can use tracing paper, which you can then tear off the hem, but you'll leave paper in your hem. You can use tear-away stabilizer, which also leaves stabilizer in your hem. Or you can use wash-away stabilizer, which will disappear after the garment's first washing. None of these are ideal, so it just depends on what type of fabric you're working with and what you have on hand.
I decided to try this sew-and-turn method with Fabri-Solvy, which is a fabric-like wash-away stabilizer normally used for appliqués and such. It comes in a range of widths and lengths, so I thought that getting a sheet that's 20-inches wide and 1-yard long would enable me to customize my own strips to match the curves of a small hem.

1. Pin the stabilizer on top of the right side of your hem. Trim it to match the raw edge perfectly:

2. You can now trim down the rest of the stabilizer to make it easier to handle if desired. Accuracy isn't important here:

3. Sew the stabilizer to the fabric at your desired hem width:


4. Now flip the stabilizer to the wrong side of the garment. This gets a little fiddly because the stabilizer is soft, but you want to make sure the raw edge of your fabric and the stabilizer are butted up against the fold of your hem so it's an even width around. Use your fingers to maneuver the curves into place. You can use the very tip of your iron to help crease the hem, but try not to let the iron touch the exposed stabilizer because it may shrivel and/or start to melt.
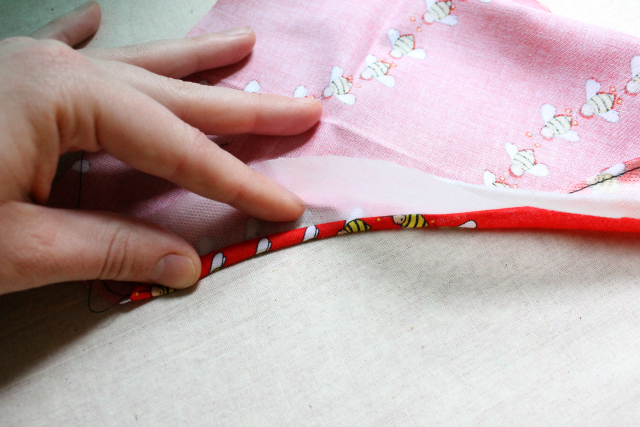
5. Sew the hem in place.

6. Trim away the excess stabilizer. You can leave it as is until its first full washing, or you can saturate the hem in water for a few minutes to dissolve the stabilizer still inside the hem, then let dry.


This method is pretty effective, but it can't really be used on fabrics that shouldn't be washed. I also felt like I was using my scissors a lot, which would be annoying on a longer hem. It uses more resources in general since the stabilizer is not reusable,and I would have to buy longer sheets for bigger garments. Still a good trick to know, yes?
-------------------------------------------------------------------------------------------------
I hope this post introduced you to some new ways to achieve a nice narrow hem. Do you have any other tricks or tips to add? Are there other kinds of materials that could be used instead of ban-rol or stabilizer to help roll hems? Let me know your favorite methods!