Showing posts with label sewing. Show all posts

Wednesday, November 12, 2014

steaming out permanent creases on altered garments

I seem to know a lot of tall guys. Poor guys, can't find shirts or suit jackets that fit in the shoulders and chest AND are long enough for their gorilla arms. Poor seamstresses (me), having to alter the tall guys' sleeve lengths and mess with those awful mitered vents.


I will answer a couple major questions here. Can you lengthen a suit jacket sleeve? Despite the sad lack of internet tutorials on how to do so, YES, you can. In this case I lengthened the jacket sleeves by 1-1/4" and added a facing so I would have enough fabric to recreate the sleeve vent. The buttons along the back sleeve seam are not functional, so I could pop them off and re-position them after the sleeves were lengthened.

Another major question: Can you get rid of that pesky horizontal crease that persists from the original factory-pressed hem? YES. Maybe not 100%, but yes. Here is what it looked like before, even after pressing and steaming, steaming, steaming with water multiple times:


Many moons ago, Megan Nielsen blogged about steaming out a seemingly permanent crease on her denim Kelly skirt using a brown paper bag that she wet with a 50/50 mixture of white vinegar and water. Luckily I was able to find her post again (HERE) and followed her lead to remove the hem creases on this suit jacket. 


I cut a scrap of brown packing paper from one of my far-too-frequent Wawak mail orders, then I dipped that in a mixture of white distilled vinegar and water. I placed the wet paper on top of the creased area, then steamed the daylights out of it. Held my iron there with constant steam for maybe 15 seconds until the paper was dry, then moved to the next section.


Side note: I have a "one size fits all" iron shoe tied to my iron, in case you're wondering what that thing is. Helps prevent scorching and shine.

And here's the finished sleeve after the vinegar magic show:


Not bad! The garment does not smell like vinegar, though my sewing room and hands now do. I'll also note that the thinner packing paper worked better on the crease than when I tried this with a Trader Joe's paper bag, which is a bit thicker. 

That's all. Just wanted to share this tidbit in case you ever have to alter clothes for a tall guy (or gal). Have you tried this?

Sunday, August 31, 2014

how to gather fabric with a serger


Darlings! I haven't had a moment to breathe sew much for myself since I last updated, but I figured I could at least share some lil' techniques I've been learning "on the job." In my freelance work, I often sew multiples of the same thing, so I use those opportunities to try out different ways of executing the same step to see which method is fastest or looks the best. 

Gathering fabric is one of those [obnoxious] tasks that can be done a few different ways, such as pulling on two parallel lines of basting stitches, zig-zagging over a strand of dental floss or string, or using a gathering or ruffle foot on your machine. Those all work fine... when they work. I actually haaaaate gathering fabric because those methods very easily go wrong and can be time-consuming, especially when your threads snap and you have to start all over again. And what if you need really dense gathers, or your fabric is a bit thick? A gathering foot won't do you much good there.

Well, I was recently commissioned to make 10 gathered party skirts for a local startup clothing line, so I had to figure out a way to get fast and consistent results with sewing gathers. OR ELSE. The fabrics I'm working with for these skirts are cotton sateen and silk taffeta, and they have a skirt-to-waistband gather ratio of 2.75-to-1, so they're pretty frickin' poofy and need a lot of gusto to gather. I think 3-to-1 is the determined max limit on gathered skirt poof before it becomes, like, physically impossible to sew and maybe socially unacceptable to wear.


I knew in the back of my mind that sergers could gather fabric, but I had never tried it. So when I did try it, I couldn't believe how much easier and faster it seemed. All you have to do is adjust some settings on your serger and get gathering. Now, of course this method can go wrong, too, as nothing in sewing is fool-proof, right? This technique actually works in an opposite manner as the basting method because you gather the fabric as you serge and then loosen the gathers to fit. This is unlike the basting method, in which you typically tighten the gathers to fit. This means you should test out your gathers on scrap fabric first to make sure it gathers tightly enough on your serger. If the gathers are too loose after serging, it will be difficult to tighten them up.

The first step is to set up your serger for four-thread overlock. The tightest gathers will occur if there are two needles engaged instead of one. Once you have threaded your serger properly, tighten the tension of the two needles (not the loopers), which are typically the two leftmost dials. For this particular project, I needed to gather the fabric very tightly, so I increased the needle tension as high as it would go, which on my Brother 1034D serger is at a "9" tension. After some trials, I found I achieved best results if my left needle is at "9" and the right needle is more like a "7" tension. Your machine may react differently. I left the loopers at default tension, which for my machine is a "4":


Next, tighten the differential feed if you are able to. The serger has two sets of feed dogs, one in front of the other, and the differential feed controls the ratio at which these feed dogs move the fabric under the presser foot. A higher differential feed -- in this case, a "2" -- will move the first set of feed dogs twice as fast as the second set, which gathers up the fabric. Conversely, a lower differential will move the first set of feed dogs more slowly, which stretches out the fabric. Here I've set it to the highest ratio possible:


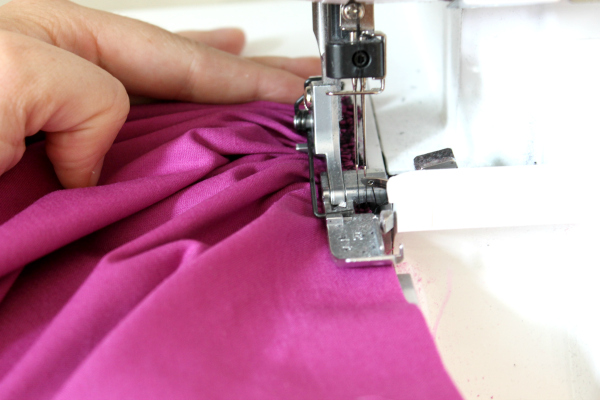
Now, all you have to do is serge along the edge of the fabric and the machine will do the gathering work for you. 

Here is a video I took of the gathering at work. This is high production value, folks. Oh you're welcome!


Keep in mind that the serger will gather along the edge, so you may need the adjust your seam allowance first or serge so the blade cuts off part of the seam allowance if it is 1/2" or larger. Make sure the left needle of your serged seam does not extend past your desired seam allowance because the threads will then be exposed on your garment and they're hard to pick out neatly. It may help to match your serger thread color to your garment, but I did not do that here (the skirt is lined and I did not want to spend money on four fuschia cones for one project!).


If you are attaching the gathers to a flat piece of fabric, it helps to have marked the gathered fabric and the flat fabric into fourths so it's easier to match up the points and distribute the gathers evenly. Below, I have matched the quarter marks and then I gently loosened and distributed the gathers so they match the length of the flat fabric. If you yank on the serging too hard to loosen it, the threads may snap, so be currful. Lots of pins help secure the gathers.


When you sew the gathers to the flat fabric on your sewing machine, it helps to have the gathered side facing up so you can make sure the gathers aren't folding over or jutting out from the seam allowance. Be sure your needle sews right below the serged seam.

Donezo.


It's worth mentioning that you can do something similar with a regular sewing machine by upping the tension, but the serger helps create tighter, more even gathers because it is set up to sew two parallel lines of stitching with two needles and you can adjust the differential feed as well. I also like that it finishes the edge as you gather so there's less annoying fray to deal with when you're attaching it to the flat fabric. And because it's so fast, if your gathers somehow fall out or get too loose, you can just zip over one section again with the serger. Much less stress than having to rebaste two full lines.

How do you prefer to gather fabric?

Thursday, June 19, 2014

chardon (m. thistle)


PATTERN THROWBACK. To ye olden days of 2013, when it seemed like we were in the midst of an indie pattern boom but were in fact only on the cusp.

Last week I was feeling nostalgic for simpler times, so I bypassed my PDF pattern collection and turned to my paper pattern stash. Remember thems? They arrive in your mailbox like a pretty little present amongst the health insurance invoices and jury duty summons. Then you unfold a large sheet of paper and all the pattern pieces are just laying there looking up at you, and you actually hold the physical instruction pages and flip them left to right like you're some kinda scholar. The last paper pattern I bought was Deer & Doe's Jupe Chardon, or Chardon Skirt, or Thistle Skirt, or however this French-to-English sewing pattern language thing works. It seemed like a fun basic garment to sew so I cracked her open.


Yuck photos.

Chardon is a simple unlined A-line skirt with in-seam pockets and stitched box pleats for shaping at the waist. I liked the no-waistband look and forgiving fit. You can add belt loops or a tie or a contrasting band but I skipped that noise this time. The skirt is finished with a waist facing and a regular zipper in the center back. 


It's a quick sew as long as you choose your waist size properly. I dunno what was wrong with me but I had the completely WRONG waist measurement in my head when I picked the size to cut, so the skirt was basically two sizes too small when I went to try it on after stitching down all those pleats. Luckily with this style, you can adjust all the pleats to size the waist up or down. Just make sure you do your math correctly when altering each pleat so you don't over- or under-compensate. And remember to cut a new facing to fit your fattened skirt. Yeah, this skirt took me far longer than it should have because I have a pea brain.


I made this in a gray striped home decor linen because I apparently enjoy dressing up like a sofa. It was easy fabric to work with and it holds the shape of the pleats nicely. It is pretty poofy, so I tapered the skirt slightly from its original A shape so I wouldn't be mistaken by Philly tourists as the Liberty Bell. Wow, stellar joke, right? If you want to see TRUE POOF, check out what swallowed me whole at work yesterday.


I serged all seams before pressing them open. The bottom of the waist facing is also serged. I'd recommend understitching the facing and tacking it down at the side seams as well so it stays put.


The navy top I'm wearing is a new Archer Shirt, another homage to 2013. Though let's be real; I'm still addicted to this pattern. I modified it by making it sleeveless, curving the front placket into a V-shape at the neck so it lays flat, and omitting the collar but leaving the stand. You can see another version of this variation on my Instagram here. I may blog about that one day because I wear it like twice a week and the fabric was a gift from Internet pen pal and fellow Grainline addict, Ash M. Higgs

I like my new outfit but this photoshoot just made me realize the dire situation of my bangs. In half my photos, my bangs are either in my eyes all Grudge girl style, or I'm in the middle of swinging them out of my eyes, which does not at all look sexy beach bombshell like I imagine in my head:


So, are any of you still trying to catch up with 2013's (or earlier) patterns or are you always ready for the next great thing?

--------------------------------------------------------------------------------------

P.S. Reminder! I'm leading a three-week workshop on Sewing Knits at Butcher's Sew Shop in south Philly on Monday nights starting June 30th. If you wanna join up, you can use coupon code 4SQUAREWALLS at checkout to get 20% off the registration fee ! ! ! ! There are a few spots left, so sign up here. Scroll down to Special Workshops.

Thursday, June 5, 2014

red ava jacket

Hi, little cuties. This is my third post since last Thursday, which surprises no one more than me. But I gotta show you this red-as-red-gets jacket. It's red enough that I could probably wear this as part of a Sarah Palin costume for Halloween, but that topical humor ship has long since sailed. Still glad I took off my glasses for these photos anyway.


This is the Ava Jacket, a new release by Bluegingerdoll Patterns, my first garment made from this independent company. FULL-UP DISCLOSURE: I was a pattern tester for the Ava jacket. I did not get paid, though I did receive a rough draft of the pattern for free. I then pored over the instructions and worked hard to determine whether the pattern came together well and if everything was clearly laid out. I made a muslin first, based directly on the original pattern and instructions, then made this red-red version based on the FINAL edited instructions she sent us, while implementing some design modifications of my own.


I'm blogging about it by choice, because 1) I have a new handmade garment to show you guys, and this blog is primarily about show-and-tell, 2) I want to help spread the word of the pattern release on behalf of a hard-working and relatively new designer I admire, and 3) I want to provide a helpful review of a new pattern on my blog so when others are deciding whether or not to buy it, I can be a reliable resource. I just want to be transparent about the pattern testing process, in case there are any doubts about my motives! (See here for more discussion.) This should be one of my last pattern test/blog tour garments for awhile, so if it annoys you at all (and I understand why it would), just know that the interbloggy promotion should be calming down for awhile.

The Ava Jacket is a fully-lined kimono-sleeved swing jacket. It features a full lining, a wide shawl collar, loose 3/4-length sleeves and turned-backed cuffs. The cuffs and collar can be made in the same or contrasting fabric.

Images via Bluegingerdoll.com

Bluegingerdoll is known for her vintage-inspired aesthetic, which I admit isn't really my normal style. So for this wearable version, I omitted the lining, significantly reduced the width of the shawl collar, and narrowed the sleeves and cuffs (probably too much). I made it in a lightweight, drapey, poly crepey fabric so the flared back would drape gently and swish around. I was hoping for a more blazer-esque modern look with these changes.


Some things to note about this pattern. 

FIT: The jacket is easy to fit because it's built with generous ease and has kimono sleeves. I made a size 8 based on my bust and waist measurements, which seemed to work out fine. It was my fault that I narrowed these sleeves a bit too much which makes it hard to roll up the cuffs. I do find that as I'm wearing it, the shoulder seams slip backwards, so I'm often chucking the jacket forward to realign it.

CONSTRUCTION: There aren't many pieces to put together as far as jackets go, but there is a lotttttt of hand-stitching. The collar shell is hand-stitched to the facing, the cuffs are catch-stitched to the inside of the jacket, the hem is catch-stitched, and then the entire lining is hand-stitched to the jacket shell. Lordy lord lord. Believe me, I tried to get around some of it because that's not normally my thang. It may be yours, though! I machine-edgestitched the collar shell down for a clean finish, like you would normally do on a collar stand or waistband facing, for instance. You can kinda see that at the top of the photo of the jacket innards here:


I also left off the lining entirely, which was actually difficult to figure out how to do properly, since a lot of raw edges that you catch-stitched down, like on the cuffs and hem, are supposed to be covered up by a lining. I French-seamed everything and used lace tape to cover the raw edge of the hems, which I then turned up and blindstitched down by hand. I only had lace seam binding/hem tape, and it's white, and it looks terrible, so I almost plan to replace it with something red once I go notion shopping. With the dip of the swingy hem, the white hem tape is often flashed to the outside world. Ick.


With the test version, I struggled with the instructions for sewing the bottom of the front lapels; it gets confusing with all those corners of the collar shell, facing and eventually the lining. Abby did a good job working on that part and including more guidance for the final version. Still, it's a bit hard for me to wrap my head around how it's really supposed to come together. I made it work and it looks fine, but I'm not entirely sure I did it as instructed so I would like to see this demonstrated more in-depth with photos of a real garment versus the illustrations.


I like my red Ava jacket because it's unlike anything else I own. I'm a pear-shape so I often avoid jackets and tops with flared hems, but I think I like the silhouette of this one. It's a nice summer-weight garment to throw on for extra coverage or to add a knock-out punch of color to an outfit. I have a dreamy idea of an Ava in a silky floral, to keep up with the kimono jacket trend going on (right? Wut r fashun?).

The Ava was released along with the curve-hugging Betsy pencil skirt, which you'll find on many other testers' blogs. It's incredibly flattering on everyone I've seen so far and the little details -- like the button tabs on Version A -- are cute, so I'm actually tempted to splurge for the pattern even though I rarely wear pencil skirts these days! Abby of BGD carefully picked testers with different body types and with varying degrees of blog popularity, which I'm sure we can all appreciate. Check them out:

29th May – Tanya at MrsHughes (Betsy skirt)
2nd June – T at uandmii (Betsy skirt)
4th June – Mary at Idle Fancy
6th June– Tanya at MrsHughes (Ava jacket)
8th June - T at uandmii (Ava jacket)

Have you sewn a Bluegingerdoll pattern yet? What do you think of the new ones?

Monday, June 2, 2014

craftsy + butcher's + a plaid dress

There is a finished object sighting in this post, but I gotta yap about some other things before we get to that. First, a sincere thanks to all those who commented on my last post about my recent career change. Your support means everything, and I appreciate your willingness to discuss your own career goals and express your desires and/or hesitations about following a similar path. A lot of you said that you aren't "good enough" at sewing to even consider earning money from it. Believe me, you're better than you think, and you're probably better than me. It's amazing what you can do when you set the bar higher for yourself.

Craftsy Blog: Okay, time for some self-promotion. I've joined the ranks of sewing superstars Marie, Rochelle, AlidaMaris and others and am now a regular contributor to the Craftsy blog. I will be posting for the sewing category of their blog about twice a month. My first post is about knit fabrics (surprise), and tips for hemming them. Apparently I'm really into hemming stuff lately. Check it out and let me know if you have a technique to add.


Knits Workshop: omg. A friend of a friend of a friend (alright, we're all friends now) just opened a beautiful sewing studio in Queen Village of south Philly. It's called Butcher's Sew Shop, named in honor of the family-owned butcher shop that occupied the space for almost 80 years. Starting mid-June, they will be hosting intensive sewing classes, like flat patternmaking, draping, and various levels of garment construction from beginner to advanced. There are also shorter workshops and BYO stitch nights, and lil' ole me will be teaching a workshop called Sewing Knits (surprise). There will be three installments of the course on Monday evenings from 6-9pm starting June 30th. If you live in or near Philadelphia and would like to learn how to make the Deer & Doe Plantain T-Shirt, come hang out with us! To sign up, visit here and scroll down to the Special Workshops section to find "Sewing Knits". 


Alright, onward.

To round out this theme in threes, here's a dress made from a knit (surprise). Coincidence? Maybeh. I finished it surprisingly quickly so I am glad to throw it in this post with the rest of these knitty announcements.


I was afraid that sewing a dress in this colorway of plaid would be too autumnal or Christmasy or something else that would make people on the street be like "SHE CRAZY." Turns out, people on the street don't notice things like the colorway of my plaid, if you can believe it. They may think I'm a Catholic school girl, however, which is slightly more of a problem.


The pattern is McCalls 6599, the same pattern I used for a striped knit dress in 2012. I loved that dress to the point of spilling coffee all down the front of the skirt. I miss it. Playing with the direction of stripes and plaids is always fun, so this princess seam bodice and flared skirt are good foundations for that sort of thing. I cut the side pieces on the bias, though the pattern doesn't call for it. It's a pattern meant for a woven fabric, so as with the striped dress, I sized down and cut the back on the fold. All seams are serged and hems are coverstitched.


The fabric feels like a double knit and has nice body, which makes it a breeze to sew except at major seam intersections. I bought it from Jomar, a Philly discount fabric store where almost everything is $3.99/yd or less. I went on a major shopping spree there this weekend... I know, after confessing to you all how broke I am. But I set a limit of $100 and got 14 pieces of fabric, or a total of 25 yards, which I hope will keep me busy for awhile. I've already sewn three garments! See? I do still obsessively sew for myself when I have inspiration.


Anyone else sewing plaids for summer?

Thursday, May 22, 2014

in the round vs. in the flat

Are you a round or flat person? Um, lemme rephrase that. When given the choice, do you like to construct your garments using an in-the-round method or in-the-flat method? 

Nettie bodysuit sleeve attached flat

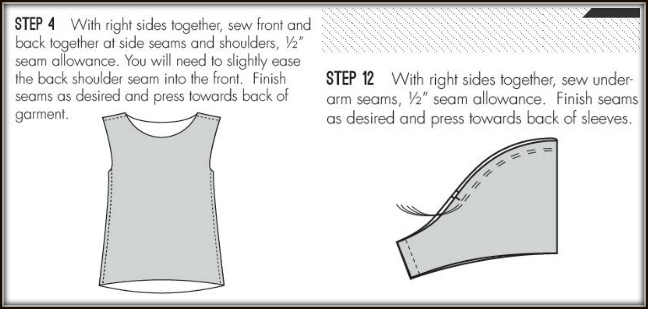
I don't know what else to call these techniques, really, so if you have no idea what I'm yapping about, here's the basic idea. On a bodice or top, most patterns have you sew the shoulder seams, side seams, and underarm sleeve seams pretty early on in the construction process. This creates round openings for the armholes, neck finishings, bottom opening (t-shirt hem/bodice opening to attach to skirt/etc), and sleeve caps. Here's the Scout Tee pattern as an example:


An alternative method is to leave those seams open so you can construct everything flat instead of in the round. For example, sew only one shoulder seam, attach the neck binding, then sew the other shoulder seam. You can also attach your sleeves and finish your hems BEFORE sewing the side seams and underarm seams. Here's an example from the Plantain Tee pattern for attaching sleeves flat:


I'm pretty fascinated with industrial techniques for making garments. When I "shop," I just turn clothes inside out to inspect the finishing techniques and make Hmmm noises. Of course, the fashion industry's primary goal is making clothing as quickly and cost-efficiently as possible, which means that the way they do things isn't necessarily the best way a home sewer should do them, or the way we even can with our measly little junk machines ;) However, I do strive to find ways to make sewing easier for me, and I will always try alternative methods if I think they will be faster but still achieve the same, or very similar, results. 

Storebought tank with straps attached flat before side seams are sewn

Sewing garments flat is one of those industrial methods that I will almost always turn to if possible. Awhile ago, Colette Patterns' blog featured a guest post from Sharon Blair explaining different industry practices. One of them was as follows: 
"Perform similar operations at the same time and sew flat. Sew the details first. Set these aside. Then start assembling the garment. Complete as much as you can before joining side seams. Sewing in a tube is more time consuming than sewing flat."

It's true that if you inspect your store-bought garments, you can tell that the side seams are usually sewn last in one continuous line of stitching from the sleeve opening to the hem. Many of my t-shirts have one shoulder seam sewn after the neckband is attached, and even sleeves that were hemmed before the underarm seam was sewn. To keep the serged seam more obscure, it's always pressed and tacked down toward the back of the garment. Would you ever know the differences here if you weren't looking for them?

Storebought t-shirt with sleeves hemmed before side seams sewn

I often change construction so I can use these methods, too. I never ever set in sleeves, no matter the fabric type or sleeve cap size-- I attach them flat because it's easier to ease the sleeve cap evenly this way. I'll do the same for armhole bindings because it's easier to sew on binding around curves when those curves are not yet attached in a circle. On t-shirt nec kbands, I will leave one shoulder open so I don't have to do any measuring; I'll just cut a long binding piece and "feel the stretch" as I pin it on, then snip off the excess once I reach the other shoulder. For super small hem openings, like the legs of baby leggings, hemming the legs flat is faster than forcing your presser foot around a tiny tube, especially on a coverstitch machine like mine that likes to stall and skip stitches when sewing over seams.


I figured everyone else would be lazy like me and prefer the flat construction method. However, when I was pattern-testing the Nettie Bodysuit, I applauded Heather for including instructions for constructing the neckband flat (shown above). She followed up with me to say that other testers didn't like that method, so she changed it back to "in the round" instructions for the published version. Y'all are just some tidy little seamsters, aren'tcha. 

So that made me wonder why someone would choose the round over the flat method. Does the end result look cleaner? Do you find that the methods are actually comparable in how easy or fast they seem? Do you use one on certain fabric types only? Or you just prefer to follow the pattern instructions regardless? What's your choice?

Thursday, May 1, 2014

narrow hem: three ways


I sew a lot of narrow hems these days, and I've tried so many different methods to make them. The majority of tutorials for narrow or rolled hems (that I've seen) include a ton of measuring, trimming, or exhaustive pressing. Boo, ain't got time for that. What if you could make the narrowest of hems doing a minimal amount of all that stuff, and without a rolled hem foot? Yea, I said it.

A narrow hem has a finished depth of 1/8" to 1/4". The tiniest versions, baby hems (1/8"), are typically used to keep lightweight garments flowy without weighing down the edges, and to keep the hem of sheer fabrics as inconspicuous as possible. Due to the nature of their narrowness and the nature of the fabrics you will likely be sewing them on, these hems can be tricky to fold and sew evenly if you're doing a standard hem technique of measure-fold-press-measure-fold-press-sew. So here are some alternatives.

METHOD ONE: WITH A SERGER
For a 1/4" hem, my favorite method uses a serger for the first step. You can definitely do a similar method with a regular sewing machine, but I prefer the serger because it makes folding the hem easier; the width and sturdiness of the serged stitches help keep the fold perfectly even. You can also adjust the differential feed in case you want to tighten up the edge of your fabric ever so slightly to help with easing in a curved hem.

1. Set your stitch width so the left needle hits 1/4" away from the raw edges, or just within 1/4". Thread color doesn't necessarily matter as long as your fabric's not too sheer. Serge along the raw edge of the right side of your garment without cutting anything off. IF you're using a regular sewing machine, sew a line of stitches 1/4" from the raw edge, or just within 1/4" if possible.


2. Start folding the serged stitches toward the wrong side of the garment the same width as the stitches. Or if you didn't serge the edge, fold the edge under so your first sewn line of stitches juuuust rolls to the wrong side. The width of the stitches does all the measuring for you here. I only do a quick finger press to get the fold going, then immediately start sewing from the wrong side of the garment, using my hands to keep folding the edge before it reaches the presser foot.

Sew right along the folded edge, about 1/16" inward. This secures the first fold and makes a guide for stitching on the next fold:


My thread is darker blue so you can see it. Again, this is the wrong side of the garment now:


3. Fold the edge under once more, the same depth as the first fold. Working from the wrong side of the garment, sew along the line of stitching you created in the last step, folding the hem over as you go. This secures the hem perfectly by catching the top edge in your stitching:


You will have a single line of stitching on the right side, and a doubled line of stitching on the wrong side:


A classy hem, without any tedious pressing OR measuring.

METHOD TWO: WITH BAN-ROL
This little trick needs to be wider known. If you dig on the Internet you can find it in other tutorials, but I thought I'd go ahead and share it here to help spread the word. For an even tinier hem (~1/8"), I like to use the aid of Ban-Rol, also sometimes referred to as Ban Roll. wtf is that? It's a very sturdy starched interfacing used by tailors for stiffening waistbands in pant and skirts. It comes in various widths on continuous yardage. It's loosely woven, despite being stiff, so you can peel away the threads to create a "comb" that helps easily turn your fabric for hemming but will be pulled out after stitching.
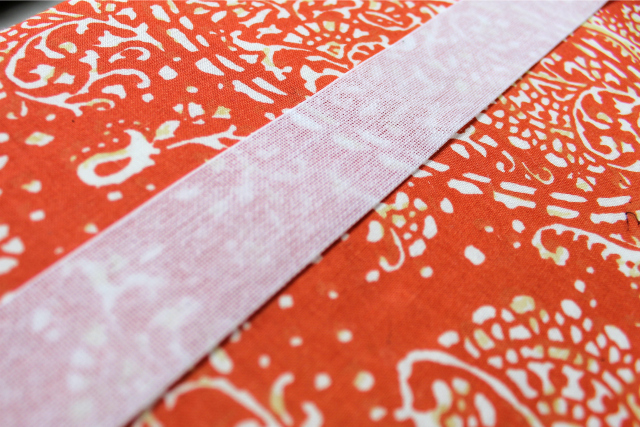

The great thing about this method is that the Ban-Rol is reusable so you can make one small investment to have a lifetime of beautiful tiny hems. You can find it in 50-yard packs on Amazon and Wawak, but there's no way you would ever need that much. They sell it by the single yard online at the Sewing Place, Crafter's Vision, Londa's Creative Threads, and B. Black and Sons (edit: and Kenton Trimmings Online, for those in the UK). I'd recommend getting a few yards so you can create different "combs" for different hem widths, or just in case you ever have to hem a maxi-length circle skirt or something cray.

1. Snip into one bound edge in order to get the first vertical thread free. From there, you can start pulling out the threads with your fingers. Keep pulling the single thread until you have a length that matches or slightly exceeds the circumference of your hem:


Keep going until you create a "comb" that is the width of the hem you would like to have. So, this would work for super teeny hems and heftier hems:


2. Now align the edge of the comb with the RIGHT SIDE of the raw edge of your garment to be hemmed. If your fabric frays madly, move the ban-rol inward slightly to stay clear of the fray. Pin if you want, but I've found that the ban-rol doesn't really shift as long as you align it correctly as you sew.


3. Take it to the sewing machine, where you will stitch JUST INSIDE the inner edge of the comb part. You don't want your stitches to catch the still-woven part of the ban-rol. Remember the comb is pulled out of your stitches later, so you should only sew over the horizontal threads:


4. For fraying fabrics, trim the stray threads off now so they don't poke out of your hem later. Now gently flip the ban-rol all the way over to the wrong side of the fabric. This rolls the tiny hem for you without you having to measure all the way around or burn your fingers with the iron. For complete accuracy, you may want to press this part down so the hem is flattened first.


5. Stitch along the edge next to the ban-rol to secure the hem.


6. Now gently pull the ban-rol comb out of the stitches.


~OmG~ what a stable, perfectly minuscule hem you just made. And there's no double stitching to be seen:


Note that you can use ban-rol when hemming in the round. Just overlap it where the circular hem meets. The comb will pull out as usual.

METHOD THREE: WITH WASH-AWAY STABILIZER
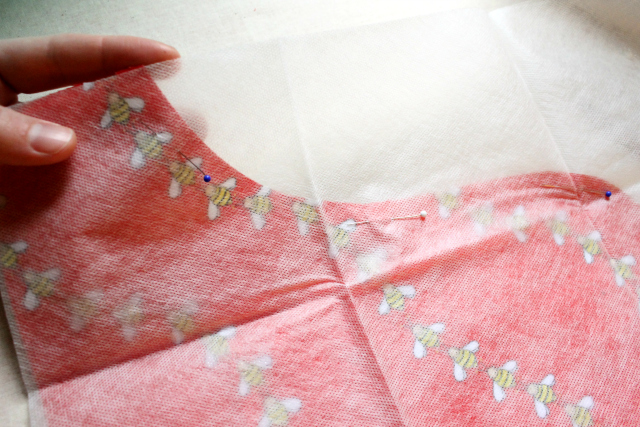
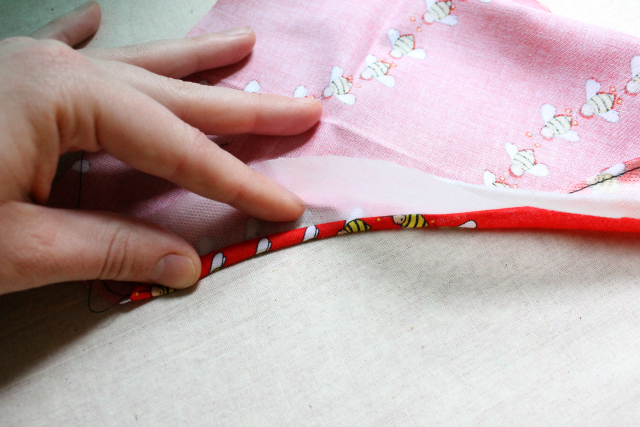
I do love the ban-rol method because it creates a very clean and light hem, versus the serged method which may add thread bulk or opacity to your hem. However, ban-rol is not flexible enough to be sewn around tight curves. I have used it on fuller A-line dress hems so it can follow gentle curves, but what if you're trying to hem a rounded placemat or the curved sides of a man's dress shirt? Or something else weird-shaped in a bee print?:


I agree; those bees are CUTE AS HELL.

This method is similar in theory to the ban-rol method, in that you're sewing something to the right side of the garment and then flipping it over to help turn the hem. EXCEPT you're using something that is wide enough so you can trim it to match the curves exactly. And you can't make a comb out of it to remove later. It's essentially like sewing a facing on a garment edge, but you want the seam to roll farther back toward the wrong side of the garment, and you want the facing to disappear somehow.

So, you have some options: you can use tracing paper, which you can then tear off the hem, but you'll leave paper in your hem. You can use tear-away stabilizer, which also leaves stabilizer in your hem. Or you can use wash-away stabilizer, which will disappear after the garment's first washing. None of these are ideal, so it just depends on what type of fabric you're working with and what you have on hand.

I decided to try this sew-and-turn method with Fabri-Solvy, which is a fabric-like wash-away stabilizer normally used for appliqués and such. It comes in a range of widths and lengths, so I thought that getting a sheet that's 20-inches wide and 1-yard long would enable me to customize my own strips to match the curves of a small hem.


1. Pin the stabilizer on top of the right side of your hem. Trim it to match the raw edge perfectly:


2. You can now trim down the rest of the stabilizer to make it easier to handle if desired. Accuracy isn't important here:


3. Sew the stabilizer to the fabric at your desired hem width:


4. Now flip the stabilizer to the wrong side of the garment. This gets a little fiddly because the stabilizer is soft, but you want to make sure the raw edge of your fabric and the stabilizer are butted up against the fold of your hem so it's an even width around. Use your fingers to maneuver the curves into place. You can use the very tip of your iron to help crease the hem, but try not to let the iron touch the exposed stabilizer because it may shrivel and/or start to melt.


5. Sew the hem in place.


6. Trim away the excess stabilizer. You can leave it as is until its first full washing, or you can saturate the hem in water for a few minutes to dissolve the stabilizer still inside the hem, then let dry.


This method is pretty effective, but it can't really be used on fabrics that shouldn't be washed. I also felt like I was using my scissors a lot, which would be annoying on a longer hem. It uses more resources in general since the stabilizer is not reusable,and I would have to buy longer sheets for bigger garments. Still a good trick to know, yes?

-------------------------------------------------------------------------------------------------

I hope this post introduced you to some new ways to achieve a nice narrow hem. Do you have any other tricks or tips to add? Are there other kinds of materials that could be used instead of ban-rol or stabilizer to help roll hems? Let me know your favorite methods!