Showing posts with label jackets. Show all posts

Thursday, June 5, 2014

red ava jacket

Hi, little cuties. This is my third post since last Thursday, which surprises no one more than me. But I gotta show you this red-as-red-gets jacket. It's red enough that I could probably wear this as part of a Sarah Palin costume for Halloween, but that topical humor ship has long since sailed. Still glad I took off my glasses for these photos anyway.


This is the Ava Jacket, a new release by Bluegingerdoll Patterns, my first garment made from this independent company. FULL-UP DISCLOSURE: I was a pattern tester for the Ava jacket. I did not get paid, though I did receive a rough draft of the pattern for free. I then pored over the instructions and worked hard to determine whether the pattern came together well and if everything was clearly laid out. I made a muslin first, based directly on the original pattern and instructions, then made this red-red version based on the FINAL edited instructions she sent us, while implementing some design modifications of my own.


I'm blogging about it by choice, because 1) I have a new handmade garment to show you guys, and this blog is primarily about show-and-tell, 2) I want to help spread the word of the pattern release on behalf of a hard-working and relatively new designer I admire, and 3) I want to provide a helpful review of a new pattern on my blog so when others are deciding whether or not to buy it, I can be a reliable resource. I just want to be transparent about the pattern testing process, in case there are any doubts about my motives! (See here for more discussion.) This should be one of my last pattern test/blog tour garments for awhile, so if it annoys you at all (and I understand why it would), just know that the interbloggy promotion should be calming down for awhile.

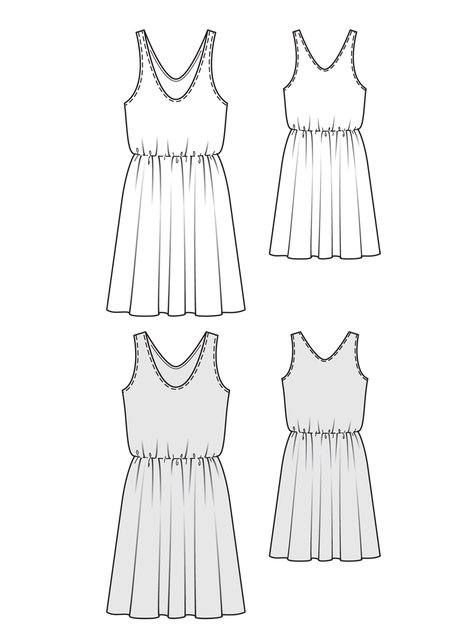
The Ava Jacket is a fully-lined kimono-sleeved swing jacket. It features a full lining, a wide shawl collar, loose 3/4-length sleeves and turned-backed cuffs. The cuffs and collar can be made in the same or contrasting fabric.

Images via Bluegingerdoll.com

Bluegingerdoll is known for her vintage-inspired aesthetic, which I admit isn't really my normal style. So for this wearable version, I omitted the lining, significantly reduced the width of the shawl collar, and narrowed the sleeves and cuffs (probably too much). I made it in a lightweight, drapey, poly crepey fabric so the flared back would drape gently and swish around. I was hoping for a more blazer-esque modern look with these changes.


Some things to note about this pattern. 

FIT: The jacket is easy to fit because it's built with generous ease and has kimono sleeves. I made a size 8 based on my bust and waist measurements, which seemed to work out fine. It was my fault that I narrowed these sleeves a bit too much which makes it hard to roll up the cuffs. I do find that as I'm wearing it, the shoulder seams slip backwards, so I'm often chucking the jacket forward to realign it.

CONSTRUCTION: There aren't many pieces to put together as far as jackets go, but there is a lotttttt of hand-stitching. The collar shell is hand-stitched to the facing, the cuffs are catch-stitched to the inside of the jacket, the hem is catch-stitched, and then the entire lining is hand-stitched to the jacket shell. Lordy lord lord. Believe me, I tried to get around some of it because that's not normally my thang. It may be yours, though! I machine-edgestitched the collar shell down for a clean finish, like you would normally do on a collar stand or waistband facing, for instance. You can kinda see that at the top of the photo of the jacket innards here:


I also left off the lining entirely, which was actually difficult to figure out how to do properly, since a lot of raw edges that you catch-stitched down, like on the cuffs and hem, are supposed to be covered up by a lining. I French-seamed everything and used lace tape to cover the raw edge of the hems, which I then turned up and blindstitched down by hand. I only had lace seam binding/hem tape, and it's white, and it looks terrible, so I almost plan to replace it with something red once I go notion shopping. With the dip of the swingy hem, the white hem tape is often flashed to the outside world. Ick.


With the test version, I struggled with the instructions for sewing the bottom of the front lapels; it gets confusing with all those corners of the collar shell, facing and eventually the lining. Abby did a good job working on that part and including more guidance for the final version. Still, it's a bit hard for me to wrap my head around how it's really supposed to come together. I made it work and it looks fine, but I'm not entirely sure I did it as instructed so I would like to see this demonstrated more in-depth with photos of a real garment versus the illustrations.


I like my red Ava jacket because it's unlike anything else I own. I'm a pear-shape so I often avoid jackets and tops with flared hems, but I think I like the silhouette of this one. It's a nice summer-weight garment to throw on for extra coverage or to add a knock-out punch of color to an outfit. I have a dreamy idea of an Ava in a silky floral, to keep up with the kimono jacket trend going on (right? Wut r fashun?).

The Ava was released along with the curve-hugging Betsy pencil skirt, which you'll find on many other testers' blogs. It's incredibly flattering on everyone I've seen so far and the little details -- like the button tabs on Version A -- are cute, so I'm actually tempted to splurge for the pattern even though I rarely wear pencil skirts these days! Abby of BGD carefully picked testers with different body types and with varying degrees of blog popularity, which I'm sure we can all appreciate. Check them out:

29th May – Tanya at MrsHughes (Betsy skirt)
2nd June – T at uandmii (Betsy skirt)
4th June – Mary at Idle Fancy
6th June– Tanya at MrsHughes (Ava jacket)
8th June - T at uandmii (Ava jacket)

Have you sewn a Bluegingerdoll pattern yet? What do you think of the new ones?

Tuesday, October 8, 2013

babies who brunch


I rarely pay attention to children's sewing patterns, but Oliver + S have nudged their way into my periphery with their adorable paper doll envelope art and popular online presence. This is classically cute stuff, people. Like shrunken grownup clothes, with empire waist lines. 

For my niece's 2nd birthday gift, I decided to give the company a try. I obviously love sewing from indie sewing patterns and it's fun to try new ones, especially when it's a baby pattern that allows you to make a full jacket from one tiny yard of fabric. I thought a jacket might be appropriate for her late September birthday, so I went with the Sunday Brunch Jacket pattern.


The name of this pattern cracks me up, because it makes me think of a table full of babies drinking Mimosas on the patio of some trendy brunch joint that serves things like lemon ricotta pancakes. Mmm, brunch.

This is a PDF pattern that was easy to align and tape together because there are one-inch grid lines printed on all the pages. Hey, it's the simple things that win my heart. This jacket was so fun to sew, and even though I didn't originally plan to blog about it, the result was so stinking cute I just had to. 


The pattern size range is 6 months to a size 8 (does that mean 8 years old? Good thing my clothing size isn't associated with my age anymore). I sewed a size 2T since my niece just turned two and is within the weight range for that size. Since I don't have kids of my own or know how kiddo sizing works in store-bought clothing, I can't say how an Oliver + S size 2T compares to an off-the-rack size 2T. 

Edit: Baby's mama has since told me that the jacket fits well in the shoulders and arms but is a bit short in the torso. She apparently already wears some 3Ts in ready-to-wear.

For the jacket shell I used a stretch denim in a rich teal color. The inside is supposed to be finished with facings and decorative bias tape, but I went for a full lining. The lining here is a quilting cotton with colorful peacocks.


I admit I was making it up on the fly when I was drafting the lining, and I actually cut the front lining pieces far too narrow at first. I didn't realize this until after I had sewed on the whole lining, clipped all my seam allowances, turned everything right sides out and tried to hem the damn thing. The bottom edges were misaligned by several inches. I nearly drove all the way out to JoAnn's again to buy more fabric and start from scratch because I hate, hate, hate reversing my work and unpicking the daylights out of some serged seams. Though frustrating, I chose to fix my error and move on. I guess I can say the lining is "bagged" but I'm not gonna claim expertise on that.


Hey, sassy peacock, I see you.


The pattern doesn't call for covered buttons, but how could I resist? They fit perfectly with this style.


I cuffed the jacket sleeves, rolling them up twice to reveal the lining but hide the raw edges, and slip-stitched them secure.


I unfortunately don't live in the same place as this babe, so I don't have any clear photos of her actually wearing it. But I do think the parents approved! The baby likely showed a substantial amount of genuine disinterest. Lemme show you these cheeks anyway:


Happy birthday, sweet cowgirl. 
Love, 
Your weird aunt who will forever send you handmade clothes on your birthday instead of money. xoxo

Who else has made an Oliver + S pattern? Did the end result melt your heart?

Sunday, September 29, 2013

tribal / cord


My general approach to cold-weather apparel includes wearing normal summery dresses with additional layers. I've never really been the type to keep two separate wardrobes that replace each other every six months. The foundation pieces in my "winter clothes storage" include one sweater knit dress and a couple cord and wool skirts. My tights and cardigans, however, are overflowing.


I made this dress in (cringe) "tribal print" rayon a few months ago. It's a basic sleeveless dress with a high elastic waist that I made from the under layer of the Burdastyle Double Layer Dress PDF pattern from 6/2013. I didn't think the style of the dress was blog-worthy but I've probably worn it once every weekend since I made it. The fabric is interesting and goes with black AND brown, which I obviously love to mix. It's rare for JoAnn's to carry rayon prints, but I'm always happy when I find them because it's one of my favorite fabrics to sew and wear.


The dress truly is nothing special. The neckline and armholes are finished with bias tape facings. It has a machine-stitched narrow hem. Done and done. And I'm obsessed with it.


These days I'm starting to prefer wearing light jackets instead of cardigans, I guess because they're edgier (?) and feel more weekend-appropriate. I've had a thrifted khaki jacket for awhile that was stained and starting to rip in the elbows. I decided it was time for a new one, so I bought some khaki corduroy to recreate a similar style.

I did this by seam-ripping an old Target jacket and using those pieces as the pattern. I was able to make a broad back adjustment, which I've finally accepted as something I need to do on most fitted garments with sleeves. In the original jacket, I wasn't able to even hug anyone. Wah! Now I will hug everything and everyone. I think there's a misconception that a well-fitting garment needs to be flush against the skin from all angles. Don't forget (like I have for years) that your arms move forward and upward, but not backward, so even if a jacket looks puffy in the back by the armscye when you're standing straight, it's necessary for comfortable driving/hugging/cooking/child-holding/dancing/pool-playing/Swiffering/etc.


I don't love the cuff openings on this thing, as they gape open when the cuffs are buttoned. I think I need to study other ready-to-wear jackets to see how the cuffs are made. 


This corduroy is pretty thin and SUPER wrinkly. The elbow areas of this jacket look like a constant hot mess no matter what. My recommendation: if you're going to make a jacket using the remains of a cheap old Target jacket, use nicer fabric and NICER BUTTONS or else your handmade garment will end up looking like a cheap old Target jacket. Does anyone know where to buy higher-quality corduroy?

Still, though, I'ma wear the hell out of this outfit, even if autumnal corduroy mixed with tribal print rayon is a bit of a seasonal disconnect. Try and stop me.

What's first on your fall sewing list?

Tuesday, May 21, 2013

project sewn: 80s challenge

Three challenges in! I'm thrilled to have made it to this point of Project Sewn, so thanks to those of you who have voted for any of my outfits. Today is the reveal for the next challenge, for which we had to sew something inspired by the fashion of the 1980s. I'm excited to see what my fellow contestants have come up with for this one, because there are so many routes you can take. 


I decided to go with a jean jacket, a colorful slim-fitting fly-front denim skirt, and a graphic top. I almost can't believe I finished this whole outfit by the deadline; come Thursday, I had only started the jacket. I was in a cold sweat, scurrying around JoAnn's after work on Thursday, hurling bolts of cobalt blue stretch denim and interfacing at the woman behind the cutting counter yelling "Chop, chop!" Just kidding. I don't use fabric cutting puns out loud.


All of the Project Sewn challenges so far have been difficult when it comes to settling on an idea, but this one was the hardest by far. I don't personally remember fashion from the 80s, since I mostly wore diapers and onesies back then, and there's a fine line between an 80s-inspired outfit and an 80s Halloween costume. I admit that it was extremely tempting to make a sequined Tina Turner dress since I actually had an excuse, but I decided to go for something that was a bit more practical. Man, there were some scary silhouettes in 80s fashion. I just couldn't go dramatic with it, I'm sorry.

For inspiration I watched some clips from teen movies such as Sixteen Candles (1984), Secret Admirer (1985) and St. Elmo's Fire (1985). I even watched some early Cosby Show but those women sure liked their oversized clothing. I eventually returned to an old idol of mine, Kelly Kapowski from the teen sitcom Saved by the Bell. It's a little bit of a stretch because Saved by the Bell first aired in 1989 and ran into the 1990s, so I singled out her earlier style that still had an 80s hangover, like her denim jackets, slim skirts and fluffy hair:

source

I've been wanting a jean jacket anyway, so I thought this was the perfect time to make one. I'm not a fan of the acid-washed look, so I used this dark denim from my stash since it's a bit more modern. I used a Burda PDF pattern, the cropped denim jacket from 02/2010 (here). Luckily I had extra yardage because I completely forgot to add seam allowances when I cut all the pieces out the first time. Genius. Burda magazine patterns are insane. How would any beginner know where to start with them? For this jacket, there were three different style patterns printed on the same sheets, but I didn't know that until I realized there were extra pieces that didn't actually go with this jacket. Plus there are no illustrations for the steps, and adding your own seam allowances means a higher risk for inaccuracies. Anyway, I like the jacket for the most part. The buttons are kinda big, though.


For the skirt I used the Grainline Studio Moss Mini Skirt pattern, omitting the pockets and lengthening view A by 4 inches (I wanted the length but not the hem band of view B). I topstitched all the seams, though it's not called for, just to get a more casual jean skirt look. I wanted it to sit a little higher than intended so I cut a size 4 in the waist and graded out to a size 10/12 at the hips. I used a denim/lycra blend for the skirt -- which creases and wrinkles like crazy, btw -- but if I used a non-stretch woven I'd probably go up a size further so I could comfortably sit. I really like this pattern and will probably make more. Getting tired of all my work-appropriate skirts and having nothing to wear out on weekends.


The top had no pattern... I just improvised a baggy wide-neck kimono-sleeve tee like Molly Ringwald wears on her birthday in Sixteen Candles. I know I should have layered it  over another tee but I can only make so many pieces in a few days' time, people! This jersey was a local find I already had in my stash because it's awwwwwesome. Lucky break that it had an 80s vibe with the colors and geometric shapes. Huxtable-approved, I hope.


I swiped Corey's sunglasses to use for these photos since they're clubmaster style, actually from the 80s. I think he found them on eBay.


Be sure to check out the other 80s looks on Project Sewn today and vote for your favorite by Thursday! If you vote for me, I'll be like:


Thanks everyone!!

Wednesday, April 10, 2013

blue. minoru. v2.


Minoru Jacket v1 and I were two peas in a pod. We went everywhere together and saw all the sights. We held each other close when the weather turned bitter. Many people IRL commented on Minoru v1, always impressed by how well we complemented each other. Minoru v1 saw me through my long-distance-relationship and a job change and a significant out-of-state move. It was my first handmade jacket, my first creation of substance with a clean finish and flattering fit, and probably the project that started regularly bringing traffic to my blog and turning visitors into followers.


Then, one gray day in October 2012, on my way home from the Philly airport after a weekend away, Minoru v1 escaped from my loving grasp and took a tumble off the train platform into oblivion. Or something. All I know is that I had it on the train but then it didn't make it home with me. And that was that.


Of course, I exaggerate for the sake of storytelling. Minoru v1 was a decent jacket, sure, but it's not like I slaved over tailoring techniques for months or anything. I knew I could remake a Minoru in a matter of days with inexpensive materials and it would be all good. And it IS good. I like my new jacket. I still wonder, though, where did that other little guy end up?


Anyway, you may have noticed I modified the pattern a bit this time around. I was a little TOO inspired by Mika's most recent version, and when I'm TOO inspired I just downright copy ya. I liked her diagonal welt pockets in the front, and I liked the way she attached the hood to the collar piece, and I liked how her elastic waist didn't wrap all the way around the jacket, and I liked that she changed the cuffs to non-elastic. So, you know, I just did it all. I even e-mailed her asking about the shape of her pocket bags at the welt (thanks, Mika!), so I think she could already tell that I was a big fat Minoru plagiarizer. And now I have proof.


These are my first single welt pockets evar. I followed Poppykettle's tutorial for them, which I certainly recommend. However, I first sewed mine on right-side-to-wrong-side of the jacket, which I didn't notice until AFTER I had sliced them down the middle. After some Instagram sobbing (what, you don't turn to your tiny friends living in your phone at a moment of crisis?), fray check dabbing, stitch unpicking, and deep breathing, I got em all squared away. The pocket bags are kind of small but I can ball up my fists in them, fit an iPhone, my usual million tissues. I'm a snot-nosed child, if you didn't know.

The jacket shell is made from some lightweight wool suiting from Jomar in Philly. Last month this fabric was actually halfway to becoming a Colette Anise Jacket. I made four bound buttonholes and everything, guys. I decided I didn't like the Anise, though (seems to be the theme with my Colette patterns lately), and so I switched plans to Minoruville. Off topic, but does anyone know how to pronounce Minoru for real? Min-o-roo? Min-ORR-oo?


The wool is loosely woven so I fused some ProWeft Supreme Medium Interfacing from Fashion Sewing Supply to the entire shell. This interfacing is like a baby blanket; it's wonderful to the touch. It really doesn't like staying fused to my fabric, though, so there's constant bubbling at the zipper placket. I wonder if it's too heavy for my fabric?


The lining is vintage cotton in a blue paisley print that my sweet boyf got me from Etsy for my birthday. The print is not my usual style for a blouse or dress, but I thought it would work well here with the navy jacket. I only used it on the front and back lining pieces. The sleeve lining is bemberg rayon so the jacket is easier to slide on and off over long sleeves.


I'm still not crazy about the elastic in the back, but the jacket had to have some kind of waist definition or I was going to look back-pregnant. I tried copying Mika's idea here, too, with the tab and buttons. I couldn't sew a decent looking oval-shaped tab for the life of me, though.


I used the same hood pattern piece as is, improvising ways to attach a lining and connect it to the collar. It's wonky on the inside (long story) but looks fine on the outside... except the hood is HUGE. I guess most people who've made the hooded version of the Minoru already know that. It tends to fall in my eyes as I walk, but I actually prefer that to it falling off the back of my head entirely. Who needs vision while walking through city streets?


I could be done now, but what blog post of mine is complete without a new Archer shirt to show you? 


This is my second of three Archers so far (first here and third here): an orange linen version that I wear obnoxiously often. I made a couple changes, like lengthening it, curving the side hem some more to make room for my hips, doing a tiny swayback adjustment, and facing the yoke with a cotton print because of fabric limitations.


I only had enough fabric to make half-sleeves, so there are no cuffs. I used French seams on the side and underarm seams because I wasn't about to buy orange serger thread and I knew I would want to roll up the sleeves and expose the seam. P.S. I'm still pretty chuffed that I know what French seams are but Richard from freakin' Project Runway didn't. Home sewers: 1. Fashion designer wannabe reality show divas: 0.

So, I like my Minoru a lot, but since I finished it, the weather went from winter coat temperatures to sundress temperatures within a matter of like four days. This is supposed to be a spring jacket -- wtf earth? Climate change is bad news for the polar bears as well as the slow seamstresses. How can I plan my spring wardrobe if suddenly spring just doesn't exist in the northeastern USA?  Bah.

How's your spring sewing going?

Saturday, December 22, 2012

cameraman jacket


Ha-cha-cha. It's done! After maybe a month of toil (with a few much-needed breaks to sew other things), I finally completed this jacket for my boyf. It's probably the most time and effort I've ever put into any garment, so I'm incredibly relieved that it's done, that it fits, that it's actually what we both had envisioned, and that I didn't accidentally chop a huge hole into it in the final moments.


This jacket was not difficult in technique, per se, but it was time-consuming because there were a lot of fiddly details, and I kept making mistakes or deciding something wasn't good enough. Annnnd I had to match plaids at the side seams, at the bottom band, at the button placket, and across four lined pockets with corresponding lined flaps. Oy. 


Corey likes to say that he "designed" this jacket, but I'm not quite on board with that statement since we essentially copied a RTW design and I used a sewing pattern as the base. The inspiration was the high-end Nigel Cabourn Cameraman Jacket, which retails for over 1,000 USD at places like Barney's, or $500 on eBay. Uh, yeah.


We cut down on the sporty outdoorsman style by using leather patches and wooden toggles instead of metal snaps, nixing the drawstring hood, and sticking with the classic sleeve instead of the raglan.

I was lucky to find Vogue 8842 for the core jacket construction, which is more of a parka pattern that's meant to be made of (-shudder-) nylon fabric, a plastic zipper, Velcro and elastic. The shape of it, though, was almost exactly what he was looking for, and I liked that it already had a hood and a full lining so I wouldn't have to figure out that nonsense by myself.


I made a size 36 -- whatever that means in guy-sized jackets -- and it basically fit right out of the envelope. I did take in some of the bagginess at the sleeve and armpit, and added 2 inches in length to the sleeves to accommodate his long arms. In terms of the pattern design and construction process, I changed a LOT and eventually just tossed aside the instructions.

The changes included:

1) Adjusting the proportions of the color-blocking -- scooting down the plaid section by 2.5 inches. The vintage wool was part of the fabric haul gifted to me recently (blog post here). The upper section is a sturdy cotton twill from JoAnn.


2) Eliminating the multi-seams in the sleeves so it was just one pattern piece instead of three.

3) Drafting new pockets and pointed flaps for the front. As with the Cameraman style, the top two pockets sit a bit higher than the division line of two fabrics. Definitely unique.


4) Interlining (underlining?) for more warmth. The lining is made of gray flannel with a subtle herringbone print. It didn't feel thick enough on its own to make the jacket wearable in cold months, so I basted leftover ponte knit to the wrong sides of all my lining pieces. The jacket is now surprisingly heavy (especially with all those pockets) and super cozy on the inside. Corey has worn it everyday for the past week, which has been in the 40s temperature-wise.


5) Using three toggle buttons plus three regular buttons on the front placket instead of a zipper. We mocked the Cameraman style in this way to mix button styles. The toggle buttons and clasps came in a set (hallelujah) from M&J Trimmings' online store. The leather patches were THICK and required a size 110 needle and vigorous churning the hand wheel of my machine to stitch them on. If I tried to use the foot pedal alone, my machine squealed in protest. My stitches are messy, but actually better than I expected they would be. I'm just glad I got the toggle patches on at all, because for awhile there I doubted that I'd be able to do it with my limited skill set and equipment.


6) Adding cuffs with adjustable buttoned tabs.


and 7) Adding a snap to keep the top of the placket closed. This was the very last thing I did, and I had a HELL of a time hammering on this stupid snap. After five busted and bent snaps, I finally... finally... realized I was trying to attach one of the pieces the wrong side up. Truly infuriating to be SO close to done and yet wasting a couple hours on figuring out one friggin' snap.


This jacket is unique enough that quite a few strangers have complimented it out of the blue. Special shout-out to the Fresh Grocer cashier who has my blog address now because of one of these little interactions.


So that's that. Merry Chrimbus, Corey ! ! ! !

I hope you all have a safe and happy holiday. We're flying home this afternoon to be with our friends and family for the week, but I promise that now that the gift-making season is almost over, I will soon be back to more frequent posting. I've missed you all!