Showing posts with label baby. Show all posts

Sunday, December 29, 2013

ted d. bear


This year I almost didn't bother to make any gifts for Christmas. It's too stressful and time-consuming, right? But, if you think about it, handmade gifts are totally forgiving. Even if the receiver isn't smitten with the item itself, or it's something they would never think to get for themselves, they tend to be more likely to appreciate the gesture even moreso because it's handmade. For example, you can just buy an ole teddy bear anywhere, so it's not that interesting of a gift on its own. They sell teddy bears in airports, hotel gift shops, Amazon, in line at the CVS Pharmacy, Wal-Mart, Goodwill (#bedbugs), and even at the fabric/craft store. There is no shortage of teddies in any shape, size, or color. But a HANDMADE teddy bear? Oh c'mon now, that's special. ...Right?


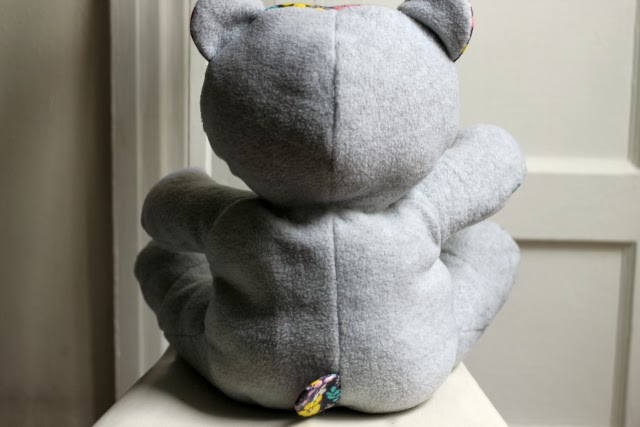
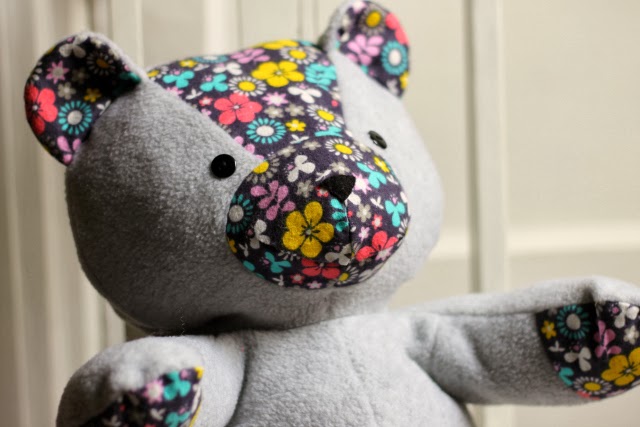
I made this particular bear for my two-year-old niece for Christmas. I know a two-year-old doesn't care whether something is handmade or not, but her parents know and hopefully they'll tell her about it one day. I've mostly made clothes for her in the past (see the robe, dress/cardigan, and jacket), but making garments for an ever-growing child who is disinterested in clothes feels like too much of a risk. I decided this year that I should still make her something, but something that she can love for longer. I saw the bear that Lisa G made for her daughter recently, and decided to try that same How Joyful bear pattern and tutorial because they were free (here), and the finished product looked cute instead of creepy. It's 16 inches tall, sits up on its own, and is readily posed for a big hug. I followed Lisa's lead and made it a showcase for a cute fabric print.


The How Joyful Bear tutorial seems to be a popular post, but I could only find a handful of other people online who posted about their finished bears. The consensus seems to be that it's a difficult tutorial to follow. I agree that it's not explained very thoroughly, and it lacks photos of steps that could really use accompanying photos, like where the seams of the feet pieces should meet and how. However, the pattern pieces are labeled with letters on each corner so you know how they should line up with other pieces, which certainly helps because the bear's shape was not intuitive for me to figure out the construction order on my own. I wouldn't say it was difficult to make this bear, because it can be completed in one evening even with unpicking and some frustration about seams not matching up. It's just different than what I'm used to since it's a more complex curved 3-D shape than your typical knit dress.

I actually sewed this bear up once before this one, but the fabric I chose (some bathrobe-type material) shed like crazy, even after it had been sewn up, which made it very impractical for dragging around the house. Here's what I was dealing with:


Plus the first bear just turned out ugly. My second time around, I used better fabric, colors and accessories, and smoothed out some of the curves of the bear's head and belly so he wouldn't end up as grotesquely fat as my first one did. For this guy, I used light grey anti-pill fleece for the bear body and navy floral flannel for the contrast pieces. I didn't want to use a set of "animal eyes" because they kinda gross me out (don't ask), so I just sewed on black plastic buttons. I first tried fabric-covered shank buttons, but the fabric attracted lint and the buttons flopped around making the bear's face look insane. He's much more charming with these eyes, and I think I like that it gives off a hint that the bear is handmade instead of storebought. I cut the nose from felt and hand-stitched it on. The whole thing is stuffed with polyfill bought in a bag from JoAnn's.


I took a few photos of my niece opening the bear on Christmas morning. I think she said "Wow" and then kissed it (on our command), but since it's just a stuffed bear, it doesn't really provide endless opportunities for entertainment for a small child. I just hope she'll hang onto it for awhile and grow to love what Aunt Andrea made for her. Teddies are timeless! And this one has flowers on its face!


And yes, she and her daddy (in the background) were both wearing cowboy boots. Did you forget I'm from Kentucky?

I hope you all had a wonderful holiday. Did you, too, make something fleecey for a special niecey?

Tuesday, October 8, 2013

babies who brunch


I rarely pay attention to children's sewing patterns, but Oliver + S have nudged their way into my periphery with their adorable paper doll envelope art and popular online presence. This is classically cute stuff, people. Like shrunken grownup clothes, with empire waist lines. 

For my niece's 2nd birthday gift, I decided to give the company a try. I obviously love sewing from indie sewing patterns and it's fun to try new ones, especially when it's a baby pattern that allows you to make a full jacket from one tiny yard of fabric. I thought a jacket might be appropriate for her late September birthday, so I went with the Sunday Brunch Jacket pattern.


The name of this pattern cracks me up, because it makes me think of a table full of babies drinking Mimosas on the patio of some trendy brunch joint that serves things like lemon ricotta pancakes. Mmm, brunch.

This is a PDF pattern that was easy to align and tape together because there are one-inch grid lines printed on all the pages. Hey, it's the simple things that win my heart. This jacket was so fun to sew, and even though I didn't originally plan to blog about it, the result was so stinking cute I just had to. 


The pattern size range is 6 months to a size 8 (does that mean 8 years old? Good thing my clothing size isn't associated with my age anymore). I sewed a size 2T since my niece just turned two and is within the weight range for that size. Since I don't have kids of my own or know how kiddo sizing works in store-bought clothing, I can't say how an Oliver + S size 2T compares to an off-the-rack size 2T. 

Edit: Baby's mama has since told me that the jacket fits well in the shoulders and arms but is a bit short in the torso. She apparently already wears some 3Ts in ready-to-wear.

For the jacket shell I used a stretch denim in a rich teal color. The inside is supposed to be finished with facings and decorative bias tape, but I went for a full lining. The lining here is a quilting cotton with colorful peacocks.


I admit I was making it up on the fly when I was drafting the lining, and I actually cut the front lining pieces far too narrow at first. I didn't realize this until after I had sewed on the whole lining, clipped all my seam allowances, turned everything right sides out and tried to hem the damn thing. The bottom edges were misaligned by several inches. I nearly drove all the way out to JoAnn's again to buy more fabric and start from scratch because I hate, hate, hate reversing my work and unpicking the daylights out of some serged seams. Though frustrating, I chose to fix my error and move on. I guess I can say the lining is "bagged" but I'm not gonna claim expertise on that.


Hey, sassy peacock, I see you.


The pattern doesn't call for covered buttons, but how could I resist? They fit perfectly with this style.


I cuffed the jacket sleeves, rolling them up twice to reveal the lining but hide the raw edges, and slip-stitched them secure.


I unfortunately don't live in the same place as this babe, so I don't have any clear photos of her actually wearing it. But I do think the parents approved! The baby likely showed a substantial amount of genuine disinterest. Lemme show you these cheeks anyway:


Happy birthday, sweet cowgirl. 
Love, 
Your weird aunt who will forever send you handmade clothes on your birthday instead of money. xoxo

Who else has made an Oliver + S pattern? Did the end result melt your heart?

Thursday, September 20, 2012

tiny


My brother's baby is turning one-year-old next week. One! I was never around babies that much in my life, so I am always overly fascinated whenever I witness this one reach some developmental milestone. Yesterday I was texted a video of her wobbling all the way across the kitchen floor, which is the first time I've seen her walk. Bipedal babe! She's, like, kinda doing something that resembles something that adults do! Weird.


I can't be home in KY for her big birthday party (invitation above), so I thought the least I could do was send her some clothes, handmade with love and a minimal amount of curse words.


The dress is made from the McCalls 6015 pattern. I made some changes, such as shaving off eight whole inches from the front and back skirt pieces so it wouldn't be so dang floofy once gathered. It's girly enough as it is, geez. I also shortened it a few inches, because I didn't think someone who still mostly crawls on her knees would appreciate wearing an Amish-length dress. Let that baby move and groove.


I bought the pattern because they said it was fully lined, which is the only way I was going to make a zipped dress for a baby. BUT, the pattern has you slip-stitch only the bodice lining to the zipper, and leave the rest of the zipper exposed. This is because the skirt lining is attached to the skirt first and then treated as one piece from then on. Yuck. I thus had to change the order of construction to make sure the entire lining could cover the zipper edges. I love my tangrams.


I have no idea if this will fit. They don't tell you corresponding ages/months on the pattern envelope, just height and weight. I made it XL, a size larger than her current weight indicates, but hopefully she'll get it to wear it sometime this autumn. I liked the fall-ish colors of this fabric, which is soft quilting cotton.

The only reason I made a sleeveless dress for a kid with a late September birthday was so I could also make her a cardi. This baby better grow up to share my love of cardigans or else. Or else... I'll be making her pullovers, I guess.


For this, I used the jacket from Butterick 3782, in size L. The fabric is a stable interlock knit in gray-brown with tiny white squares. It was in the "juvenile knits" section of JoAnn, and I was offended because I kinda want it for myself. I did juvie this pattern up with some flower buttons. Why not?


This pattern's pretty good, but since they assume you're using a knit, they don't have you encase or neaten up the raw edges at all when hemming. I followed along and did what they said for the neckline, which was staystitch and clip the curves. Then you're supposed to fold it down once and stitch it in place. Uhhh, you mean, my clipped curves will be exposed at the neckline? Ain't doin' THAT, but it was too late. So I serged the edges to re-attach the clipped fabric, then top-stitched with a double needle. Not ideal but it's the best I could do to make it look gift-worthy.


The twin needle was used for all hemming. Legit, right?


So there's the prezzie. I hope it's enough!


I know these pieces don't go together exceptionally well, but somehow I like the larger-scaled floral print paired with the smaller-scaled geometric print. And I think someone as cute as my niece can get away with pretty much anything.


Sorry, couldn't resist sharing another blurry iPhone pic. Happy birthday, sweet girl. See you soon!

Monday, February 13, 2012

and I was like, baby, baby, baby

Sorry if the title of this post gets some Bieber lyrics stuck in your head. Shared misery, eh.


"Andrea, you shrank and became real adorable!" Wait, you guys, that's not me. That's my one and only niece, wearing the one and only thing I've made for her so far in her little baby life. I know, how negligent. For her baby shower I gave her a store-bought laundry hamper and a stuffed cow. What kind of seamstress aunt am I? I'll make up for it once she's of the age when drooling all over her clothing is no longer socially acceptable.


I made her a robe, which my dad thinks looks like a Jedi robe and my brother thinks looks like a boxer's warm-up robe. I think I'm okay with either one of those interpretations. 


I made it from Simplicity 3711 (size 3 to 6 months) with some simplifications. For the main fabric I used JoAnn's "Lil' Safari Buddies" cotton interlock knit, which is soft and cozy. The lining is made from a camel-colored king-sized pillow case that has a bit of sheen to it. 


Safari-themed kid prints are my favorite; I think it's hilarious how they "bab-ify" wild ravenous beasts like lions by giving them oversized heads/whiskers, little round bodies and goofy grins. Trust me, human babies: these animals aren't actually "buddies" with each other in the real world, but I admit they do look pretty cute when they frolic together on your bath robe.


As you'll notice on the model, the sleeves are too long and have to be rolled up. I made it for her current age range as indicated on the pattern, but I'm glad she has room to grow in it. I added belt loops to the side seams so the belt wouldn't slide off and become lost forever. I put them where the pattern indicates the waistline, but I think they should probably be lower since babies tend to flail their arms around and get picked up a lot (making the belt line rise up - see fourth photo of this post). 


I omitted the patch pockets because I found it incredibly tedious to press and neatly top-stitch tiny bébé pockets. Almost certainly my niece is the smartest baby in the whole world ever (of course), but even she doesn't yet understand the concept of pockets, so I doubt they'll be missed. I also omitted the ric rac and appliqués because I'm a no-frills kinda gal. The hood has a flat-felled seam down the center which I like.


O hai.

So, the robe's safari fabric was leftover from a set of baby-related things I made for my work's silent auction fundraiser (actual baby not included). I'll show you those items, too, because I know you're just dying to see.


I used Simplicity 2924 as the base pattern for everything here, though if you're familiar with the pattern you'll notice a lack of plastic vinyl, ribbons, reflecting tape (seriously) and bias tape in my version. I made the diaper bag, wipes case, burp cloth, bib and a pacifier clip. Everything you need to take care of your baby's spontaneous bodily messes! Lovely. 


It was difficult choosing fabrics, since the diaper bag needed to be gender-neutral enough for a mom or dad to carry around for their baby girl or boy. It also needed to be adult-friendly with enough whimsy to pair well with baby prints (i.e. no ornate damask). I wanted it to be sturdy, too, so I stuck with home decor fabric and heavyweight interfacing. I eventually chose brown and beige geometric shapes with blue accents for the whole set. Learn from me: don't use a directional print for the diaper bag because of all the seams and overlapping pockets/flaps; mismatching stripes (or circles) are inevitable, unless you're incredibly patient or have a ton of fabric to spare. Imagine how thrilled I was to find, when cutting, that both fabrics for the two bags were printed crooked on the cross grain. How perfect for a pattern that's essentially a bunch of rectangles! 


I threw in a bottle and two pacifiers for some name-brand desirability. There should be a gift certificate to a local baby product store (Mama's Hip) included, too, so I hope the whole set is a desirable item at the auction. 


I'm pretty nervous about this silent auction, to be honest, since I'm not a professional seamstress  and I've never done anything like this before. I just hope it gets some bids and  is able to raise a little money for this organization that's so dear to my heart. It's kinda ironic that my job for them is to write grant proposals for pretty substantial funding, but I'm most anxious about trying to raise ~$50 with some handmade burp cloths. Oh nooo my top-stitching's not perfect! 

Have you ever sewn for charity?

Saturday, November 5, 2011

warning: baby stuff ahead

I normally skim over (or avoid altogether) any crafts/DIY/products on the blogosphere related to babies or small children. I've only been to three or four baby showers in my life, two of which were for my baby niece (photo here). She's the only babe in my life at the moment, though, and I haven't ventured into these kind of projects for her yet. So I was sorta out of my element when I decided to make something by hand for my colleague's baby shower next week. Definitely the first time "baby shower DIY" has graced my Google search history. But hey, it wasn't too bad.

Swaddling wrap/tie blanket and matching burp cloths

My co-worker and her husband have chosen not to learn the gender of the baby before he/she is born. I'm all for this idea, because I'm not a fan of most of the gender-specific items sold in stores. Some of it can be pretty awful. Anyway, for my projects I chose flannel with a blue palette, but only because I like blue, not because I hope the baby is a boy. At least it's birds and trees, not cars and trucks or something.


I have plenty more photos of these items after the jump: