Showing posts with label diy. Show all posts

Thursday, June 21, 2012

diy spray starch: eliminate curled edges on jersey

Look familiar?:


Knit jersey is GREAT (yea? nay?), but, you know, it has some characteristics that can bug the hell out of us seamsters. The raw edges don't fray, but they do curl. This can work in your favor if you want it to be a design element, like on the cardigan Lizz made from Dixie's pattern. Or it can mean difficulty matching edges and trimming seams accurately. And careful -- watch that overlocker knife when you use your finger to unroll the edge as you serge.

I don't know what you people do/don't know, but I thought I'd go ahead and share a new-to-me discovery of a way to keep those roley-poley edges in check. Quite obvious, really: fabric starch!

Certainly you can buy some fabric starch spray at your local grocery store or whatever, but I decided to go au naturel and make my own. Save money, avoid the chemicals, love your jersey.

THE INGREDIENTS:


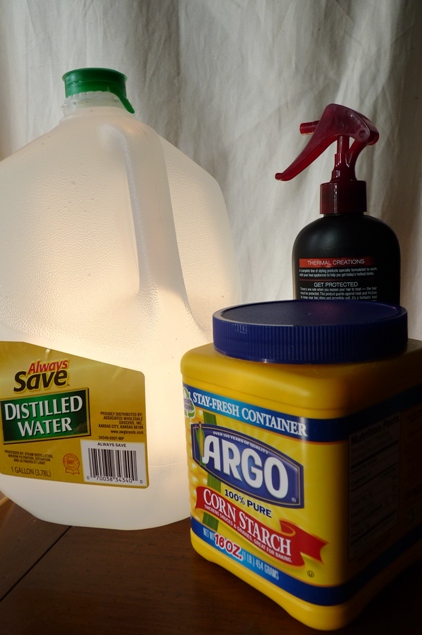
  • Distilled water (in case you have hard tap water with high mineral content that can damage your iron or possibly your fabric)
  • Corn starch
  • Empty plastic spray bottle. They sell these at stores, too, but luckily I had saved this spray bottle from a questionably effective hair product so I'm totally eco-friendly here. OK that's questionable, too. Please forgive that I bought water in a huge plastic tub.

I used 1 cup (240 mL) of distilled water: 


and 4 level teaspoons (20 mL) of corn starch:


You may want to use less corn starch to test first, and I think it also depends on the fabric content and weight. Cotton jersey stiffened up more easily, so three teaspoons would probably be fine, but rayon jersey seemed to need the help of an extra teaspoon. I wanted to get rid of the curl but also wanted to use it as a stabilizer for stitching, so I was happy with my lightweight cotton jersey turning pretty crisp.

Mix these ingredients in a bowl or something that will be easy to pour from. I used my measuring cup. The liquid will turn milky white, and the lumps should dissolve once stirred.


Pour into your spray bottle, reattach the nozzle and give it a good shake. Don't spill like I did. Or photograph the process in the light of an epic sunset, like I did.


Here's what normally happens when you don't starch but simply press the edge out and then lift or move the fabric at all:


Instant re-curl! Instead, press the curl out, then spray the edge liberally with your starch. I spray until it's pretty damp, but don't go overboard.


Run your iron over it until dry. I did not use steam.


And your edges will be nice and crisp. Go ahead, wave the fabric around. No re-curl!


Here's the fabric, where the left edge has been starched and the right edge has not. Much more sewable, eh:


The starch will come out when you wash your finished garment. No worries. In the end you'll still have a nice drapey garment to frolic around in.

And here's a part I test-hemmed along the crossgrain. It seems more successful (less wavy) than my jersey hems usually are, and faster than using Steam-a-Seam:


Unfortunately I don't know how long this starch will keep before you need to make a new batch. The Internet has mixed verdicts on DIY starch, so maybe just make a small amount as you need it. Be sure to shake the mixture each time before you use it, and as always, test on scrap fabric first to make sure it doesn't leave any residue or stains.

Any other fabric starching or jersey stabilization tips out there?

Monday, March 12, 2012

tutorial: how to add a peplum to a blouse

Want to add a little flare (literally) to a standard blouse pattern -- or even an existing RTW blouse? It's super simple and probably very intuitive to most of you anyway, but I thought I'd share with you how I created a small peplum on this blouse using elastic. I guess I just thought this floral print wasn't feminine enough? Seriously, sometimes I wonder what my 11-year-old Adidas-wearin' tomboy self would say if she could see me now.


A peplum is a short "skirt" of fabric attached to the waistline of a fitted dress, skirt or blouse. They've become trendy again, but they seem like a pear-shaped girl's nightmare. Let's add ruffly attention-drawing volume to our already prominent hips, why don't we?
But, IMO, a small and subtly-flared blouse peplum is more workable and wearable for my body type than a skirt peplum. As per usual, I cinched the garment close to the natural waist, and made the peplum short so it doesn't stop at the widest part of my hips. This vintage blouse was my inspiration: 


OK let's go!
Note: Cutting and re-sewing the peplum will shorten the blouse by the length of the two added seam allowances. Be aware of this and accommodate your fabric as necessary; in my case, I cut the pattern as usual and was fine knowing it would be shorter in the end.

Step 1) Use a blouse that is already attached at the side seams. My original blouse wasn't that loose but did have a slight A-line shape, meaning it would create a little flare once the elastic was added. A very tight or straight blouse may not work as well. Start by marking where you would like the elastic to be. Cut along this line. You may decide not to cut at all, and simply fold the fabric to the inside before stitching the necessary seam allowance. I cut mine so I wouldn't have to measure the fold all the way around; it's an easier way (for me) to sew a more accurate line.


Step 2) Turn the garment inside out and re-attach the bottom by pinning right sides together. Make sure you realign any vertical seams or stripes/plaids if you have any. Of course this method will cut into and shorten the print of your fabric, so it may be best to use a print where continuity isn't that important, like busy florals or dots instead of words or a large-scale print of your favorite celebrity's face or something, you weirdo.


Step 3) Stitch using a 5/8" (16mm) seam allowance. Do not trim any of the seam allowance, but do finish the raw edge using a zig-zag stitch or serger. The seam allowance will become the elastic casing, so you can make it wider or narrower depending on the width of your elastic.


Step 4) Press the seam up toward the top of the garment. I pinned it in place to prevent the bottom layer from rolling.


Step 5) I planned to use 1/4" (~6mm) elastic, so I stitched about 3/8" (10mm) away from the seam line so the casing could accommodate the width of the elastic. This was basically down the center of my serged stitches. Leave an opening between the beginning and end of your line of stitches so you can insert the elastic in the casing you just made.


Step 6) To measure the length of my elastic, I wrapped it around my waist where it would sit (without stretching it at all), then shortened that measurement by two inches. Be sure to check it again to make sure the elastic stretches comfortably at that length so it's not too tight or loose. Attach a safety pin to one end of the elastic and weave it through the casing, making sure the other end doesn't pull through where you won't be able to reach it. You can always pin the other end to the garment so it doesn't get pulled in... (or just hold it in your teeth like I do, ha).


Step 7) Once it's weaved all the way through, overlap the two ends of the elastic, pin in place, then secure them with a zig-zag stitch. I use a short zig-zag back and forth several times so the thread is very dense.


Step 8) Make sure the elastic lays flat inside the casing, then stitch the gap closed along the same line as in Step 5. This completely encloses the elastic.


Step 9) Hem the garment as usual and that's it! You're adorable.


You can certainly make a more dramatic (ruffly) peplum by initially cutting a bottom piece that's wider than the garment, basting some gathering stitches, then gathering the fabric before making the elastic casing. You could gather the fabric and omit the elastic completely, as long as there's a zipper or buttons of some sort to let you get the whole thing on and off.


Curious about this blouse? Details about the original pattern will come later, just you wait. Hint: OWOP!

Sunday, March 4, 2012

the hello yellow top

They call me not-so-mellow yellow.


This yellow is brighter in person. It's like a sun beam. It's like corn on the cob. It's like a Wheat Thins box. It's like a Louisiana State University school color. These analogies make me both happy and annoyed. I really only bought this color because it was the sole apparel fabric (besides pink camo fleece or whatever) on the remnant shelf at the store, and I'm a sucker for cotton interlock knit so I couldn't resist. It's very possible this yellow looks awful against my skin tone. According to my mom I'm "autumn"-toned so I should probably be wearing more of a mustard color if I wear yellow at all. But sometimes a girl just wants to look like a miniature school bus, yaknow?


I only had .77 yards, but since it was 60 inches wide I could squeeze enough out of it to make a decent top with sleeves. (By decent I mean not scandalous; I don't necessarily mean decently constructed.) It's really short, though, and can barely be tucked into a skirt like this. I shouldn't have hemmed it at all because I was an irresponsible knit-stitcher and I didn't adjust the differential feed (or whatever) on my serger and now the hem is all stretched out and wavy. Who cares? Not me. Okay, well, I care a little bit. Okay, well, I audibly gag every time I look at the hem. How much gagging does it take before I decide I need to seam rip it all, though? Shall I set a hem-gag threshold for myself?


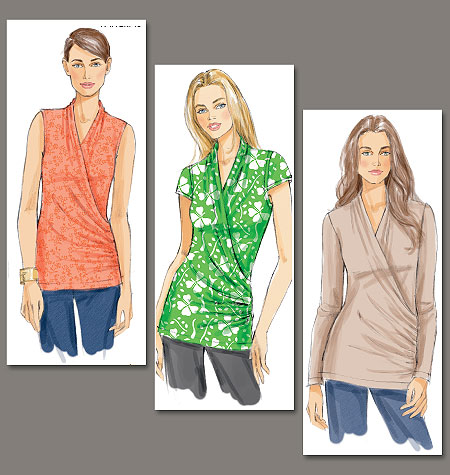
I used Vogue 8790 (beautifully illustrated above) as the base pattern. Obviously I didn't have enough fabric to use much of the original design with the uber-fancy faux wrap and waist gathers. It's my first Vogue pattern, and I only bought it because it was on sale for $3.99 -- normally it would be TWENTY-FIVE DOLLARS according to my receipt. C'mon, Vogue, take it down a notch.

Changes I made:
- Eliminated the "wrap" and made seams down the center front and center back. I kept as much of the gathered back neck part as I could, because I liked the look of the draped neckline in front. Mine's a little more folded-looking than draped-looking, though.

- It looked boring and kinda sloppy with just the V-neck, so I created front ties from some remaining scraps. They're sewn together into the front center seam. Now I have a bow blouse. A bright yellow bow blouse. Is this even a blouse, or just a top? What's the difference?

- I made the sleeves as long as I could with what fabric I had. This is my preferred sleeve length anyway, since they cover my (ahem, untoned) upper arms but can still be worn in warmer weather.


Total cost: $3.99 pattern + $7.69 fabric = $11.68. Worth it? Maybe. It's the perfect style for the schoolteaching job I never knew I wanted.


I've presented myself (and you) with many questions in this post. Let me wrap up:
1) How yellow is too yellow? Is it okay to walk around looking like a banana Laffy Taffy wrapper with a bow stuck on front?
2) How ugly is too ugly for a shirt hem that won't be seen by anyone else but me?
3) Why do Vogue patterns cost a million dollars?
4) What's the difference between a top and a blouse? If it's just about buttons, then the Pendrell Blouse must be a misnomer. Maybe there is no difference, but the Butterick website separates them into two categories (see here). This issue is obviously well worth a deep analysis and possibly a heated debate.

Saturday, February 25, 2012

farmer's daughter banksia dress


Guys and gals, I took your advice on my last post and decided to move on from winter sewing to the fun stuff for spring. Therefore, I blame you for how cold I was taking these pictures in my open doorway. Just kidding... your encouragement helped this little dress come to fruition and I think it's wonderful. It's not denim, by the way; it's a $3 blue cotton bedsheet!


Hey, wrinkly bum, this serves as a reminder to not sit down & play around on Pinterest before a photo shoot. 


The pattern is (mostly) Megan Nielsen's newest release - the Banksia Top, which she describes as a: "Semi-fitted [top] with button-up placket front and large peter pan collar... elbow-length sleeves and shaping darts at the bust line." In the back of the instruction booklet, Megan suggests some possible modifications to the top, such as lengthening the hem to make a dress. Well, that sounded brilliant, so I did it.


I added about 15 inches to the pattern piece to begin with, I think, and sewed a fairly deep hem. It was quite loose-fitting as it was, and the bunched-up fabric looked sloppy when I belted it. I decided to add elastic to the waist so it'd have a better fit and the gathers would be more even. It also gave me a way to line the skirt without having to cut the dress at the waist to create two pieces. Here's the beauuutiful inside:


Yes, that's black thread for the serged edges, tan thread for machine stitching, and white lining. Some of the seams have light blue thread, too, since that's what I started with before I switched to tan. Don't judge me for ugly mismatched garment interiors, please.


Don't tell anyone but I left off the buttonholes; I just sewed the buttons through both layers of the placket because the neckline's low enough to pull the dress on over my head without having to unbutton it. So, why bother, amirite? I added a box with an X (an X-box?) to the bottom of the placket, mostly because I had messy placket sewing skills and I wanted to distract from the unevenness along the bottom seam. I highly recommend, if you make this pattern, to very carefully and evenly mark, cut and sew the placket lines. It makes a big difference in how neatly everything will fold and fit together at the bottom. Oh and another "design" element I added was narrowly tucked sleeve hems with double stitching.


I lowered the bust darts and had them slant upward at a diagonal to the bust point. The original pattern has high horizontal darts, just like the Darling Ranges Dress, which I learned don't quite work for my shape. So I used my Lisette Traveler's Dress pattern as a guide, since those bust darts had better positioning.

I was in the middle of sewing this dress and didn't know what color buttons I wanted. I just happened to see Mary of Idle Fancy pin this on her Pinterest that same day I was thinking about it:


Hey! Looks familiar. I then knew mine would have to have brown buttons, too. By the way, Mary has a lovely "Sew Much Inspiration" pin board chock full of beautiful dresses to ogle - I recommend you follow her if you have a Pinterest account.

This dress is pretty cutesy with the collar, buttons and elastic. I won't lie, I feel kind of farmer's daughterish in it. "Well hi there folks!"


Nothing wrong with that, though, and you never know when some hay-pitchin' opportunities will arise, so I best be dressed right.


project linked to sew country chick

------------------------------------------------------------------------------
Is the Banksia Top (or dress!) in your sewing queue?

Monday, February 13, 2012

and I was like, baby, baby, baby

Sorry if the title of this post gets some Bieber lyrics stuck in your head. Shared misery, eh.


"Andrea, you shrank and became real adorable!" Wait, you guys, that's not me. That's my one and only niece, wearing the one and only thing I've made for her so far in her little baby life. I know, how negligent. For her baby shower I gave her a store-bought laundry hamper and a stuffed cow. What kind of seamstress aunt am I? I'll make up for it once she's of the age when drooling all over her clothing is no longer socially acceptable.


I made her a robe, which my dad thinks looks like a Jedi robe and my brother thinks looks like a boxer's warm-up robe. I think I'm okay with either one of those interpretations. 


I made it from Simplicity 3711 (size 3 to 6 months) with some simplifications. For the main fabric I used JoAnn's "Lil' Safari Buddies" cotton interlock knit, which is soft and cozy. The lining is made from a camel-colored king-sized pillow case that has a bit of sheen to it. 


Safari-themed kid prints are my favorite; I think it's hilarious how they "bab-ify" wild ravenous beasts like lions by giving them oversized heads/whiskers, little round bodies and goofy grins. Trust me, human babies: these animals aren't actually "buddies" with each other in the real world, but I admit they do look pretty cute when they frolic together on your bath robe.


As you'll notice on the model, the sleeves are too long and have to be rolled up. I made it for her current age range as indicated on the pattern, but I'm glad she has room to grow in it. I added belt loops to the side seams so the belt wouldn't slide off and become lost forever. I put them where the pattern indicates the waistline, but I think they should probably be lower since babies tend to flail their arms around and get picked up a lot (making the belt line rise up - see fourth photo of this post). 


I omitted the patch pockets because I found it incredibly tedious to press and neatly top-stitch tiny bébé pockets. Almost certainly my niece is the smartest baby in the whole world ever (of course), but even she doesn't yet understand the concept of pockets, so I doubt they'll be missed. I also omitted the ric rac and appliqués because I'm a no-frills kinda gal. The hood has a flat-felled seam down the center which I like.


O hai.

So, the robe's safari fabric was leftover from a set of baby-related things I made for my work's silent auction fundraiser (actual baby not included). I'll show you those items, too, because I know you're just dying to see.


I used Simplicity 2924 as the base pattern for everything here, though if you're familiar with the pattern you'll notice a lack of plastic vinyl, ribbons, reflecting tape (seriously) and bias tape in my version. I made the diaper bag, wipes case, burp cloth, bib and a pacifier clip. Everything you need to take care of your baby's spontaneous bodily messes! Lovely. 


It was difficult choosing fabrics, since the diaper bag needed to be gender-neutral enough for a mom or dad to carry around for their baby girl or boy. It also needed to be adult-friendly with enough whimsy to pair well with baby prints (i.e. no ornate damask). I wanted it to be sturdy, too, so I stuck with home decor fabric and heavyweight interfacing. I eventually chose brown and beige geometric shapes with blue accents for the whole set. Learn from me: don't use a directional print for the diaper bag because of all the seams and overlapping pockets/flaps; mismatching stripes (or circles) are inevitable, unless you're incredibly patient or have a ton of fabric to spare. Imagine how thrilled I was to find, when cutting, that both fabrics for the two bags were printed crooked on the cross grain. How perfect for a pattern that's essentially a bunch of rectangles! 


I threw in a bottle and two pacifiers for some name-brand desirability. There should be a gift certificate to a local baby product store (Mama's Hip) included, too, so I hope the whole set is a desirable item at the auction. 


I'm pretty nervous about this silent auction, to be honest, since I'm not a professional seamstress  and I've never done anything like this before. I just hope it gets some bids and  is able to raise a little money for this organization that's so dear to my heart. It's kinda ironic that my job for them is to write grant proposals for pretty substantial funding, but I'm most anxious about trying to raise ~$50 with some handmade burp cloths. Oh nooo my top-stitching's not perfect! 

Have you ever sewn for charity?