Showing posts with label jersey. Show all posts

Wednesday, April 17, 2013

wrapped up in dotz


The days get warmer and my hems get longer. Bye tights, bye thighs. Hello, inner schoolmarm. It's for the best, really. And we all know how brutal the office A/C can be. What's the deal with that, man.


I decided I needed some more office-appropriate garments to incorporate into my springy wardrobe. I have exhausted my two Beignet skirts and other winter-weights, so I'm starting to feel that "what-the-haaiiiil-do-I-wear" anxiety every morning now. Jersey wrap dress time was nigh. I sit on my bum at a computer all day (doing valiant non-profit work and saving lives, of course), so I welcome the opportunity to look "professional"-ish while feeling like I'm in a fancy bathrobe.
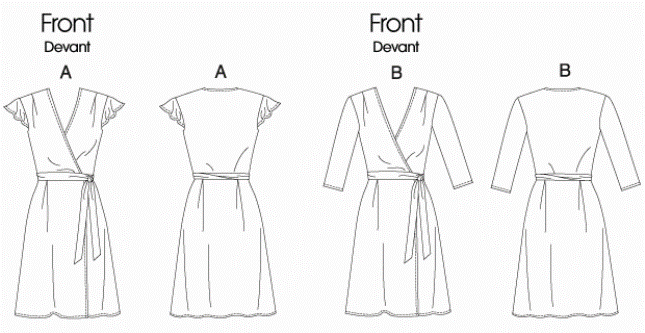

The pattern is probably the second pattern I purchased after deciding to start sewing again in 2011. It's Butterick 5546, one of those easy "See & Sew" patterns that sits on display on the back wall of JoAnn's -- I guess to try to lure in the nonchalant passersby. I did make this pattern when I first bought it, also in a jersey, pre-blog, pre-serger, pre-knowledge of ANYTHING, and I accidentally reversed the direction of the wrap and have snapped a bunch of the stitches because my zig zag tension was way too tight. Anyway, here's Round Deux. All I did this time was lengthen it three inches. Gee, I realize I haven't made a new pattern in awhile -- I'm on total repeat mode these days. 


My hair is covering the detail at the shoulders, so here's a shot of my mannequin's cleavage -- I mean, the dress' pleats:


One of the ties slips through the dress side seam from the inside to be wrapped around the waist:


The jersey fabric is perfect in every way: richly-hued (more maroon than the orangey-ness in the detail shots), whimsical, springy and drapey. It was sent to me as a thank you from Amy Alan for reviewing her Craftsy class (oh, did you forget? You can STILL get 50% off her Beginner Serging class through this link here). It's like she knew that maroon was one of the three serger thread colors I already owned. Brilliant much? And because of her class, I knew how to overlock this fabric perfectly. Well, uh, as perfect as I am patient.


On the selvedge of the fabric it says "Matchmaster Prints by Antex of California Pattern." I googled Antex of California and it seems like it's a knitting mill that's actually in California. I just hope upon hope that that means this fabric was actually milled in the USA, though I guess it's possible it was just printed here? Amy said she bought the fabric at Mill End in Portland, which used to be a fabric mill in the early 20th century. If my assumptions about this fabric are correct, it would mean that my dress was resourced and made (almost) ENTIRELY in the United States, which would make me unbelievably chuffed... and mean I was one step closer to completing one of my sewing goals for 2013. Talk about cheap labor, though. No one paid me squat.


I had planned to talk more about my coverstitch machine in this post since I used it to hem all angles of this entire dress, but I still feel like I need to be more prepared to give a proper overview of the machine's functionality. To the one person who cares (Lisa G), I swear I'm working on it!

Speaking of goals for 2013, I had also hoped to participate in Me-Made-May for the first time. And sure enough, I'm feeling ready! So I officially pledge...

I, Andrea of foursquarewalls, sign up as a participant of Me-Made-May '13. I endeavor to wear at least one handmade garment each day for the duration of May 2013.

Who's with me?! OK, better get sewing.

Thursday, February 7, 2013

sew grateful for flamingos

Who's cuter?:


Trick question. We're equally cute. Well, the flamingo may be leggier but at least I have a smaller schnoz.


Do you follow Marie's fantastic blog, A Sewing Odyssey? Did you see her flamingo print Renfrew top? Did you let out an embarrassingly shrill squeal when you saw her giveaway for two full meters of that same flamingo print jersey? Were you one of the ONEHUNDREDTWENTY people who entered? DID YOU WIN?

I did. Somehow!


These little flamingos paddled all the way across the frigid Atlantic Ocean into my outstretched arms. It's some of the softest, drapiest, most adorable jersey you could rub you face on. I thought I would wait until it was seasonally appropriate to make and wear something with flamingos all over it. Seasonally appropriate, ha ha. But someone somewhere is always turning 40, right?


What's more appropriate is that it's "Sew Grateful Week" as hosted by Debi, and today (Thursday) is the day bloggers are encouraged to post the projects they made with something they won in a giveaway. And because I'm sew grateful for Marie's generosity as well as for all the flamingos of the world, I had to take this fabric off my shelf and make something with it, stat.

I really struggled deciding what to make at first (top, dress, wrap cardigan, circle scarf, circle skirt, yoga pants, power suit, onesie, vest, hot shorts, toga, wedding gown, curtains, uh?!). I eventually determined this fabric needed to swing a lil' bit, so I ended up consulting a great source of inspiration for jersey dresses: House of Pinheiro's blog. She recently made a dress with a boat neck, scoop back and circle skirt. Flamingos on a boat neck? Perfect combo.


I traced a RTW fitted knit top for the bodice, used the Renfrew sleeve pattern (shortened to an in-between length that'll make this wearable in summer, too), and attached a quarter-ish-circle skirt. I didn't want to add a neckband to the boat neck, so I fully lined the bodice with self-fabric, which solved the issue of finishing the neck. Since I know you'll ask, I did not stabilize the waistline. Ehhh I never do. It's just serged. Sorry.


I love everything about this dress except the length. I cut it too short, as usual. I have a habit of losing my ruler at the same time I'm feeling overly confident with my rotary cutter. Learn, girl!

And since it's Sew Grateful week and I love you so, here's a photo of a a flamingo family for your viewing pleasure:


Awwwwww. Fun fact: flamingos are white when they're born and grow pink over time due to their diet. The more vibrant, the more well-nourished!

-------- P.S. I just switched to a new commenting platform, Disqus, because spam was getting through the Blogger filter at an increasingly rapid rate. I didn't want to use word recaptcha, so I switched platforms entirely. Please let me know if it's confusing or if you hate it. I don't like that it lacks a place for you write your website (if you don't have a Disqus acct already), so I won't mind if you just include a link to your blog somewhere in your comment. I like tracing your roots!

Wednesday, November 14, 2012

stripey


Hey! I made a striped knit dress. Revolutionary. 


This is a sleeveless version of McCalls 6599, a Fashion Star pattern. What is Fashion Star? I just Googled it and I'm very disturbed by what I'm seeing, and not just because the landing page is plastered with a huge photo of Jessica Simpson and Nicole Ritchie. The grand prize, essentially, seems to be the opportunity to sell your soul and relinquish all control of your production process to H&M and Macy's so your designs can be manufactured for dirt cheap in mass quantities of polyester in Bangladesh factories. Wow, chance of a lifetime! 

Moving on.


Yes, please note that McCalls so graciously drafted us a large rectangle pattern piece so we can make a scarf to wear with our dresses (view C). Innovation celebration.


I made the dress in a knit instead of the called-for woven + zipper because, c'mon, I'm me. This meant cutting the back on the fold instead of as two. The bodice is fully lined and attached to the skirt as one. The stripey design element is my own doing, not the pattern's. 

I made the dress sleeveless because with sleeves, the stripes were rather overwhelming when they were moving in all those different directions all over my body. I like wearing dresses with sleeves that I don't have to layer, but I didn't want to look like a jailbird. 


I originally cut the bodice so I could add the waistband panel thing as in View B, but decided that I preferred to have only one seam that hit my natural waist (surprise). So I just attached the skirt higher up than where it was meant to go. Works fine.

There ain't a whole lot more to say about this dress, but I kinda think it's a perfect addition to my wardrobe. It's just a princess-seamed bodice and a some-fraction-of-a-circle-skirt, but I love that it's simple yet still interesting. I cut down the amount of circle to make it a little less fussy so I can easily wear it just about anywhere. 


I used cotton jersey for this project, partly because it was the only dress-worthy fabric I felt like using from my stash, and partly because I don't abide by seasonal rules like "Don't wear short cotton dresses during Nor'easters or Frankenstorms or winter in general." I do what I want! And I own thermal tights.


I considered erasing that door hook from this photo because it's positioned awkwardly right by my face, but it looks like a little wonky-eyed two-legged octopus and that's kinda cute. Just consider him a loyal participant in my half-assed photo shoots, please.

Anyway, how do you feel about the show Fashion Star? If you know nothing about that, then tell me how you feel about wearing cotton knit dresses in winter. ;)

Tuesday, June 26, 2012

racerback & forth

Not-so-new jersey. It was high time to use these two lengths of rayon jersey I've had for awhile. Granted, "awhile" for me means like three months. "Why stash 'em when you can make ho-hum clothes out of 'em?" is my motto, after all.


I don't think the hem is crooked IRL, but I won't guarantee it either way.


You may recognize this feather print fabric from Dixie's and Suzanne's past creations. I feel like I link to those gals a lot. Blog crushes, you know how it goes.


Heyo, 4th grade throwback. I used to wear my shirts tucked in like this (only in the front), because my best friend in elementary school, who was way cooler than I was, did it. Say aye if you wanna be like me now. 

...fair enough.


Swayback or big bum or are those interchangeable? Who cares. I'm truly not crazy about my pattern choice here (McCalls 6359) because I don't even like the racerback style on me. I should have used my feather print on something more elegant. Erg. I actually tried to sell this pattern in our Memorial Day yard sale, but no one bought it. So instead I made it for myself... twice... and I'm somewhat grumpy about it. It's one of those patterns that produces clothes that no one will suspect you made. Non-sewers are so bored by these clothes that when they hear they're handmade, they're fascinated.


The pattern lists both wovens and lightweight knits as recommended fabrics. Leave off the bust darts if you use a stretchy knit. Also, make a test garment or take into account the stretch of your fabric. When making my usual size on my black polka dot version, it was enormous. I took in each side at least 47 feet and it still looks a little loose under my armpits, but I decided to keep it a slouchy-ish style. For the feather dress version I was feeling annoyed so I just dramatically cut the smallest size in the envelope, a 6 (whaaat). It's obviously more snug but I'll dare to get away with it. Here it is hanging dead on a hanger, pretending to be a swimsuit cover-up the Old Navy clearance rack:


For the feather dress, I added an elastic casing at the waist and an underlining to make it opaque.

Wanna see some edges? Of course you do. You live on the edge for these edges.


The pattern calls for store-bought bias tape to be applied as a facing to the armhole and necklines. I tried that but polyester bias tape was too heavy and not stretchy enough for this thin rayon jersey, so it made everything gape and stick out. I decided to make narrow edge binding from self-fabric instead. To do so and not lose my sanity, I used Portia's method of cutting strips of jersey by first applying masking tape/painter's tape. It stabilizes the fabric so it doesn't slink around as you cut, and it's already a perfect inch wide so there's not much measuring involved. Just cut along the edges of the tape and remove it. I tried here for consistent pattern placement but I think I just wasted fabric:


I didn't want to create bias tape-like creases, but instead just fold them in half before attaching. Since rayon jersey's so unstable, I used my handy dandy DIY fabric starch to stiffen up the strips after I folded them in half. The starch actually works kind of like an adhesive, too, so I didn't even have to baste the raw edges together after folding, starching and pressing:


I measured and applied the binding to the neckline and armholes in a method that was a combination of this Threads video and a narrow version of the Sewaholic Renfrew pattern. Nice!

You know what else is nice?


So what's your honest opinion on the racerback style? Too sports-bra-like? 
And what's your honest opinion on the sockbun style? Too ballerina-bun-like?

Thursday, June 21, 2012

diy spray starch: eliminate curled edges on jersey

Look familiar?:


Knit jersey is GREAT (yea? nay?), but, you know, it has some characteristics that can bug the hell out of us seamsters. The raw edges don't fray, but they do curl. This can work in your favor if you want it to be a design element, like on the cardigan Lizz made from Dixie's pattern. Or it can mean difficulty matching edges and trimming seams accurately. And careful -- watch that overlocker knife when you use your finger to unroll the edge as you serge.

I don't know what you people do/don't know, but I thought I'd go ahead and share a new-to-me discovery of a way to keep those roley-poley edges in check. Quite obvious, really: fabric starch!

Certainly you can buy some fabric starch spray at your local grocery store or whatever, but I decided to go au naturel and make my own. Save money, avoid the chemicals, love your jersey.

THE INGREDIENTS:


  • Distilled water (in case you have hard tap water with high mineral content that can damage your iron or possibly your fabric)
  • Corn starch
  • Empty plastic spray bottle. They sell these at stores, too, but luckily I had saved this spray bottle from a questionably effective hair product so I'm totally eco-friendly here. OK that's questionable, too. Please forgive that I bought water in a huge plastic tub.

I used 1 cup (240 mL) of distilled water: 


and 4 level teaspoons (20 mL) of corn starch:


You may want to use less corn starch to test first, and I think it also depends on the fabric content and weight. Cotton jersey stiffened up more easily, so three teaspoons would probably be fine, but rayon jersey seemed to need the help of an extra teaspoon. I wanted to get rid of the curl but also wanted to use it as a stabilizer for stitching, so I was happy with my lightweight cotton jersey turning pretty crisp.

Mix these ingredients in a bowl or something that will be easy to pour from. I used my measuring cup. The liquid will turn milky white, and the lumps should dissolve once stirred.


Pour into your spray bottle, reattach the nozzle and give it a good shake. Don't spill like I did. Or photograph the process in the light of an epic sunset, like I did.


Here's what normally happens when you don't starch but simply press the edge out and then lift or move the fabric at all:


Instant re-curl! Instead, press the curl out, then spray the edge liberally with your starch. I spray until it's pretty damp, but don't go overboard.


Run your iron over it until dry. I did not use steam.


And your edges will be nice and crisp. Go ahead, wave the fabric around. No re-curl!


Here's the fabric, where the left edge has been starched and the right edge has not. Much more sewable, eh:


The starch will come out when you wash your finished garment. No worries. In the end you'll still have a nice drapey garment to frolic around in.

And here's a part I test-hemmed along the crossgrain. It seems more successful (less wavy) than my jersey hems usually are, and faster than using Steam-a-Seam:


Unfortunately I don't know how long this starch will keep before you need to make a new batch. The Internet has mixed verdicts on DIY starch, so maybe just make a small amount as you need it. Be sure to shake the mixture each time before you use it, and as always, test on scrap fabric first to make sure it doesn't leave any residue or stains.

Any other fabric starching or jersey stabilization tips out there?