Showing posts with label men. Show all posts

Sunday, January 12, 2014

tartan


Happy new year, sweet friends. I have some ambitious plans up my sleeve for the coming year, and I've always been inexplicably more fond of even numbers than odd numbers, so I think 2014 should be a good'un. I didn't participate in all the bloggers' "top five"/reflection posts, but to seal up 2013, I thought I would share this plaid flannel shirt I made Corey in December. Last year was the year of the button-down, as I made five shirts and one shirt-dress for myself and four shirts for Corey. This one is definitely the most beloved.


The button placket IS straight!

I think we all know there aren't great men's shirt patterns out there, so I've built this pattern using trace-offs of RTW shirts (for the front, back, yoke, collar/stand) and the sleeve and cuffs from Burda 7045. The Burda pattern seems to be okay because it's actually a slim modern cut, but it didn't have the back pleat or curved hem that Corey likes, and the collar options are somehow confusing. 


I think I'm pretty close to achieving his "perfect" pattern, but the sleeves on this one puff out a bit too much above the cuff. I also still cheat and simply serge all the seams instead of flat-felling or whatever, but I think I should at least do French seams because he always rolls up his cuffs.

I was short on fabric so I had to cut the back yoke on the cross-grain, and the inner yoke out of a striped cotton sheet in my stash. The middle vertical stripe on the yoke therefore isn't the same width as the middle vertical stripe on the back, and the whole back print is kinda crooked (just now noticing, gah!) but O'WELL. The plaid matching on the front, sleeves and sides is pretty accurate so I'm happy.


The fabric is a cotton flannel shirting from JoAnn's. They do tend to have attractive tartan plaids there. Honestly I wanted to make something for myself with this fabric, but he practically pounced on it the moment he saw it on my sewing table, and he's just so damn charming. I ain't mad, though, because his wardrobe is only a fraction of the size of mine so he actually needed another shirt in the winter rotation.


Last week Corey flew back to Philly from Louisville during the winter weather chaos. His connecting flight was canceled and so they shuffled him around and got him on a late flight to a different PA airport. Not surprisingly, his baggage did not show up. They told him it'd be delivered the next day, but of course it wasn't. Days went by, and airline phone robots kept telling him that the bag had not yet been located. All I could think about was those beloved handmade shirts (four or five!), trapped in a cold, dark suitcase, abandoned in airport limbo. Losing his favorite handmade clothes all at once would mean losing a large part of his carefully curated (and limited) wardrobe, which is devastating enough. It would also mean that all MY laborious hours of love spent hunched over the cutting table and stepping on pins and slicing my hand with a rotary cutter would be a total, utter waste.

But the story ends happily because the suitcase finally arrived after a week. Has an airline ever lost any of your baggage full of handmade items?!

Anyway, that's the shirt. Does big-bearded Corey in a red plaid shirt remind you of anyone?


I smell a Halloween costuuuume. I guess I'll be the ox sidekick because I'm such a babe

Sunday, October 20, 2013

o' henley


OK, more dudewear! I know you gals love it, right? Here are some handmade Henleys for the handsome him in my life. Apparently Henley (a collarless shirt with a short buttoned placket) is a capitalized word because it's named after the English town of Henley-on-Thames. Ralph Lauren was the one who said, "Let's take this weird long underwear top historically worn by rowers and make it popular for all men to wear in public" (not a direct quote) and it worked, because he's Ralph Lauren. Alright, enough history.


The pattern is the Strathcona Henley from Thread Theory, the new menswear pattern line based in Canada. You can see the shorts I made from their great Jedediah Pants pattern here. I bought the Strathcona PDF the second the pattern was released. Corey had been wearing these awful pilling Henley shirts from H&M that stretched out like crazy in the arms and were made from the blood and tears of children working in sweatshops overseas (I perhaps exaggerate). Our household has recently enacted an unofficial and unvoiced ban against H&M. I prefer to be the underpaid seamstress for all of our clothes, got it?


Corey is 6'1" and has a 30" chest. I made him the size XS with 1/2" seam allowances instead of 5/8", and it has a slim fit to his liking.


I don't really want to sugarcoat my whole review of this pattern, because I came across some issues with the construction and design that I changed in future versions for better results. HOWEVER, it's an excellent starting-off point and the fit is great, so I'm delighted with it anyway. My first try/muslin was a hot mess. The second one (the red one in the first photo) was better, but the fabric is a weird cotton/lycra blend from Girl Charlee that changes colors when ironed and gets fingerprint markings when handled. The third one is this heather gray version that is cozier fabric and is better made (but not stellar) in general.


So, in case you're interested in making this pattern, I want to go over some stuff that concerned me or that I changed. This post is pretty detailed about a men's pattern that a lot of you won't make, so I understand if it's not your thang.

1) Placket
The placket as written is supposed to turn out like this:


The placket is cut as one piece that is intricately folded so the inside ends up with tucked away raw edges. The bottom edge is folded and topstitched on the exterior of the garment. Red flag: disastrous sewing for Andrea ahead. Plackets are naughty by nature. Combine that with stretch fabric and an impatient seamstress and good luck.

After Googling the hell out of some plackets for Henleys and polos, I realized the ideal (for me) method was already under my nose: the Banksia Top pattern by Megan Nielsen! She includes two methods for the Banksia placket in the pattern instructions and on her sew-along. She calls this one the "easy" method, and I agree that it is easier, but I also prefer the way it looks because the bottom edge is tucked out of sight to the inside of the garment. 


To make the changes to the Strathcona pattern so I could follow Meg's example, I sewed the 1"-wide rectangle on the shirt first, so that when slit down the middle it creates two 1/2" seam allowances. Then I cut two separate placket pieces instead of one. I wanted a one-inch wide final placket, so each piece is 3 inches wide to start. It's interfaced, folded in half wrong sides together, and sewn at 1/2" to the front placket slits. I followed the rest of Megan's tutorial and called it a day. Just note that the Banksia has you finish the neckline before attaching the placket, but in this case for the Henley, the placket should be sewn before the neckband is attached. And of course, for menswear, the placket opens the opposite way (which it does in the Strathcona instructions but not in the photos that accompany the pattern).


I made my own my calculation error on this placket (sewing it at 5/8" seam allowance instead of 1/2"), which is why the left side looks a little too narrow and doesn't lay completely flat when worn. What I wrote out in the above paragraph will address this, though.
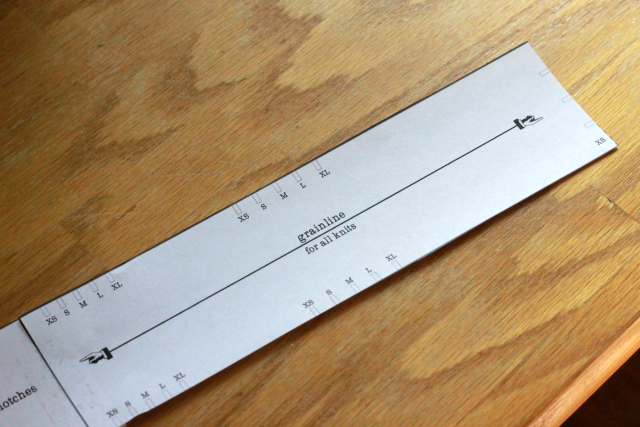
2) Neckband
The pattern piece and cutting layout tells you to cut the neckband along the lengthwise grain. Huh? On two-way stretch fabrics (jersey, double knit, interlock, ponte), the maximum stretch is on the cross-grain of the fabric. So... in this case, the neckband is NOT cut along the maximum stretch of the fabric, which doesn't make sense because the neckband absolutely needs to stretch to get over Corey's big fat head. It should be cut in the same direction of stretch as the body of the shirt is.


??

I tried it this way on the first Henley, and it was more difficult to stretch the neckband around the neckline of the shirt. The neckband is cut significantly smaller than the neckline -- which is appropriate for knit garments -- but without proper stretch in the neckband, it just doesn't really work. So, for future versions I cut mine along the cross-grain of the fabric instead.

If the neckband is cut on the lengthwise grain as instructed, then the neckband edges/corners are created by sewing vertically (along the crosswise grain), which means they groooowww as you sew, and you get ugly pointy neckband corners that are not squared off. This is hard to explain in written text, so I'm sorry if you have no idea what I'm trying to say. Let me know if you want more photos, because I plan to make this shirt again soon and can take construction shots.

3) Buttonholes
The pattern doesn't call for a button on the neckband, but it seemed too thick to not have one. I added one so it doesn't flop open and flash its serged seams. Risque.


My machine dislikes sewing buttonholes in general, but especially on this shirt, it was a nightmare trying to get the buttonhole foot to move at all on the finished placket/neckband. On my third version, I opted to sew the buttonholes on the placket and the neckband before attaching them each to the shirt. This made for neater buttonholes, yes, but it also meant I didn't get the final spacing very even. I didn't say anything about the button spacing to Corey and he didn't notice (or care), so we'll pretend it was intentional.

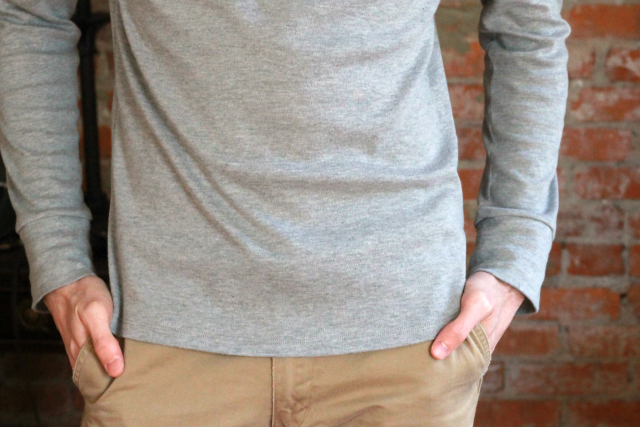
4) Cuffs and Hem Band
The sleeves on this shirt are meant to be long on a normal dude (versus long-armed Corey). The cuffs themselves are quite long. He requested that I lengthen the sleeve and shorten the cuff part a bit.


I omitted the hem band because the shirt would have been too long (in his opinion) with it, and I wasn't digging the style. I finished the hem with my coverstitch machine instead.


Besides the minor issues I had, it all sews up quickly and comfily. Snuggle up.


I hope I don't seem too nitpicky, because it truly is a great casual wardrobe staple for guys. Corey loves both of his. And Thread Theory includes very thorough instructions for sewing with knits - with or without a serger - that are geared toward beginners. If you're confident in your placket-making skillz, then this shirt can be made in a hot little minute. Or you can just make the t-shirt version!

If you've sewn a placket like this, do you have a preferred method?

Sunday, August 11, 2013

#sewingfordudes


I haven't been inspired by many women's apparel patterns lately (except for one that's taking forever to arrive by mail), but luckily for the main man in my life, Thread Theory just launched a refreshingly modern pattern line for dude clothes. We all know that the commercial patterns currently available for men are abysmal and laughable at best (check out all 8 of Butterick's studly options here), so I think Thread Theory jumped into the market at the perfect time. The young husband-wife duo (aww) behind Thread Theory create casual menswear with a slim, modern cut. So, no elastic-waist pajama pants or scrubs? Believe it.

The Jedediah Pants are chino-style trousers with front slash pockets, a back yoke and back patch pockets. I bought the pattern on the day of its release at the end of July and immediately prepared the PDF and made a muslin. I bought legit fabric for it last Sunday and have already made two pairs of shorts for Corey, who before now only had one pair of ugly (sorry) dusty green cut-offs. 


Knowing that Thread Theory was a new pattern company, I'll admit I was a little wary going into the process because I didn't know what to expect of the drafting, presentation and instruction style. But DANG, they're seriously good. All of it. Even Lisa G says so, and I always trust her eagle-eye analysis of whether a pattern is well-drafted or wonky. I thought the pattern was well-marked and sewed together beautifully, and the instructions were incredibly thorough and well-illustrated. I am nothing but chuffed with the final result. 


I was impressed with the attention to detail incorporated in the pattern instructions. They tell you how to sew flat-felled seams, how to French seam the pocket bags, how to apply bias binding to the seams of the shorts, and where to add bar tacks and other methods for seam durability. Sewing the zip fly was a cinch, and seemed faster than other fly-front methods I've used. For the pants version, they even show you how to steam and stretch some of the seams for a better fit around the curves of the legs. Not like I get it, but it sounds SMART. 


Naturally, being me, I just serged and top-stitched the seams instead of flat-felling. There's an option for rolling up the cuff but I simply sewed a 1" hem at the length he wanted. I also left off the back pocket stitching design. 


For the pocket lining of both pairs of shorts, I used a scrap of floral silk cotton from my stash. I think it's his favorite part. This man loves vintage floral prints, can you tell?


(Green Oxford shirt not made by me -- but ethically sourced and sold through Everlane, a great company that's working to bring more transparency to the fashion industry.)

The two pairs of shorts I made are slightly different sizes. Corey has long ostrich legs (sorry) and is super thin. His ideal store-bought trouser size is a 29" waist, but since you can't find that very often, he has typically worn a 30" waist and dealt with the slightly baggy fit. I decided to sew the size 30 in the Jedediah pattern-- the smallest size -- and then I took in the waistband a bit more. They fit snugly when he stands -- actually hitting at the "proper" (though rare) height for waistbands. They look good for this reason, but the fabric is a cotton twill with no give at all, so he says they strain and ride up uncomfortably when he sits down. I think it's fair to say that the Jedediah pants run a little smaller than RTW sizing for that reason. I also think it's fair to say that a muslin isn't worth much unless you actually try to move around and sit in it. My bad.


For the second version of the Jedediah, I used a tobacco-colored twill that has a slightly looser weave and an eensy bit more give. I still made the size 30, but cut the edges a bit more generously and sewed the side seams, inseams and "seat seam" (Thread Theory's less cringe-worthy term for crotch seam) with a 3/8" seam allowance instead of 5/8". That seemed to add more ease and he says they're more comfortable all around even if they look a little puffy.


I think I've made it clear that I highly recommend this pattern if you're looking to sew some bottoms for your favorite guy's bottom -- or your own! Fellas, are you out there? a/s/l? ;)


The pattern is only available as a PDF for now. Morgan, the designer and seamster behind Thread Theory, will be leading a sew-along of the shorts version of the Jedediah pattern on their blog beginning August 15th -- soon! Obviously I didn't have patience to wait for it, but I have a feeling it will be clear, thorough and well-photographed for those who'd like to follow along.

Alright, the end. I have to attend to the mosquito attack I endured when we first tried to take these photos outside in our gross overgrown background. Wanna know how many bites I got on my legs and arms in, like, a six minute span? FORTY FOUR. That's no joke. I think tomorrow I'm going to wake up as a mosquito myself, geez.

So who else has been #sewingfordudes lately?

Saturday, December 22, 2012

cameraman jacket


Ha-cha-cha. It's done! After maybe a month of toil (with a few much-needed breaks to sew other things), I finally completed this jacket for my boyf. It's probably the most time and effort I've ever put into any garment, so I'm incredibly relieved that it's done, that it fits, that it's actually what we both had envisioned, and that I didn't accidentally chop a huge hole into it in the final moments.


This jacket was not difficult in technique, per se, but it was time-consuming because there were a lot of fiddly details, and I kept making mistakes or deciding something wasn't good enough. Annnnd I had to match plaids at the side seams, at the bottom band, at the button placket, and across four lined pockets with corresponding lined flaps. Oy. 


Corey likes to say that he "designed" this jacket, but I'm not quite on board with that statement since we essentially copied a RTW design and I used a sewing pattern as the base. The inspiration was the high-end Nigel Cabourn Cameraman Jacket, which retails for over 1,000 USD at places like Barney's, or $500 on eBay. Uh, yeah.


We cut down on the sporty outdoorsman style by using leather patches and wooden toggles instead of metal snaps, nixing the drawstring hood, and sticking with the classic sleeve instead of the raglan.

I was lucky to find Vogue 8842 for the core jacket construction, which is more of a parka pattern that's meant to be made of (-shudder-) nylon fabric, a plastic zipper, Velcro and elastic. The shape of it, though, was almost exactly what he was looking for, and I liked that it already had a hood and a full lining so I wouldn't have to figure out that nonsense by myself.


I made a size 36 -- whatever that means in guy-sized jackets -- and it basically fit right out of the envelope. I did take in some of the bagginess at the sleeve and armpit, and added 2 inches in length to the sleeves to accommodate his long arms. In terms of the pattern design and construction process, I changed a LOT and eventually just tossed aside the instructions.

The changes included:

1) Adjusting the proportions of the color-blocking -- scooting down the plaid section by 2.5 inches. The vintage wool was part of the fabric haul gifted to me recently (blog post here). The upper section is a sturdy cotton twill from JoAnn.


2) Eliminating the multi-seams in the sleeves so it was just one pattern piece instead of three.

3) Drafting new pockets and pointed flaps for the front. As with the Cameraman style, the top two pockets sit a bit higher than the division line of two fabrics. Definitely unique.


4) Interlining (underlining?) for more warmth. The lining is made of gray flannel with a subtle herringbone print. It didn't feel thick enough on its own to make the jacket wearable in cold months, so I basted leftover ponte knit to the wrong sides of all my lining pieces. The jacket is now surprisingly heavy (especially with all those pockets) and super cozy on the inside. Corey has worn it everyday for the past week, which has been in the 40s temperature-wise.


5) Using three toggle buttons plus three regular buttons on the front placket instead of a zipper. We mocked the Cameraman style in this way to mix button styles. The toggle buttons and clasps came in a set (hallelujah) from M&J Trimmings' online store. The leather patches were THICK and required a size 110 needle and vigorous churning the hand wheel of my machine to stitch them on. If I tried to use the foot pedal alone, my machine squealed in protest. My stitches are messy, but actually better than I expected they would be. I'm just glad I got the toggle patches on at all, because for awhile there I doubted that I'd be able to do it with my limited skill set and equipment.


6) Adding cuffs with adjustable buttoned tabs.


and 7) Adding a snap to keep the top of the placket closed. This was the very last thing I did, and I had a HELL of a time hammering on this stupid snap. After five busted and bent snaps, I finally... finally... realized I was trying to attach one of the pieces the wrong side up. Truly infuriating to be SO close to done and yet wasting a couple hours on figuring out one friggin' snap.


This jacket is unique enough that quite a few strangers have complimented it out of the blue. Special shout-out to the Fresh Grocer cashier who has my blog address now because of one of these little interactions.


So that's that. Merry Chrimbus, Corey ! ! ! !

I hope you all have a safe and happy holiday. We're flying home this afternoon to be with our friends and family for the week, but I promise that now that the gift-making season is almost over, I will soon be back to more frequent posting. I've missed you all!

Thursday, November 8, 2012

rainbow bright baller style


Oh 'scuse me. Can I get an award please? For most incredible one-sleeved muslin that's ever been created on this earth?


Hell. Yes.

I never really show or talk about my projects in-progress on my blog, but how I could I resist it this time? I guess I need to explain what's going on here. This jacket ain't for me, for one. My boyfriend requested a jacket made from some of the wool I was recently gifted (story here). He wanted it to be Nigel Cabourn Cameraman Jacket style, with wool/tweed for the lower half and contrast cotton canvas for the upper. Par exemple, with amazing hair man here:


I found a Vogue mens' parka pattern (V 8842) that seemed easy enough to tweak to achieve the Cameraman look. Since I'm sewing for someone else, I went through the trouble of making a muslin to test fit and make sure I got the proportions and pocket sizes right. I chose this fabric from my stash for the test version because it's canvas-weight, but also because I just wanted to see a clownish plaid made into menswear that I could force my boyfriend (and me) to try on constantly so I could giggle.


Appropriate jacket for West Philadelphia, eh, where the Fresh Prince himself was born and raised.


Anyway, while this whole muslin process has provided some laughs, the fabric is a bit too distracting to even determine if it fits well and looks decent. I ran out of canvas scrap fabric to sew in the second sleeve, but I reckon I should make a sleeve out of something in order to fully check his range of arm motion. This muslin is going to look INSANE. Even more insane, I mean.

I'm pretty excited to solider on with the real thing. And memorialize this test beauty by displaying it on the coat rack for all eternity.

Monday, June 4, 2012

congrats shirt, and moving news

I relinquished some sewing time from my own greedy projects and (finally) made a boy shirt for the boy friend. 


Can you understand why he's my b/f? Well, we both have a shared love for blue garments. Isn't that enough to keep the flame a-burnin'?


Also, he's a smarty pants. Corey was offered full-ride tuition plus a stipend to attend the Villanova University G
raduate English Program this coming fall. Bravo babe! Here's a shirt. I hope it holds up during all his strenuous ventures in book-reading and essay-writing and theory-debunking and whatever else grad students do besides sit in coffee shops with their laptops, sighing.

rolled-up smarty pants

Villanova is in a township directly outside Philadelphia, Pennsylvania. Philly, as in historic & probably haunted ye-olde-founding-fathers America. As in, the city of cheesesteaks and processed cream cheese. As in, Will Smith's home town. 

man, parents still don't understand


Those are all reasons enough for me to decide to move there with him. Why not, right? I'm young and carefree and ready to try out living in a big city that has big city things, like trains and angry people on their cell phones walking quickly through crosswalks. Also, we already endured five-ish years of a long-distance relationship so we're not doing that to ourselves again. We really enjoyed Philly when we visited last month so I think it's a good choice for us. It's home to the Urban Outfitters/Anthroplogie headquarters, after all... and is close enough to NYC for extravagant fabric shopping sprees.

So that's that. We expect to move in early August. If you're from there or know anyone there or have any advice for an out-of-state move in general, please let me know!  (Thanks already for your tips on neighborhoods to look at, Maddie!) Meanwhile on this side of the Mason-Dixon line, I will be panicking silently and eventually not-so-silently about jobs and apartments.


Back to the shirt. This pattern is McCall's 6044, which is a casual, simple and straight-forward men's pattern. I tried the Colette Negroni twice before, but had trouble getting it to fit him and was frustrated by all the little details that surely make a nice shirt but were just giving me a headache. After I accidentally serged a hole in the front of Negroni #2 and almost cried, Corey revealed to me that he prefers a shirt with a traditional collar stand and collar anyway. Fine. Does anyone want a Negroni pattern (all sizes and pattern pieces intact, since I traced them)? I'll send it to you if you so kindly cover the shipping. It's truly a great pattern for someone who's not me (i.e. too lazy to be so selfless).


So after seeing M6044 recently sewn up by True Bias and Beau Baby for their charming husbands, I thought I'd give it a shot. I had to alter the medium size a little bit because the shoulders were too wide and the length too long (thus the bottom button being so low, because I shortened it after everything was already sewn). Otherwise I'm a big fan of the pattern because 1) There are no flat-felled seams. 2) There's no yoke (unless you choose that particular view). 3) The sleeve placket on the long-sleeve version is just a simple cut-out V. 4) The shirt is fairly slim-fitting which is my guy's style, and 5) The model on the envelope is kinda handsome, despite his c.2001 gelled hair fluff.


I was relieved that Corey requested the short-sleeve version, as it made my job lovingly performed task even easier. He's super picky about the design and colors of his plaid fabrics, so after a long search online, it was surprising to us both that JoAnn of all places had exactly what he wanted. It's one of their "homespun" cottons that are tucked somewhere in the quilting section. It was more difficult than I expected to work with, because it became misshapen easily and was resistant to gliding under the presser foot. Thus it took a LOT of pinning so everything stayed in place while I matched and sewed the plaids.

laughing at a dude laughing at our photo shoot

Sewn for any men lately? Would you like to? I'm serious about that Negroni, by the way... If there's enough interest, I'll draw names for it. Otherwise it'll just go to the first person who calls dibs. ;)
UPDATE 6/12/12: I ended up drawing names for the Negroni and it went to Little Miss S all the way in Denmark. Enjoy!