Showing posts with label serger. Show all posts

Sunday, August 31, 2014

how to gather fabric with a serger


Darlings! I haven't had a moment to breathe sew much for myself since I last updated, but I figured I could at least share some lil' techniques I've been learning "on the job." In my freelance work, I often sew multiples of the same thing, so I use those opportunities to try out different ways of executing the same step to see which method is fastest or looks the best. 

Gathering fabric is one of those [obnoxious] tasks that can be done a few different ways, such as pulling on two parallel lines of basting stitches, zig-zagging over a strand of dental floss or string, or using a gathering or ruffle foot on your machine. Those all work fine... when they work. I actually haaaaate gathering fabric because those methods very easily go wrong and can be time-consuming, especially when your threads snap and you have to start all over again. And what if you need really dense gathers, or your fabric is a bit thick? A gathering foot won't do you much good there.

Well, I was recently commissioned to make 10 gathered party skirts for a local startup clothing line, so I had to figure out a way to get fast and consistent results with sewing gathers. OR ELSE. The fabrics I'm working with for these skirts are cotton sateen and silk taffeta, and they have a skirt-to-waistband gather ratio of 2.75-to-1, so they're pretty frickin' poofy and need a lot of gusto to gather. I think 3-to-1 is the determined max limit on gathered skirt poof before it becomes, like, physically impossible to sew and maybe socially unacceptable to wear.


I knew in the back of my mind that sergers could gather fabric, but I had never tried it. So when I did try it, I couldn't believe how much easier and faster it seemed. All you have to do is adjust some settings on your serger and get gathering. Now, of course this method can go wrong, too, as nothing in sewing is fool-proof, right? This technique actually works in an opposite manner as the basting method because you gather the fabric as you serge and then loosen the gathers to fit. This is unlike the basting method, in which you typically tighten the gathers to fit. This means you should test out your gathers on scrap fabric first to make sure it gathers tightly enough on your serger. If the gathers are too loose after serging, it will be difficult to tighten them up.

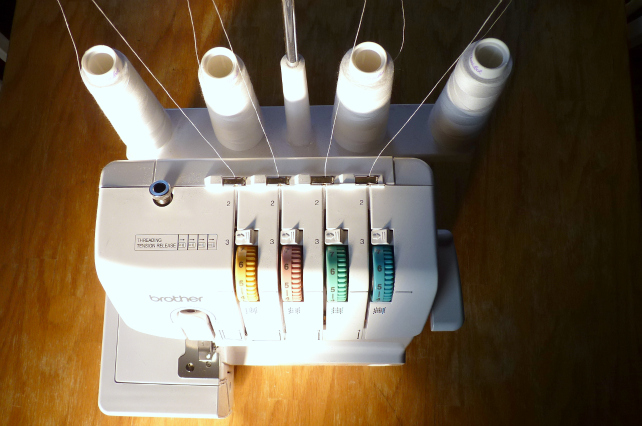
The first step is to set up your serger for four-thread overlock. The tightest gathers will occur if there are two needles engaged instead of one. Once you have threaded your serger properly, tighten the tension of the two needles (not the loopers), which are typically the two leftmost dials. For this particular project, I needed to gather the fabric very tightly, so I increased the needle tension as high as it would go, which on my Brother 1034D serger is at a "9" tension. After some trials, I found I achieved best results if my left needle is at "9" and the right needle is more like a "7" tension. Your machine may react differently. I left the loopers at default tension, which for my machine is a "4":


Next, tighten the differential feed if you are able to. The serger has two sets of feed dogs, one in front of the other, and the differential feed controls the ratio at which these feed dogs move the fabric under the presser foot. A higher differential feed -- in this case, a "2" -- will move the first set of feed dogs twice as fast as the second set, which gathers up the fabric. Conversely, a lower differential will move the first set of feed dogs more slowly, which stretches out the fabric. Here I've set it to the highest ratio possible:


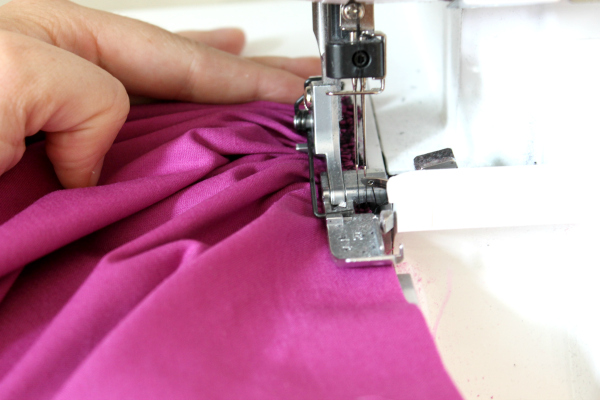
Now, all you have to do is serge along the edge of the fabric and the machine will do the gathering work for you. 

Here is a video I took of the gathering at work. This is high production value, folks. Oh you're welcome!


Keep in mind that the serger will gather along the edge, so you may need the adjust your seam allowance first or serge so the blade cuts off part of the seam allowance if it is 1/2" or larger. Make sure the left needle of your serged seam does not extend past your desired seam allowance because the threads will then be exposed on your garment and they're hard to pick out neatly. It may help to match your serger thread color to your garment, but I did not do that here (the skirt is lined and I did not want to spend money on four fuschia cones for one project!).


If you are attaching the gathers to a flat piece of fabric, it helps to have marked the gathered fabric and the flat fabric into fourths so it's easier to match up the points and distribute the gathers evenly. Below, I have matched the quarter marks and then I gently loosened and distributed the gathers so they match the length of the flat fabric. If you yank on the serging too hard to loosen it, the threads may snap, so be currful. Lots of pins help secure the gathers.


When you sew the gathers to the flat fabric on your sewing machine, it helps to have the gathered side facing up so you can make sure the gathers aren't folding over or jutting out from the seam allowance. Be sure your needle sews right below the serged seam.

Donezo.


It's worth mentioning that you can do something similar with a regular sewing machine by upping the tension, but the serger helps create tighter, more even gathers because it is set up to sew two parallel lines of stitching with two needles and you can adjust the differential feed as well. I also like that it finishes the edge as you gather so there's less annoying fray to deal with when you're attaching it to the flat fabric. And because it's so fast, if your gathers somehow fall out or get too loose, you can just zip over one section again with the serger. Much less stress than having to rebaste two full lines.

How do you prefer to gather fabric?

Friday, February 22, 2013

craftsy winner + good news for everyone

THANK YOU to everyone who entered my recent giveaway for Craftsy's Beginner Serging class with Amy Alan. I'm thrilled to see that so many of you have a similar goal to learn more about your serger. We should all be best buds with our machines.


Onto the winner. There were 105 comments, but one person commented twice and one person opted out since she had already taken the class. So, using the trusty Random.org random number generator, we have:


Which was...


Yay Elizabeth! Sounds like you'll put the class to good use. I have e-mailed you the link to your free class.

But, friends, don't fret. Craftsy and Amy have also offered to share a link with all my readers for a 50% DISCOUNT on the Beginner Serging class. Yep, fifty percent. Just click HERE to get your class half-off. The best part is, it doesn't expire. So even if you don't have a serger right now but are looking into it, you can use this discount link later. How's that for a deal, huh. Let me know if you take the class; I'd love to hear what you think.

Thank you Craftsy and Amy for making this class more widely available for all of us. 

I sound all salesy, but I'm just happy to share these opportunities with you wonderful folks. Have a great weekend, everybody.

Thursday, February 14, 2013

beginner serging: craftsy class review and giveaway


One of my stated sewing-related goals for 2013 was to learn more about how to use my serger properly. I received my Brother 1034D as a Christmas gift in December 2011 (thanks, Ma & Pa), so I've owned it for a decent length of time and use it on all my projects. I've done some studying, but even after all this time I haven't felt like I knew exactly what I was doing. I didn't really understand what I was looking for to determine proper tension, or which way to turn the dials when things looked obviously wonky.


The Internet came through once again. Craftsy-- an educational and sharing network for sewers, knitters, quilters, etc -- currently offers a class called Beginner Serging taught by the talented and darling Amy Alan. After reading her bio on Craftsy, I hopped over to her blog, Really Handmade. I was an instant fan of her blog content and knew that she would make a fantastic teacher because she's a fantastic seamstress. Just check out her Colette Anise jacket made from Pendleton wool and vintage leather buttons:


I KNOW, RIGHT. And she did a mini series on cutting & matching plaids, which is invaluable info for us all.

The stars aligned and Amy reached out to me not long after (I guess she discovered my blog around the time I discovered hers, coinky dink), and she asked if I'd take her Beginner Serging course and review it on my blog. Girl, you had me at "Hello."

I will start by saying I really liked this class. My main goal for taking this course was to learn about "problem stitches" and how to fix them. That expectation was met, but I came away with a lot more. Even as someone who has used my serger regularly, I was never bored by the course content and I feel like I learned a substantial amount of information about a variety of topics. My more detailed (and 100% honest) review is below.

SITE INTERFACE AND USER-FRIENDLINESS
A+. Okay, this isn't unique to the Beginner Serging class, but this is the first Craftsy class I've ever taken so I didn't know what to expect. I was incredibly impressed with the site's format, function and features, like the ability to mark your own personal notes at a specific place in the video. For example, when she explained what type of needles to use with the Brother 1034D, I flagged it at 21:48 with my own note so I could easily find this info again later:


Disclaimer: All screenshot images were taken and posted with the permission of Craftsy.

You can also ask questions in the chat box on the right, with photos of the issue you're having (brilliant), and you get an e-mail notice when Amy herself answers them. You can see what other people have asked, too, which can be helpful but is admittedly distracting as the questions continue to scroll up the page. You can hide the chat box, though.

I loved the drop-down bar at the top of the video, which tells you the lesson you're on and lets you easily navigate through all segments. Craftsy magically remembered wherever I left off in a particular lesson, so I could even revisit the very first lesson then immediately shoot back to where I was.


CONTENT AND RESOURCES
Seriously, after watching this class I'm so embarrassed now about how little I knew about my serger all this time. Did you catch my comment above about how I flagged the part where Amy talks about needle type? I DIDN'T EVEN WHAT NEEDLES TO USE. Luckily, my assumption this whole time turned out to be correct. Phew.


The class content is structured in the following way:

Your Serger & How It Works (machine parts and accessories). Amy introduces three common models of sergers, including a Bernina, Janome and the ubiquitous Brother 1034D, and compares their basic features and functionality. She uses her Bernina for the rest of the course, but she shared enough info in the beginning that I was comfortable proceeding on my own machine based on what she was doing with hers. Sometimes I had to think twice about which direction to turn my dials to make it do what I wanted, but it's so easy to jump back in time to re-watch Amy's explanations. Or, you know, guess.


Basic Stitches - Yeah, I've only ever used the four-thread overlock, but apparently there's a lot more you can do. I honestly don't think I'll use any others for the type of stuff I sew, but I still watched the whole segment for reference in case I do want to do a rolled hem, flatlock, or wrapped overlock one day.

Decorative Stitches - This was mostly about decorative types of thread. Did you know you can serge with yarn in your upper looper? Dang that's cute. But again, not really my thing.

Troubleshooting Your Serger - Now this is what I came for. She talks about stitch/tension issues as well as mechanical issues that may occur, how to spot them, and how to try to fix them. I liked that she showed examples of common tension problems (loops falling off the edge, loops wrapped to one side, rippling, hiccups, etc.) because I feel like I'm constantly fighting with that stuff. My regular sewing machine has auto tension so that's what I'm used to, so when I started using this serger I was in unfamiliar territory. This segment of Amy's class was helpful but I'm still no master, and some of my current problems were not covered (I really DO think I have a dull blade, because even with proper tension my edges are jagged and poke out of the loops... but I still don't know for sure!)


Part of what Amy suggests you do for the class is create serger stitch samples on strips of different types of fabric. Once you achieve proper tension, you write down your machine settings and attach your fabric sample to that handout. These handouts then form a reference manual so you know exactly how to proceed on all your future projects. I love this idea in theory, but when it comes to my sewing I'm admittedly impatient, unorganized and more reactive that proactive. Creating a binder full of stitch samples would be beautiful and wonderful, I KNOW, but I also know I will just never follow through completely.  I did do a few, though, just to see how I'd feel about it. I can see the usefulness, for sure:


Projects - This part is fun because you feel like you're actually sewing alongside someone, instead of dragging along alone with your grammatically incorrect Burda instructions or whatever. Amy shows how to make three different projects using only your serger: 1) an exposed zipper bag, a project that practices basic four-stitch overlocking and tying off; 2) a ruffled apron that practices ruffling by adjusting your differential feed and needle tension; and 3) a ribbon-striped scarf that practices flatlocking, serging in the round, and decorative edging (shown below).


I thought about making the scarf but I'm not crazy about the look of overlocked edges on the outside of my projects. Now, Amy used rayon thread for the edging of her scarf and it's actually quite beautiful. Instead of rushing out to buy rayon thread that I probably would botch up, I decided to use what was already on hand at home and make the exposed zipper bag. Who can resist a boxy bag?! Mine's made of corduroy (Beignet skirt leftover) and the lining is a linen napkin I knew I wouldn't use for napkining. I even had fusible fleece on hand and I have no idea why.


Quick and satisfying! And now I can say I've inserted a zipper with my serger. Weird, huh.


QUALITY OF INSTRUCTION
Amy is incredibly knowledgeable and her teaching style is very clear and organized. She did a good job explaining the basics without dumbing anything down. She's friendly and easy to watch on screen, which is important for the viewer since you're spending hours watching someone talk at you.

Sometimes the camera angles on the serger weren't ideal, probably due to studio restrictions and the fact that you'd need to swing around a full 360 degrees to see it all. It seemed difficult for them to zoom in on all those tiny monochromatic parts, and show simultaneously what the serger was doing and what her hands were doing. The example I have in mind is when Amy showed how to remove the thread from the lower looper so you can easily unthread the machine. I couldn't quite catch what she was doing, so I still don't really know how to do it. Despite that, I know that Craftsy quality is 100x clearer than all those wobbly, poorly-lit YouTube how-to-sew videos out there.


The only thing I think she could have discussed more was serging with knits, though perhaps that's considered more "advanced" or too specific for the purposes of this class. It seems like one of the reasons people buy sergers is to use it with knit fabric, since the stitches are stretchy by nature. I don't remember the class really talking about that. Amy did talk about the differential feed and the use of ballpoint needles for knits, but a rookie is going to want to serge the heck out of their tissue jersey hems and they're going to be disappointed when they wave out. (Or was that just me, who thought it'd be brilliant to make a cardigan out of the thinnest-weight poorboy rib knit fabric for my FIRST serger project?) While Amy demonstrated using a stabilizer to use when serging delicate fabrics, she didn't talk about using a stabilizer for knits.


CONCLUSION
All in all, I'm very happy with this course and I think it's worth it for any serger newbie (or not-so-newbie, as my case may be) to check out. It's just nice to have all your info in one place, coming from a consistent & trustworthy source, instead of in spotty tutorials spread out over Pinterest, YouTube, internet bookmarks, or your bookshelf. I definitely came away knowing what my stitches should look like, what all the machine parts do, and I have a better understanding of what steps I should take to fix issues and make my seams edges stellar. I even have a cute boxy bag that will hold my sewing supplies when I travel to Sewing Circle on Sundays.


GIVEAWAY!
So if you made it through my rambling, you may be keen to take this class yourself! Maybe you recently bought or received a serger, or you bought one three years ago and it's still in its box. Maybe you just want your stitch quality to be a little better, or are interested in making the projects she teaches. This class could be perfect for you! Because Amy and Craftsy are SO FREAKING NICE, they have offered to give away a free Beginner Serging class to ONE OF YOU!

All you have to do is leave one comment below, stating why you think this class could benefit you. That's it! The giveaway is open until February 21st at midnight EST (a week from today) and I'll announce a winner the next day. Good luck, future serging fiends. Meanwhile, you can ask me any questions you have about the class and I'll be happy to answer.


Sunday, January 20, 2013

a quicker way to change serger thread


Ruh roh. It's time for one of my most inexplicably dreaded parts of beginning a sewing project (well, besides tracing, cutting and marking): changing the serger thread color. Confession --- I usually avoid this step as much as possible, so I actually have made quite a few white garments with black serged insides, or red with white insides, black with navy. Yep, for someone who owns a seam finishing machine, I probably have some of the junkiest and funkiest seam finishes out there.

But apparently there's a fast(er) and easy(er) way to change your thread color. WHO'S BEEN HIDING SECRETS FROM ME? I can't keep this knowledge to myself now that I have it, so I'll show you how I switched from blue to white thread on my Brother 1034D without actually unthreading the blue thread. Yes, this is real.

First, snip the thread above the machine on all four spools.


Replace your old thread with the new cones, and bring the new color through the thread guide.


Tie the old color to the new color. I made a simple square knot and clipped the excess. 


IMPORTANT: Pulling this knot through your tension discs is NOT a good idea. What I did is lower my tension down to zero then gently pull the thread up out of the discs. Pull the string of thread forward so the knot is now beyond the tension discs, then thread the new color back into the discs. Do this for all four.


Now, lift your presser foot and make sure your needle is in the highest position. Grab a hold of your threads and start pulling gently. I pulled my looper threads separately from the needle threads, but I don't think it matters.


This will string the knots through the whole machine so eventually the new thread color replaces the old. Incredible, yea?


For the left & right needle threads, don't pull the knots through the needle eyes. Snip the threads and re-thread both needles with the new color. This is the only time you may need your serger tweezers and a keen eyeball.


Hey cool, it's now fully threaded. Make sure to readjust your tension discs to the appropriate tension for your fabric, and now you can take off and serge to your heart's desire. Wee!


Now, how much faster is this REALLY? For the sake of education, I decided to time it. Since I'm not a beginner threader, I can actually thread my serger the "real" way without too much struggle. But what can I say, I still don't like doing it!

Here's the ole fashioned way, switching from white to blue:


Ha, it's kind of pathetic that I used to refuse to re-thread my serger because it seemed sooo tedious, but it actually takes less than three minutes. I should time things more often to put it all in better perspective.

And now, here's the fancy new way, switching from blue back to white:


I'll be honest, though. I pulled the knots through the needle eyes! Ohhhhh noooo cheater. No harm was done to my needles, though. The majority of my time in the conventional way was threading the loopers, no surprise. The majority of my time in the new way was knotting the two thread colors together. So, it's up to you how you prefer to spend your time, and if those 50ish seconds of your life are worth saving.

What do you think? Give it a try? Is rethreading your serger something you dread doing, too?