Showing posts with label decor. Show all posts

Saturday, November 24, 2012

sewing room tour

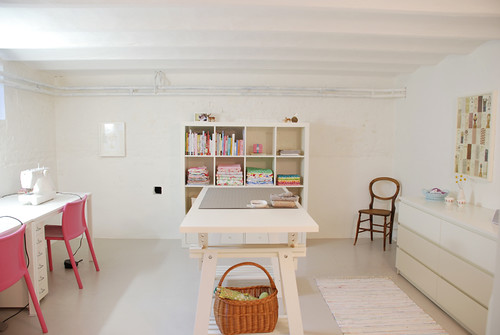
I love nosying in on others' sewing spaces (I've spent far too much time reading these features), so I figured it was due time to show you my own. It's nothing that special, but I might as well give you an insider's look at my creative environment and what I stare at everyday. Welcome to my lair. 


This is the view from the door. The A-frame shelf was from Corey's last apartment -- it's not the most practical storage solution, and it's VERY difficult to style without looking crazy messy, but hey, A is for Andrea and A+ sewing projects.


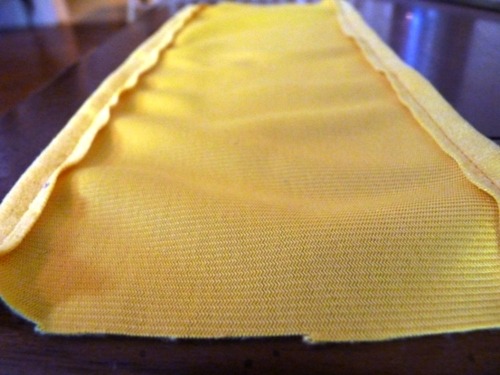
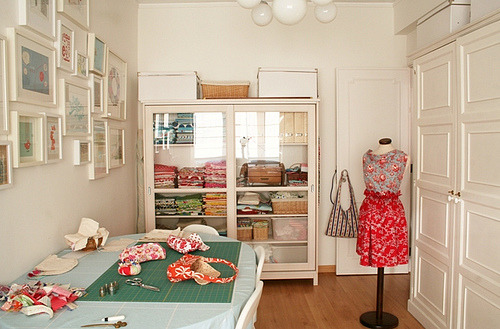
Moving counterclockwise. That's the closet that holds all my fabric, full and empty moving boxes, unfinished objects, unwanted objects, objects I need to but don't want to alter or refashion, and our off-season clothing. The door currently hangs Corey's cameraman-jacket-in-progress. And YES, that's the door that provides the glamorous backdrop to all my stunning blog photoshoots. To the left is the dark yellow cave that hosts my makeshift Ikea-bought cutting table with two adjustable legs in front. It's bracketed to the wall in the back. I'm considering draping a curtain in front of it so I can shove more clutter under there and hide the lamp cords. 


I used paprika-colored wood stain on the birch tabletop to match the hardwood floors. This is the first time in three months this table was clear of junk. Savor it. The red pendant lamp is this one from West Elm.


My machine and overlocker share the same table so they don't have to fight too much for my affection. It's efficient this way, but I have found myself accidentally pressing the serger pedal when I mean to press the sewing machine pedal and vice versa. The little dressing table was my grandma's, and despite the limited leg room, the drawer space is great for hiding all my tools. The obnoxiously yellow lamp was obnoxiously expensive from Urban Outfitters but I'm kinda in love with it. The frames above my machines hold a print from this artist on Etsy and a poem my boyfriend wrote for me. Awwww-gag.


Everyone should study world geography while ironing their party dresses. Wait, where's Antarctica? Eh. Map print is here on Etsy.


I use 4-oz quilted crystal Ball jelly jars to store little loose things, like hooks & eyes, safety pins, bobbins, covered button kits, etc. The jars are clear enough that you can kinda tell what's in each one, but they're not cluttered eyesores either. I like their country charm.


I store my patterns in these IKEA PRÄNT plywood boxes, organized by garment type. They're the perfect width for commercial patterns, but unfortunately I can't find this size on the Ikea website anymore. 


My button stash floats loosey-goosey in this old wooden box, which belonged to my great-grandmother. I'm not sure how she acquired the box or what her connection was to the Art Club of Philadelphia, but obviously I had to have it for my new home in Philly.


I don't have too many sewing books though I do appreciate them. What can I say? I'm a Gen-Y'er and the Internet is almighty.


So there she is. Small and sweet. A grab bag of vintage hand-me-downs, handmade Etsy stuff, colorful Urban Outfitters stuff and blah Ikea storage. I'm very lucky and grateful to have a whole room dedicated to my hobby, and I'm thrilled it's actually... clean right now. Time to sew.

Sorry that my posts have been few(er) and far(ther) between, but November and December are my busiest months at work so I've been putting in a lot of hours there lately. I definitely haven't been able to pump out a sewing project a week like I had been! Corey's jacket is coming along, but I need to buy lining fabric and figure out how to make toggle buttons. Does anyone know a resource for buying toggle button sets, that come with the buttons, cord and ready-made leather patches? Or do you just have to make that stuff yourself?

So tell me, what is your sewing space like? Or what do you WISH it was like? Hope you all are having a great weekend!


Friday, December 23, 2011

diy drape shade @ que linda

Today I had the honor of guest blogging for the wonderful Janny at Que Linda. There's a tutorial on how I made a versatile drape shade for my bathroom window. Check it out!


Have you already finished all your holiday shopping and crafting and cooking? Of course you have! So, why not use this weekend to sew a curtain? 
--------------------------------------------------------------------------------
project shared with:
and
twice with 504 Main -- oops, Janny got there first!

Friday, November 18, 2011

scrap buster: no-slip corduroy coasters

Everything's cuter in corduroy, even coasters.


When I first moved in my apartment, I bought some cotton quilted coasters on Etsy that tied some of my decor colors together. However, these coasters find themselves on the floor more often than the tabletops because they slip around so easily. Solution? Non-slip rug pads.


I'm still mourning my red corduroy skirt that I botched a few weeks ago. I tried getting fancy with a self-designed waistband, then hastily cut into the back seam to take it in... whoops, way too tight. Can't part with the fabric, though, so now it's helping protect my living room furniture from beer bottle ring stains.

Cut two pieces of 4"x4" fabric per coaster.

Apply fusible interfacing to the wrong side of each piece.

Pin a 3"x3" piece of non-slip rug padding to the
 right side of one side of the coaster only.

Your sewing machine's presser foot will not want to 
slide over the rug pad, so do the minimal amount 
of sewing necessaryto secure it (I did corners).

With right sides together (the rug pad will be inside),
sew around the corners, leaving a gap to turn.

Clip corners and trim seams, but leave enough fabric
around the gap so that you can secure it by topstitching later.

Turn right side out, poking out corners. Press.
Topstitch close to the edge, all the way around, securing the gap.

You can only see the rug pad if you lean down and look for it.


Just TRY and scoot this thing across a wood table. This baby's going nowhere.


.....................................................................................................................................
Project linked to:

 and  and 

Friday, November 4, 2011

simple sewing: fabric-covered pencil cups

Here's an easy breezy sewing project: turn your lunch into pencil cups.


I've never done anything with tin cans besides toss them in my recycling bin, but I can now say they're pretty much a craftswoman's dream since they're so accessible and versatile. They have such a practical shape and size, and are still cool-looking just on their own without their labels.

I can't cook, so I eat a lot of canned soup. It's about time that I used all those cans to enhance my life in other ways. Why not pencil cups? I probably spend as much time per week looking for a frickin' pen in this apartment as I do eating soup, so I need them to be more accessible.

OK. Step 1: Remove the label, which comes off easily under hot water. At least for Amy's soups it does.


Step 2: Cut a 5.25" x 10" rectangle of fabric. I used leftover fabric from some other home projects, because living room matchiness is a must. Turn the long edges over a 1/2 inch each and stitch. The resulting width is about 4.25" (the height of the can).

Step 3: Wrap the fabric around the can and mark where the ends should meet. It should be snug but not too tight that you won't be able to slide it on. Stitch the ends where you marked, right sides together. Trim the excess and press the seam open so it lays flatter on the can.

Step 4: Turn it right side out and pull it over the can, kinda like a beer coozie:

That's all it takes. Make one or one dozen. They contribute both color and functionality -- gotta love that.


----------------------------------------------------------------------------------

Project linked to:

Monday, October 24, 2011

diy: custom dry erase board

I was originally inspired by this jewelry display idea from Real Simple magazine:


So I bought an inexpensive picture frame from Garden Ridge, a sheet of styrofoam, fabric to cover the styrofoam, and gold pins to hang earrings and bracelets on the board. I even bought a giraffe statue to hang necklaces, instead of a bust, because it seemed eccentrically cute at the time. I ended up hating the whole project because my jewelry is too ugly to display and the giraffe looked tacky (surprise).

Instead, I decided to put the glass back in and frame a slightly patterned yellow dishtowel to create a dry erase board for my kitchen:


Works for grocery lists, to-do lists, "Happy Birthday Mom" messages, questionably funny drawings, and other pretending-to-be-practical-but-really-just-kinda-cute-decor things.


Why a dishtowel? It matched my kitchen decor already and was one of those waste-of-money towels that can't actually absorb any liquid. Upcyclin'.


Here are others that used regular fabric or decorative paper, some of which have tutorials:
Source: Real Simple
Source: Make and Takes
Source: Metal and Mud
Source: O. Alouette
Source: Papernstitch

Sunday, October 23, 2011

tutorial: how to make a round pintuck pillow

Want this pillow?:
 

If you stalk the apartment decor section of Urban Outfitters like I do, you may already recognize these round velvet pintuck pillows that come in an array of colors (currently 11 colors). They have a rating of 4.5 out of 5 stars over 73 reviews, probably because they are pretty fabulous. They're also $32-$34 each, which isn't outrageous but of course I like to think I can always do better.

So I made one.


Certainly it's not exact, especially the pintucking, but it still emulates the retro-throwback style. And it was half the price to make. So, wanna make your own? Get ready to smock!

Click below to see the full tutorial:

Tuesday, October 18, 2011

sewing rooms & storage

I re-adopted this sewing hobby only recently and still have a relatively manageable amount of supplies and scraps, but I'm getting impatient to move to a place with a spare room for all things sewy. Okay, well to ask for a "spare room" would be to ask for how much more in monthly rent? 


As it is, I'm stationed in my living room, which already serves dual function as my dining area, so when my dining table is covered in a sewing machine, tabletop ironing board and an explosion of pattern tissue, I'm subjected to cutting fabric on the floor and eating dinner on the couch and entertaining guests in... the bedroom? Um.


Then:


Right now:

This could be (and has been) worse, actually; last night everything in that garbage bag above (pillow stuffing, blue scallop scraps, piles of thread) was strewn across various surfaces as well.

I'm gonna distract myself from this awful mess by collecting photos of lovely sewing areas that belong to other people who clearly never touch a thing within them:

Hideable yet also displayable. Primary source: Better Homes and Gardens


Everything seems so tiny here. Secondary source: Truelock Equals Truelove


These people stand up to sew, and sit down to use their enormous 1990s computer monitor. Source: Super Ziper


You can't call yourself a true sewist until you have one of those headless ladies hanging around. Source: Saídos da Concha


Sewing shed. Lovely and rustic and only slightly claustrophobic. Source: Content in a Cottage 

Teach me how to use that sewing machine. Source: Home Klondike

They call this a minimalist sewing room, which seems like an oxymoron. Source:  Genuine Style

Yes, you can create a sewing room without using the color pink. Source: Country Living


Moral of the story: all fabric scraps should be lightweight cotton prints with equal size, yardage and color palette so they can be stacked like perfect little rainbows in your China cabinets. Seriously? I tried the neat little sweater-stacks on my closet shelves before and that failed by the second hour. This would be no different, and maybe worse.


This is more up my alley:


Maybe I should stick with my current style of throwing all my simultaneous sewing projects on the couch, because it seems neat & organized spaces annoy me. Sew on!